| Problem | Possible causes | Solutions |
| Poor precision | Incomplete washing | Ensure that the washing apparatus is working correctly; |
| Ensure adequate time of soaking. | ||
| Inadequate aspiration of wells | Wells should be fully dry after aspiration. | |
| Incomplete mixing of reagents | Ensure adequate mixing. | |
| Buffers contaminated | Prepare fresh buffer. | |
| Improper dilution of standard | Use diluent in the kit as blank value; | |
| Ensure accurate dilution of highest standard; | ||
| Ensure accurate completion of 2-fold dilution series. | ||
| Poor standard curve | Incomplete washing | Ensure that the washing apparatus is working correctly. |
| Inadequate aspiration of wells | Wells should be fully dry after aspiration. | |
| Unequal volumes added to wells | Check pipettes; | |
| Recalibrate the pipette if necessary. | ||
| Edge effect | Uneven temperatures among wells | Adhere to recommended incubation time and temperatures. |
| Evaporation caused by inadequate covering of plate sealer | Ensure correct use of plate sealer. | |
| The assay was interrupted | The assay should be continuous. | |
| All standards/samples should be prepared appropriately before the assay. | ||
| High background | Reagents are not at room temperature | Allow all reagents to reach room temperature (18-25℃) before use. |
| Incomplete washing | Ensure that the washing apparatus is working correctly. | |
| Ensure adequate time of soaking. | ||
| Inadequate aspiration of wells | Wells should be fully dry after aspiration. | |
| Standard curve achieved but poor discrimination between points. | Improper calculation of standard curve dilutions | Check the calculation results and make new standard curve |
| Insufficient washing | Ensure sufficient washing | |
| Plate sealer reused | Use a fresh plate sealer for each step | |
| Not used plate sealers | Use plate sealers | |
| Buffer contaminated | Prepare fresh buffer | |
| Insufficient washing | Ensure sufficient washing | |
| If using an automatic plate washer, check that all ports are clean and unobstructed. | ||
| Variations in incubation temperature | Adhere to recommended incubation temperature; | |
| Avoid putting plates in variable environmental conditions | ||
| Poor reproducibility | Plate sealer reused, thus resulting in presence of residual HRP | Use fresh plate sealer for each step. |
| Pipetting error | Check pipettes; | |
| Low signal or no signal | Buffer contaminated | Make fresh buffer. |
| Determinant level contained in samples is above the kit’s detection range | Dilute samples and run again | |
| Incorrect wavelength | Check the filters/reader. | |
| Stop solution was not added | Add stop solution to each well. | |
| Insufficient incubation time | Increase the incubation time. | |
| Incubation temperature vary wildly | Check the incubator. | |
| Incorrect dilutions of detection Ab/HRP-conjugate | Adhere to the manual. | |
| The kit has lost its activity | Get a new kit. | |
| Plate not incubated long enough | Increase Substrate Solution incubation time. |
Enzyme-Linked Immunosorbent Assay
ELISA
Immunoassay precision is defined as the reproducibility between wells within an assay (intra-assay) and between assays (inter-assay). Poor precision, determined by high CVs, is often caused by two main factors: pipetting technique and washing technique
Pipetting Technique
1. Pipette reagents and samples into the center of each well but do not touch the bottom or the wall.
2. Tap the plate gently after pipetting to ensure thorough mixing of reagents.
3. If your sample is viscous, please pre-rinse the pipette tip with the reagent to compensate for surface tension. Then wait a moment to allow the volume to reach equilibrium before removing the pipette tip from the reservoir.
4. Inadequate or uneven fill volumes in the wells is a good indication that the pipette needs to be calibrated. Check the pipette function and recalibrate if necessary.
5. Always be sure to change pipette tips between reagents, standards, and samples to avoid carryover or cross-contamination.
6. Check to be sure that the pipette tips are fitted properly. A pipette tip that is not fitted properly may not draw or dispense the volume accurately.
Washing Technique
1. If using an automated washer, aspiration apparatus, or a multi-channel pipette, always be sure that each cannulae is dispensing and aspirating properly.
2. After the last washing, decant any remaining Wash Buffer by inverting the plate and blotting it dry by rapping it firmly against clean paper toweling on a hard surface. Washing the wells too rapidly or too slowly may result in poor precision. Do not allow the wells standing to dry. Proceed immediately to the next step in the kit insert.
3. Using less Wash Buffer might often lead to poor CVs. Be sure to wash the wells with the volume specified in the manual to ensure that each well has been thoroughly washed.
4. If the Wash Buffer has run out, please don’t use Wash Buffer from another kit because not all Wash Buffers are general. You can contact Technical Service for assistance.
5. Don’t skip or shorten the soak time in the washing procedure, otherwise it may lead to poor precision. Always follow the directions in the manual for optimal performance.
6. It is recommended that the number of washing specified in the kit manual be adhered to. Changing the number of washing can affect the precision of the assay.
Reservoir
Use separate reservoirs for each reagent to avoid contamination. Some analytes are highly susceptible to contamination (e.g., saliva, oxidizing reagents, etc.). Refer to the manual. Take necessary precautions to protect the reagents.
The plate sealer
A reused plate sealer may contain residual from the previous step which can contaminate the current component in the well, thus leading to poor precision. Using a new plate sealer for each incubation is recommended.
Sample collection
Serum: Allow samples to clot for 2 hours at room temperature or overnight at 4℃ before centrifugation for 15 minutes at 1000×g at 2 – 8℃. Collect the supernatant to carry out the assay. Blood collection tubes should be disposable, non-endotoxin.
Plasma: Collect plasma using EDTA or heparin as an anticoagulant. Centrifuge samples for 15 minutes at 1000×g at 2 – 8℃ within 30 minutes of collection. Collect the supernatant to carry out the assay. Hemolysis samples are not suitable for ELISA or CLIA assay.
Cell lysates: For adherent cells, gently wash the cells with moderate amount of pre-cooled PBS and dissociate the cells by trypsin. Collect the cell suspension into the centrifugal tube and centrifuge for 5 minutes at 1000×g. Discard the medium and wash the cells for 3 times with pre-cooled PBS. For each 1×10⁶ cells, add 150-250uL of pre-cooled PBS (0.01M, pH=7.4) to keep the cells resuspended. Repeat the freeze-thaw process for several times until the cells are lysed fully. Centrifuge for 10minutes at 1500×g at 2 – 8℃. Remove the cell fragments, collect the supernatant to carry out the assay. Avoid repeated freeze-thaw cycle.
Tissue homogenates: You’d better get detailed references from other literatures before assay aiming at different tissue types. For general information, hemolysis blood may affect the result, so you should mince the tissues to small pieces and rinse them in ice-cold PBS (0.01M, pH=7.4) to remove excess blood thoroughly. Tissue pieces should be weighed and then homogenized in PBS (tissue weight (g): PBS volume (mL) =1:9) with a glass homogenizer on ice. To further break the cells, you can sonicate the suspension with an ultrasonic cell disrupter or subject it to freeze-thaw cycles. The homogenates are then centrifuged for 5 minutes at 5000×g at 2 – 8℃, collect the supernatant to carry out the assay.
Cell culture supernatant: Collect samples and centrifuge for 20 minutes at 1000×g at 2 – 8℃. Collect the supernatant to carry out the assay.
Saliva: Remove particulates by centrifugation for 10 minutes at 4000×g at 2-8°C. Collect the supernatant to carry out the assay. Recommend to use fresh saliva samples.
Urine: Use a sterile container to collect urine samples. Remove particulates by centrifugation for 15 minutes at 1000×g at 2-8°C. Collect the supernatant to carry out the assay.
Stool: Collect feces, suspend the stool with PBS (0.01M, pH=7.4), oscillate on the ice for 15 minutes and then centrifuge for 5 minutes at 5000×g at 2 – 8℃. Collect the supernatant to carry out the assay.
Other biological fluids: Please contact tech-support for details.
Note for sample:
- Samples should be assayed within 7 days when stored at 4℃, otherwise samples must be divided up and stored at -20℃ (≤1 month) or -80℃ (≤3 months). Avoid repeated freeze-thaw cycles. Centrifuge again before assaying to remove any additional precipitates that may appear after storage.
- Please predict the concentration before assaying. If the sample concentration is not within the range of the standard curve, users must determine the optimal sample dilutions for their particular experiments.
- If the sample type is not included in the manual, a preliminary experiment is suggested to verify the validity.
- If a lysis buffer is used to prepare tissue homogenates or cell culture supernatant, there is a possibility of causing a deviation due to the introduced chemical substance.
Bring all reagents and samples to room temperature before use. Centrifuge the sample again after thawing before the assay. All the reagents should be mixed thoroughly by gently swirling before pipetting. Avoid foaming. It’s recommended that all samples and standards be assayed in duplicate.
1. Add Sample and Biotinylated Detection Ab: Add Standard working solution of different concentrations to the first two columns: Each concentration of the solution is added into two wells side by side (50 uL for each well). Immediately add 50 μL of Biotinylated Detection Ab working solution to each well. Cover the plate with sealer provided in the kit. Incubate for 45 min at 37℃. (Note: solutions should be added to the bottom of micro ELISA plate well, avoid touching the inside wall and foaming as possible.)
2. Wash: Aspirate or decant the solution from each well,add 350 uL of wash buffer to each well. Soak for 1~2 min and aspirate or decant the solution from each well and pat it dry against clean absorbent paper. Repeat this wash step 3 times. (Note: a microplate washer can be used in this step and other wash steps.) Complete removal of liquid at each step is essential to good performance. After the last wash, remove any remaining Wash Buffer by aspirating or decanting. Invert the plate and pat it against thick clean absorbent paper.
3. HRP Conjugate: Add 100 μL of HRP Conjugate working solution to each well. Cover with the Plate sealer. Incubate for 30 min at 37°C.
4. Wash: Aspirate or decant the solution from each well, repeat the wash process for five times as conducted in step 3.
5. Substrate: Add 90 μL of Substrate Reagent to each well. Cover with a new plate sealer. Incubate for about 15 min at 37°C. Protect the plate from light. (Note: the reaction time can be shortened or extended according to the actual color change, but not more than 30min.)
6. Stop: Add 50 μL of Stop Solution to each well. (Note: the order to add stop solution should be the same as the substrate solution.)
7. OD Measurement: Determine the optical density (OD value) of each well at once, using a micro-plate reader set to 450 nm. The micro-plate reader should be preheated and set in advance.
8. After experiment, put all the unused reagents back into the refrigerator according to the specified storage temperature respectively until their expiry.
Bring all reagents and samples to room temperature before use. Centrifuge the sample again after thawing before the assay. All the reagents should be mixed thoroughly by gently swirling before pipetting. Avoid foaming. It’s recommended that all samples and standards be assayed in duplicates.
1. Add Sample: Add Standard working solution of different concentrations to the first two columns: Each concentration of the solution is added into two wells side by side (100 uL for each well). Add samples to other wells (100 uL for each well). Cover the plate with sealer provided in the kit. Incubate for 90 min at 37℃. (Note: solutions should be added to the bottom of micro ELISA plate well, avoid touching the inside wall and foaming as possible.)
2. Biotinylated Detection Ab/Ag: Remove the liquid of each well, do not wash. Immediately add 100 μL of Biotinylated Detection Ab/Ag working solution to each well. Cover with the Plate sealer. Gently mix up. Incubate for 1 hour at 37°C.
3. Wash: Aspirate or decant the solution from each well,add 350 uL of wash buffer to each well. Soak for 1~2 min and aspirate or decant the solution from each well and pat it dry against clean absorbent paper. Repeat this wash step 3 times. Note: a microplate washer can be used in this step and other wash steps. Complete removal of liquid at each step is essential. After the last washing, remove the remained Wash Buffer by aspirating or decanting. Invert the plate and pat it against thick clean absorbent paper.
4. HRP Conjugate: Add 100 μL of HRP Conjugate working solution to each well. Cover with the Plate sealer. Incubate for 30 min at 37°C.
5. Wash: Aspirate or decant the solution from each well, repeat the wash process for five times as conducted in step 3.
6. Substrate: Add 90 μL of Substrate Reagent to each well. Cover with a new plate sealer. Incubate for about 15 min at 37°C. Protect the plate from light. (Note: the reaction time can be shortened or extended according to the actual color change, but not more than 30min.)
7. Stop: Add 50 μL of Stop Solution to each well. (Note: the order to add stop solution should be the same as the substrate solution.)
8. OD Measurement: Determine the optical density (OD value) of each well at once with a micro-plate reader set to 450 nm. The micro-plate reader should be preheated and set in advance.
9. After experiment, put all the unused reagents back into the refrigerator according to the specified storage condition respectively until their expiry.
The samples available to ELISA detection usually have various types, such as serum, plasma, urine, and cell culture supernatant or tissue homogenate. The pretreatment methods for different types of samples are also different. Appropriate sample treatment is the first step to ensure the correctness and accuracy of ELISA detection. Here we’ll introduce treatment methods for different sample types.
1. Serum
Serum is the most common sample type detected in ELISA, the treatment of which is also very simple.
First, use a test tube or centrifugal tube without pyrogen or endotoxin to collect blood samples. Then keep the test tube or centrifugal tube for 2 hours at room temperature or overnight at 4℃ to separate out the serum (It is recommended to tilt the test tube or centrifugal tube to expand the cross section of the liquid surface, so that the serum can be separated out at a larger degree). Afterwards, centrifuge the tube for 20 min at 1000×g at 4℃, collect the supernatant(serum) carefully and carry out the assay immediately. It is suggested to aliquot and store the collected serum at -20℃ or -80℃ to avoid repeated freeze-thaw cycles.
Avoid hemolysis in the process of collecting blood samples because the erythrocyte will release substances with peroxidase activity when it lyses. In this case, non-specific chromogenic reaction will appear in HPR-labeled ELISA, resulting in inaccuracy of the detection. Meanwhile, avoid of bacterial contamination since the bacteria may contain endogenic HRP, which may result in false positives of the detection.
2. Plasma
First, use a blood-collection tube or centrifugal tube with anticoagulant to collect blood samples. Then centrifuge the samples for 15 min at 1000×g at 4℃ within 30 min of collection and collect the supernatant (plasma) carefully. It is suggested to aliquot and store the collected plasma at -20℃or -80℃ to avoid repeated freeze-thaw cycles. Avoid hemolysis or hyperlipidemia samples.
The common anticoagulants include EDTA, heparin sodium, sodium citrate and so on. Read the ELISA kit manual carefully before detection, ensure that whether the kit has special requirements for anticoagulants.
3. Cell culture supernatant
First, aspirate the cell culture supernatant to the centrifugal tube and centrifuge for 20min at 1000×g. Then remove the cell fragments and impurities, collect the supernatant and store at -20℃ or -80℃ to avoid repeated freeze-thaw cycles.
4. Cell
Repeated freeze-thaw method
1)Aspirate the medium in the culture plate and dissociate the cells by trypsin. Then add moderate amount of medium to flush the cells off the culture plate. As for suspension cell, this step can be omitted.
2)Collect the cell suspension into the centrifugal tube and centrifuge for 10 min at 1000×g. Then discard the medium and wash the cells for 3 times with pre-cooled PBS.
3)Add moderate amount of pre-cooled PBS(It is recommended to add some protease inhibitor into the PBS immediately before use)to keep the cells resuspended. In the 6-well culture plate, each well needs 150-250 μL of PBS to resuspend the cells.
4)Keep the samples at -20℃ or -80℃ to freeze and thaw them at room temperature successively. Repeat the freeze-thaw process for several times until the cells are lysed fully. You can also sonicate the suspension with an ultrasonic cell disrupter.
5)Centrifuge for 10 min at 10,000×g at 4℃. Then remove the cell fragments, collect the supernatant and store at -20℃ or -80℃ to avoid repeated freeze-thaw cycles.
5. Tissue homogenate
1)Rinse the tissues with pre-cooled PBS (0.01M, PH 7.4) to remove the residual blood or impurities on the tissue surface.
2)Tissue pieces should be weighed and then minced to pieces which should be cut as small as possible to be fully homogenized.
3)Add appropriate amount of pre-cooled PBS (the volume depends on the weight of the tissue. 9 mL PBS would be appropriate to 1 gram tissue pieces. After detection, the calculated sample concentration should multiply by the corresponding dilution ratio. It is recommended to add some protease inhibitor into the PBS immediately before use) and homogenize with a glass homogenizer on ice or in ice bath.
4)Aspirate the homogenates to the centrifugal tube and centrifuge for 5-10 min at 5000×g at 4℃. Collect the supernatant and store at -20℃ or -80℃ to avoid repeated freeze-thaw cycles.
6. Urine, saliva and other biological fluid samples
Centrifuge at 1000×g for 20 min, then collect the supernatant and carry out the assay immediately.
In general, as ELISA can only detect the content of soluble protein, the samples should be clear and transparent and be centrifuged to remove the sediment or suspended matter.
To ensure the accuracy of the detection, the samples stored at -20℃ or -80℃ should be detected within 1-6 months, and the samples stored at 4℃ should be detected within one week.
Besides, the samples should not contain NaN3 which will inhibit the activity of HRP and cause false negative results.
Horseradish Peroxidase (HRP) is a glycoprotein with a molecular weight of 44000 Da. It’s constituted by a colorless zymoprotein bound with a dark brown ferriporphyrin. The HRP used in enzyme immunoassay contains various isozymes with the so-called “C” isozyme as the main component. Other isozymes have relatively low activity.
HRP shows high specificity for hydrogen acceptor. Besides H202, it only acts on the peroxide of small-molecule alcohols and carbamide. The solid carbamide reagent is more convenient than H202.
Many compounds can act as the hydrogen donor of HRP. The common hydrogen donor substrates used in ELISA are O-Phenylenediamine (OPD), tetramethyl benzidine (TMB), and ABTS. Despite the advantage of high sensitivity and colorimetric convenience, OPD has poor stability after prepared into application solution and is prone to cause denaturation. Instead, TMB is free from these defects. After the colorless TMB reacts with the enzyme, it will appear blue in color. The enzyme-substrate reaction is terminated by the addition of a sulphuric acid solution and the color turns yellow. The color changes of the whole process are very obvious to the human eye. And the optical density (OD) can be measured spectrophotometrically. Therefore, TMB is the most common used substrate in ELISA. ABTS, though not as sensitive as OPD and TMB, has relatively low blank value.
HRP is the most widely applied labeling enzyme in immunoassay such as ELISA, WB and IHC. On one hand, HRP is easy to collect and relatively cheap. On the other hand, HRP is stable, and resistant to heat and organic solvent. Moreover, its activity reduces little after it conjugates with antigen or antibody.
The sodium periodate treatment is the common method for HRP to label monoclonal and polyclonal antibody. The mechanism is as follows. The glycosyl of HRP is oxidized by sodium periodate into aldehyde group which then binds with the amino group of the antibody IgG, forming Schiff reagent. To prevent the oxidized aldehyde group of HRP from conjugating with the amino group of its own, dinitrofluorobenzene (DNFB) is used to block the amino group before sodium periodate is added. After the oxidation reaction, sodium borohydride is used to stablize the Schiff reagent.
Related products
Human BDNF (Brain Derived Neurotrophic Factor) ELISA Kit
Human IL-6 (Interleukin 6) ELISA Kit
Mouse IL-2 (Interleukin 2) ELISA Kit
Mouse IL-4 (Interleukin 4) ELISA Kit
Mouse IL-6 (Interleukin 6) ELISA Kit
Biotin-Avidin-System (BAS) developed in the late 70s, is a new type of bioreaction amplification system. It can bind with almost any marker that has been developed successfully. With the firm bond between Biotin-Avidin and marker, as well as the multistage amplification effect, BAS makes immune labelling technic and related tracer analysis more sensitive. BAS is now widely applied in qualitative or quantitative detection and localization observation of antigen or antibody.
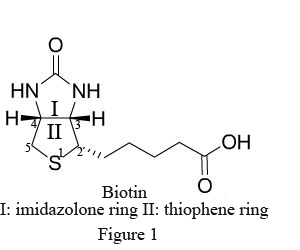
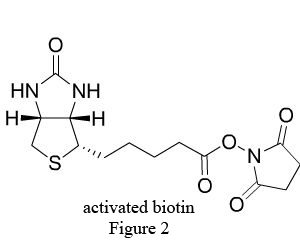
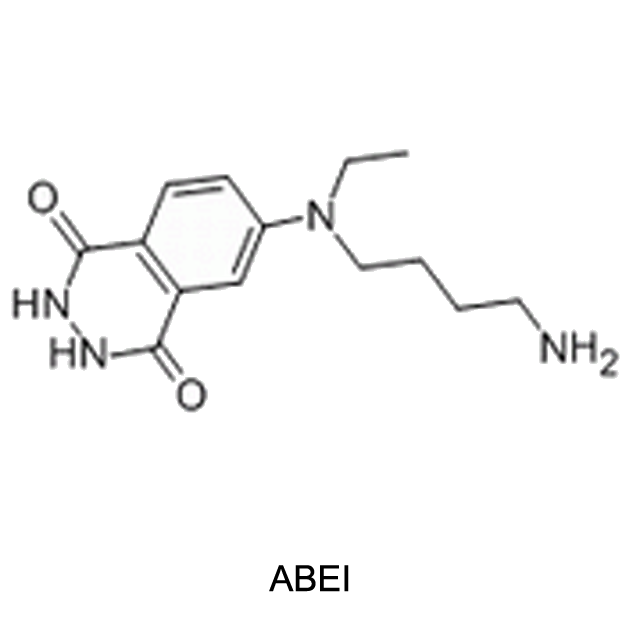
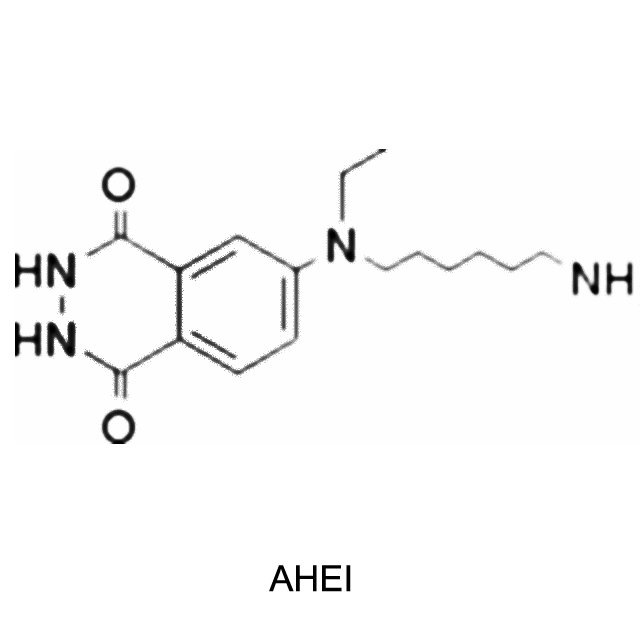
Biotin (B), widely distributed in animal and plant tissues, is often extracted from egg yolk and liver tissue rich in biotin. Biotin has a molecular weight of 244.31Da with two ring structures (Figure1): imidazolone ring (I), the main site binding with avidin, and thiophene ring (II) with the pentanoic acid as the side chain at C2, whose carboxyl terminal is the only structure to bond with antibody and other biomacromolecules. After chemical modification, the biotin becomes a derivative with various active groups, namely activated biotin (Figure 2).
Avidin (AV), also known as antibiotin, is a type of alkaline glycoprotein extracted from ovalbumin. With a molecular weight of 68kD, each avidin molecule consists of 4 identical subunits, therefore binding with 4 biotin molecules at most. Avidin has strong affinity for biotin, with a binding constant (K) up to 1015 L/mol, 10,000 times more than that between antigen and antibody (K=10.5~11 L/mol). As a result, their bond is very stable with high specificity.
The great advantages of BAS in practical application are as follows.
Sensitivity
Biotin is prone to bond with protein, nucleic acid and other biomacromolecules. The derivative it forms not only maintains the original bioactivity of the biomacromolecule, but also exhibits multivalence. Besides, each avidin molecule has 4 binding sites for biotin, so it can bond with biotinylated macromolecule derivative and marker at the same time. Therefore, the multistage amplification effect of BAS makes it highly sensitive in practical application.
Specificity
The avidin has strong affinity for biotin with high specificity. Therefore, the multistage amplification effect of BAS improves the sensitivity without adding non-specific interference. The binding properties of BAS won’t be affected by highly dilution. As a result, the non-specific effect of reaction reagents can be minimized.
Stability
The Biotin-Avidin binding constant is a million times more than that of antigen-antibody reaction. The Biotin-Avidin compound has a low dissociation constant. This process is irreversible and free from the effect of acid, alkali, denaturant, proteolytic enzyme and organic solvent. Therefore, the product of BAS in practical application is stable, reducing the operation error thus improving the precision of detection.
Applicability
Biotin and avidin can both form various derivatives. Not only can these derivatives be used to detect antigen-antibody, hormone-receptor, nucleic acid system in body fluid, tissue and cell and other bioreaction system by combining with different labeling techniques based on enzyme, fluorescein and radionuclide, but also they can be made into affinity medium for separation and purification of the reagents in above system. Besides, diversified commercial reagents made from BAS provide favorable conditions for clinical tests and scientific research.
Others
BAS can produce various universal reagents such as biotinylated secondary antibodies according to specific experiment requirement, which can be applied to different reaction systems. They can also be highly diluted before use with less amount and low cost. Particularly, when BAS combines with expensive antigen-specific primary antibody, it can greatly reduce the latter dosage and therefore save the cost. Besides, biotin bonds with avidin very quickly and efficiently. Despite the multilevel reactions, it takes only several hours for the whole experiment with short time of incubation.
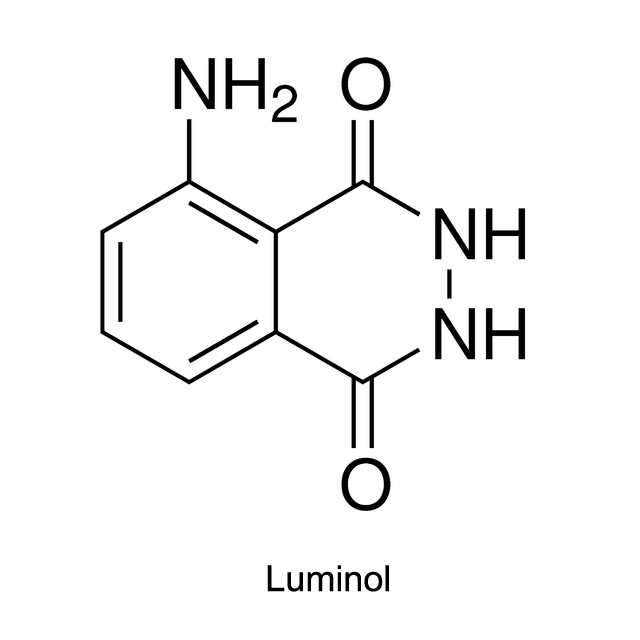
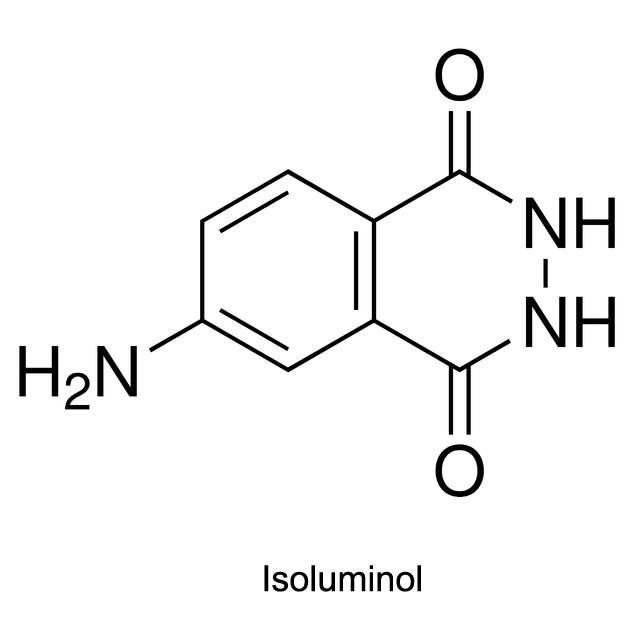
Luminol, isoluminol and its derivatives which were first used in CLIA (chemiluminescent immunoassay), are common chemiluminescent chemicals.
Chemiluminescent mechanism
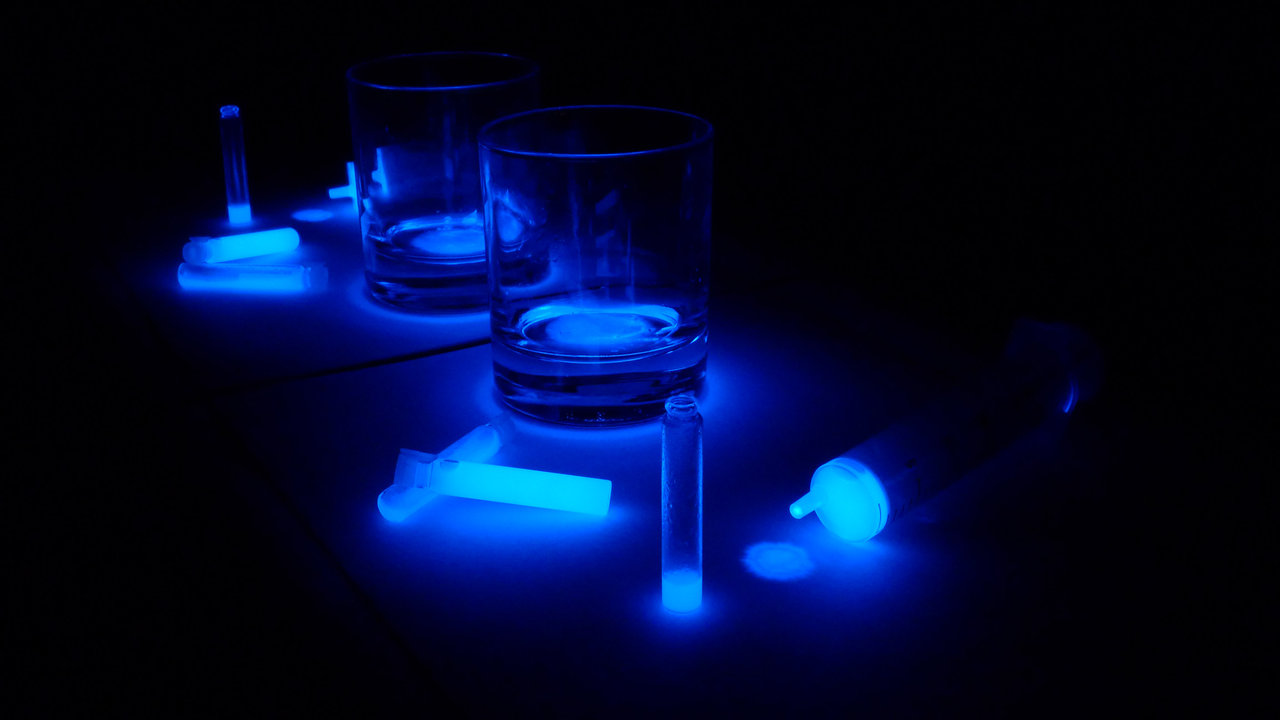
Take luminol as an example. Activated by hydroxide ions and the catalyst HRP, the luminol is oxidized by hydrogen peroxide (H2O2) into 3-Aminophthalic acid. When the 3-Aminophthalic acid changes from excited state to ground state, it releases energy as a photon. This emission produces the blue glow.

History
The luminescence quantum yield of luminol is 0.01%, and the wavelength can reach up to 425 nm. Luminol was directly used to mark the antigen or antibody in earlier time. But the luminescent intensity of luminol was reduced, which therefore influence the sensitivity. So recently HRP is used as the marker instead. After the immunoreaction, luminol reacts with the activator NaOH and H2O2, and exhibits the luminescence. The luminescent intensity of luminol depends upon the concentration of HRP in the immunoreaction.
Development
By adding a synthetic fluorescein in the system above, Whitehead and Thorpe extended the luminescent duration time to 7 minutes, strengthened the light signal intensity by 7 times and lowered the background signal intensity, increasing the SNR(Signalto Noise Ratio)to 80 times. Such was the Luminol/H2O2/HRP/Enhancer system.
In 1985, some substituted phenols such as p-Indophenol and p-Hydroxy-cinnamic acid were found out to be the best enhancer. They could extend the luminescent duration time to 30-60 minutes, and strengthen the luminescent intensity to more than 100 times. Since then, Luminol/H2O2/HRP/Enhancer system has developed rapidly.
Luminol, isoluminol and its derivatives are now applied in CLIA within Luminol/H2O2/HRP/Enhancer System: With HRP marking the antigen or antibody, Luminol, isoluminol or its
derivatives acts as the chemiluminescent substrate enhanced by p-Iodophenol or p-phenylphenol and activated by NaOH and H2O2. Two minutes after the chemiluminescence reaction, the luminescent intensity will reach the peak.
For CLIA kit,you can click to: https://www.elabscience.com/Products-clia_kits-108.html
As the last procedure of ELISA, calculation of results is of great importance to the success of the assay.
1. ELISA samples are always tested in duplicates or in triplicates, then average the absorbance values for each set
of standards and samples.
2. Subtract the average value of zero standard OD (this step is unnecessary in procedure of competitive ELISA).
3. Create standard curve.
Plot a four parameter logistic curve on log-log graph paper, with standard concentration on the x-axis and OD values on the y-axis. The software Origin is recommended to use.
The details are as follows:
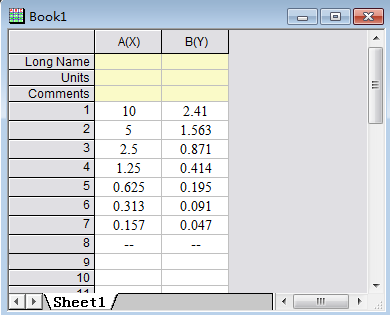
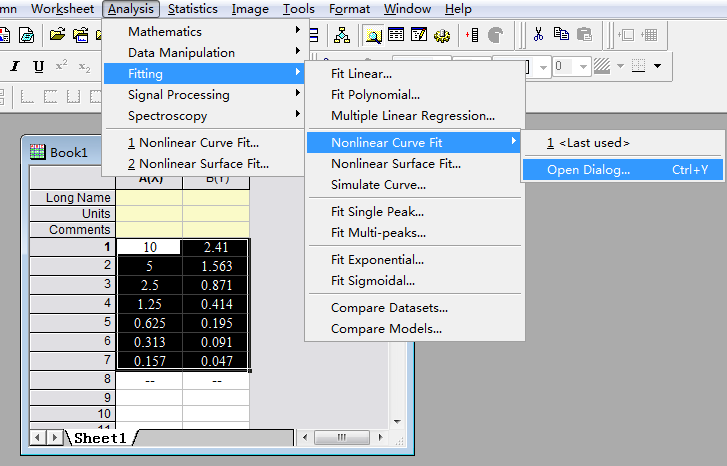
Step 1: Input information of the OD value and concentration of the standards
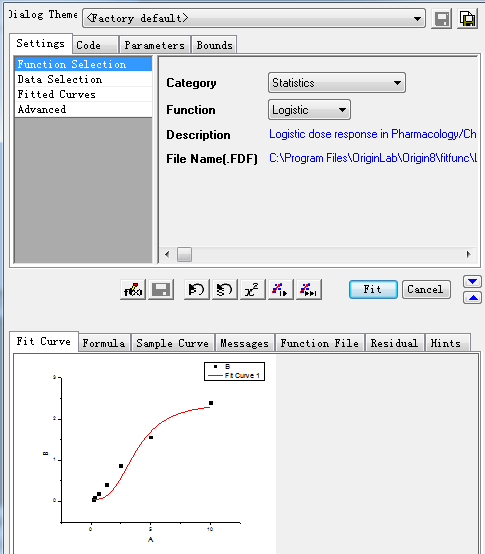
Step 2: Select the curve type:
Select the value box, and then select items in turn as below.
Step3: Select the specific X/Y:
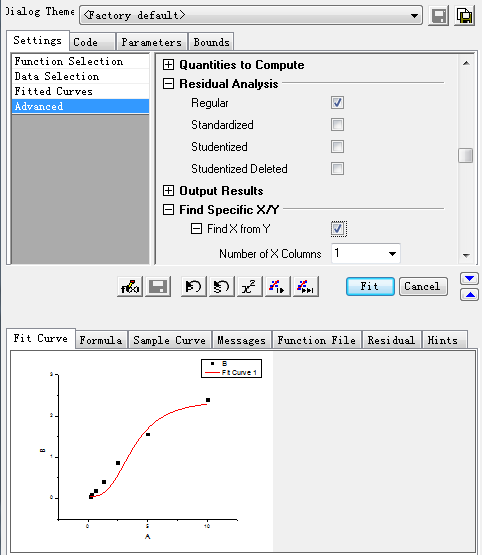
After setting the above items, click the Fit button, then the curve and its information is produced as showed in step 4.
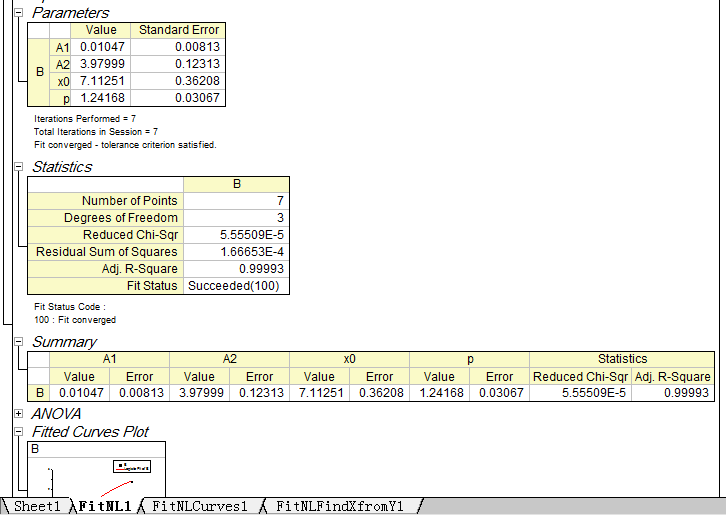
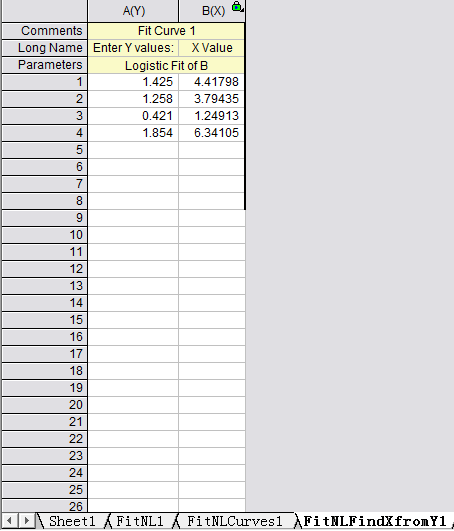
Step4: Check the information of the standard curve (parameter values, R-Square, etc.)
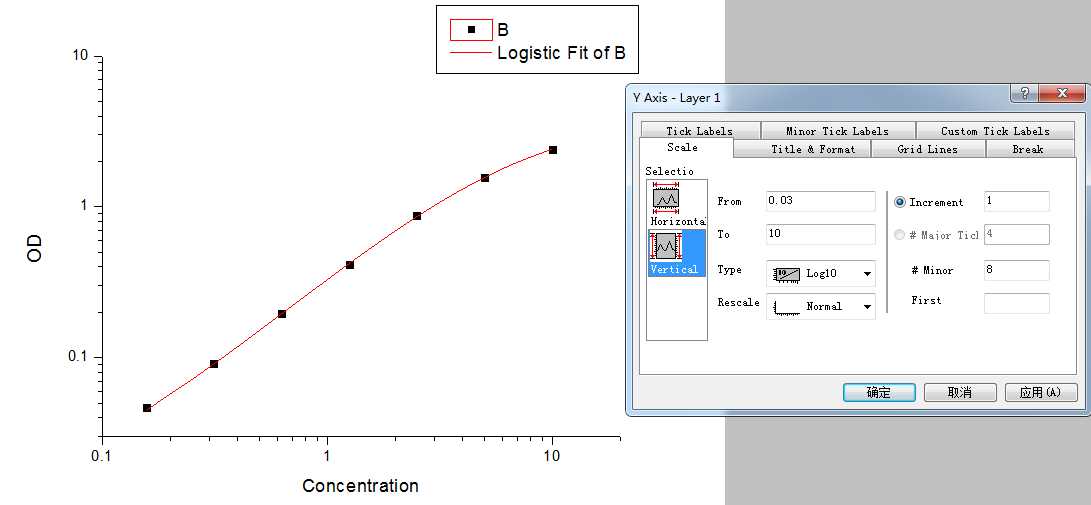
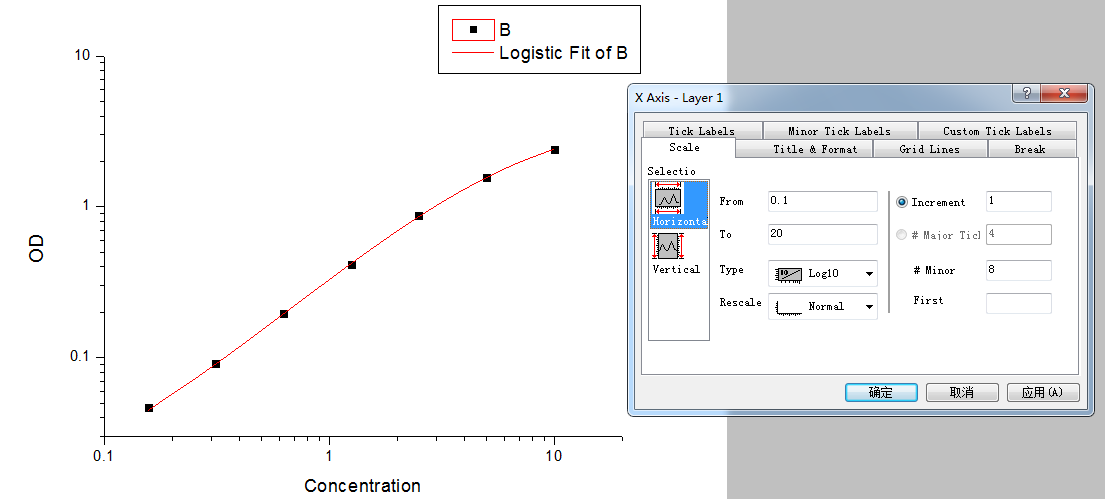
Step5: Set the axis to log-log type.
Double click the Fitted Curve Plot in step 4 to make the curve to editable state. Then double click the X axis and Y axis to set them to log type.
Step 6: Calculate the concentration according to the curve
Select the 4th work sheet (Fit NLF Find X from Y1), input or copy the OD value of the sample to the left column, the concentration will be calculated automatically.
If the OD value of the sample is out of upper limit of the standard curve in sandwich(or out of the lower limit of competitive ELISA), these samples should be diluted before proceeding with the ELISA to obtain an accurate result. As for these samples, the concentration obtained from the standard curve must be multiplied by the dilution factor when analyzing the results.
The key of repeated accuracy in pipetting is consistent technique. Consistent speed and smoothness is necessary during pipetting. Avoid sudden motions when drawing or dispensing liquid.
- Check to ensure that the pipette tip is fitted properly on the end of the pipette and seated with adequate pressure.
- Change pipette tips between adding each sample or reagent.
- Do not pipette a lower volume than the manufacturer’s suggestion. This will decrease the accuracy and reproducibility.
- Some liquids will have a tendency to cling to the inside or outside surfaces of the pipette tips. Pre-rinse the pipette tip with the sample or reagent to avoid variations in the volumes drawn or dispensed caused by this surface tension. This will improve accuracy.
- If the reagent to be pipetted isviscous, wait a moment after drawing the liquid to allow the volume to reach equilibrium before removing the pipette tip from the reservoir.
- If air bubble appears in the tip while drawing the liquid, dispense the liquid back into the container and re-pipette the liquid at a slower rate. If the air bubble appears a second time, discard the pipette tip and replace with a new tip.
- Use separatereservoirs for each reagent.
Correct washing of the wells is very important for a successful ELISA. Deionized or distilled water should be used when diluting the concentrated Wash Buffer.
There are some tips for correct washing in ELISA operation:
Using multi-channel pipette
Firstly, check the strips in the plate to make sure they are firmly in the plate holder. Secondly, empty the liquid in the plate by decanting. Fill each well with Wash Buffer of the volume specified in the manual. Set a timer for the recommended time and let the Wash Buffer soak in the wells. Decant the wells by inverting the plate and rapping it against clean paper toweling. Repeat this procedure as suggested in the manual. After the last decanting, remove any remaining Wash Buffer by inverting the plate and blotting it dry by rapping it firmly against clean paper toweling on a hard surface. Do not let the wells standing to dry. Proceed immediately to the next step in the manual.
Using manifold dispenser or autowasher
Equip the dispenser or autowasher with an appropriate vacuum supply (refer to manufacturer’s guidelines). Ensure that each cannulae is dispensing and aspirating properly. Set the volume of Wash Buffer in each well and soaking time for each washing. Then put the plate in. Ensure that no Wash Buffer is left in the wells after aspiration.
Washing the plate too rapidly or too slowly, incomplete washing or aspirating, and letting the wells standing to dry are factors that will affect the precision of the ELISA.
ELISA failure may be caused by many factors. Many unexpected results can be avoided if reading and fully understanding the manual before experiment. You can refer to the tips as following to identify your assay failure.
1. Check the expiration date of the kit, ensure that all the reagents were stored as suggested in the manual.
2. Check for signs of instability or deterioration in reagent solutions, such as precipitation or discoloration and so on.
3. The substrate reagent should be colorless.
4. Use clean plastic disposable pipettes, tips, and containers for reagent preparation and storage. Avoid cross-contamination of reagents by changing pipette tips between addition of each standard, sample and reagent.
5. Ensure that specified incubation times and temperatures have been guaranteed.
6. Ensure that no substitution of kit reagents has occurred.
7. It is recommended that samples and standards should be run in duplicate to improve accuracy.
Your first choice for scientific solutions
Find out moreSUPPORT
outstanding technical support
PRODUCT
we offer a full product guarantee
DELIVERY
we offer free delivery to UK universities and non profit organisations