Flow Cytometric analysis

Detection principle

The decrease of mitochondrial membrane potential is a marker event in the early stage of apoptosis. It occurs before the appearance of nuclear apoptotic characteristics (chromatin concentration and DNA fragmentation). Once the mitochondrial membrane potential collapses, apoptosis is irreversible.

In normal cells, the mitochondrial membrane potential is high, JC-1 gathers in the matrix of mitochondria to form a polymer, which yields a red to orange colored emission (590±17.5 nm). In the early stage of apoptosis, the mitochondrial membrane potential decreases, JC-1 can’t gather and it is a monomer which yields green fluorescence with emission of 530±15 nm.

Analysis by the Flow cytometry, normal cells are double positive with red and green fluorescence and the apoptosis cells are single positive with only green fluorescence.

Experimental Procedure:

  1. Deploy the 1×JC-1 Assay Buffer and JC-1 Staining Buffer according to the requirement of the experiment. See the instructions above for detail. The buffer should be stored at 4°C.
  2. Set the positive Control. See the instructions above for detail. Induce apoptosis of suspension cells with reagents of interest.
  3. Collect the cells, centrifuge at 300 g for 5 min, and discard the supernatant. Add appropriate amount of PBS to resuspend gently and count the cells.

Tips:Cell viability is the key to the experiment. When the adherent cells are used for apoptotic detection, treatments like digestion may increase the ratio of necrotic or apoptotic cells and cause uncontrollable effects on the experimental results. Please be aware!

  1. Split the cell suspension into tubes, 1-5 × 10⁵ cells for each. Centrifuge at 300 g for 5 min, discard the supernatant. Add PBS to wash the cells and discard the supernatant.
  2. Add 500 μL JC-1Staining Buffer to resuspend the cells. Incubate at 37°C, 5% CO2 incubator for 15-20 min.

TIP: The incubation time is depending on cell types. In general, mammalian cells are recommended at 37°C. Other species should according to cell culture conditions.

  1. Centrifuge at 300 g for 5 min, discard the supernatant. Add 500 μL pre-cold 1x JC-1 Assay Buffer to wash the cells twice.
  2. Add 500 μL pre-cold 1x JC-1 Assay Buffer to resuspend the cells.
  3. Analyze the cells immediately with proper machine settings. Otherwise, place the cells on ice in the dark and analyze within 0.5 h.


Detection by microscopy or flow cytometry

   A. Analysis by Fluorescence Microscopic Observation

1. Drop the cell suspension on a slide, cover the slide, and observe with a fluorescence microscope.

2. For adherent cells, slides can also be used to culture cells and induce apoptosis directly, and wash cells twice with PBS.

a)Add 100 μ L 1x JC-1 Staining Buffer to the slide.

b)Incubate in an incubator with 37oC, 5% CO2 for 15-20 min, wash 1-2 times with 1 x JC-1 Staining Buffer

c)Observe with the fluorescence microscope.

When detecting JC-1 monomer, the excitation light can be set to 490 nm and the emission light to 530 nm.

When detecting the JC-1, the excitation light can be set to 525 nm and the emission light to 590 nm.

Tips:

It is not necessary to set the excitation and emission light at the maximum wavelengths for fluorescence determination here.

If observed by fluorescence microscopy, JC-1 monomer can be detected with reference to other settings when observing green fluorescence, such as GFP or FITC.

Detection of JC-1 polymer can refer to other red fluorescence, such as PI.

The presence of green fluorescence indicated that mitochondrial membrane potential decreased, and the cell is probably in the early stage of apoptosis. The appearance of red fluorescence indicated that mitochondrial membrane potential and cell status are normal.

B. Flow cytometry analysis

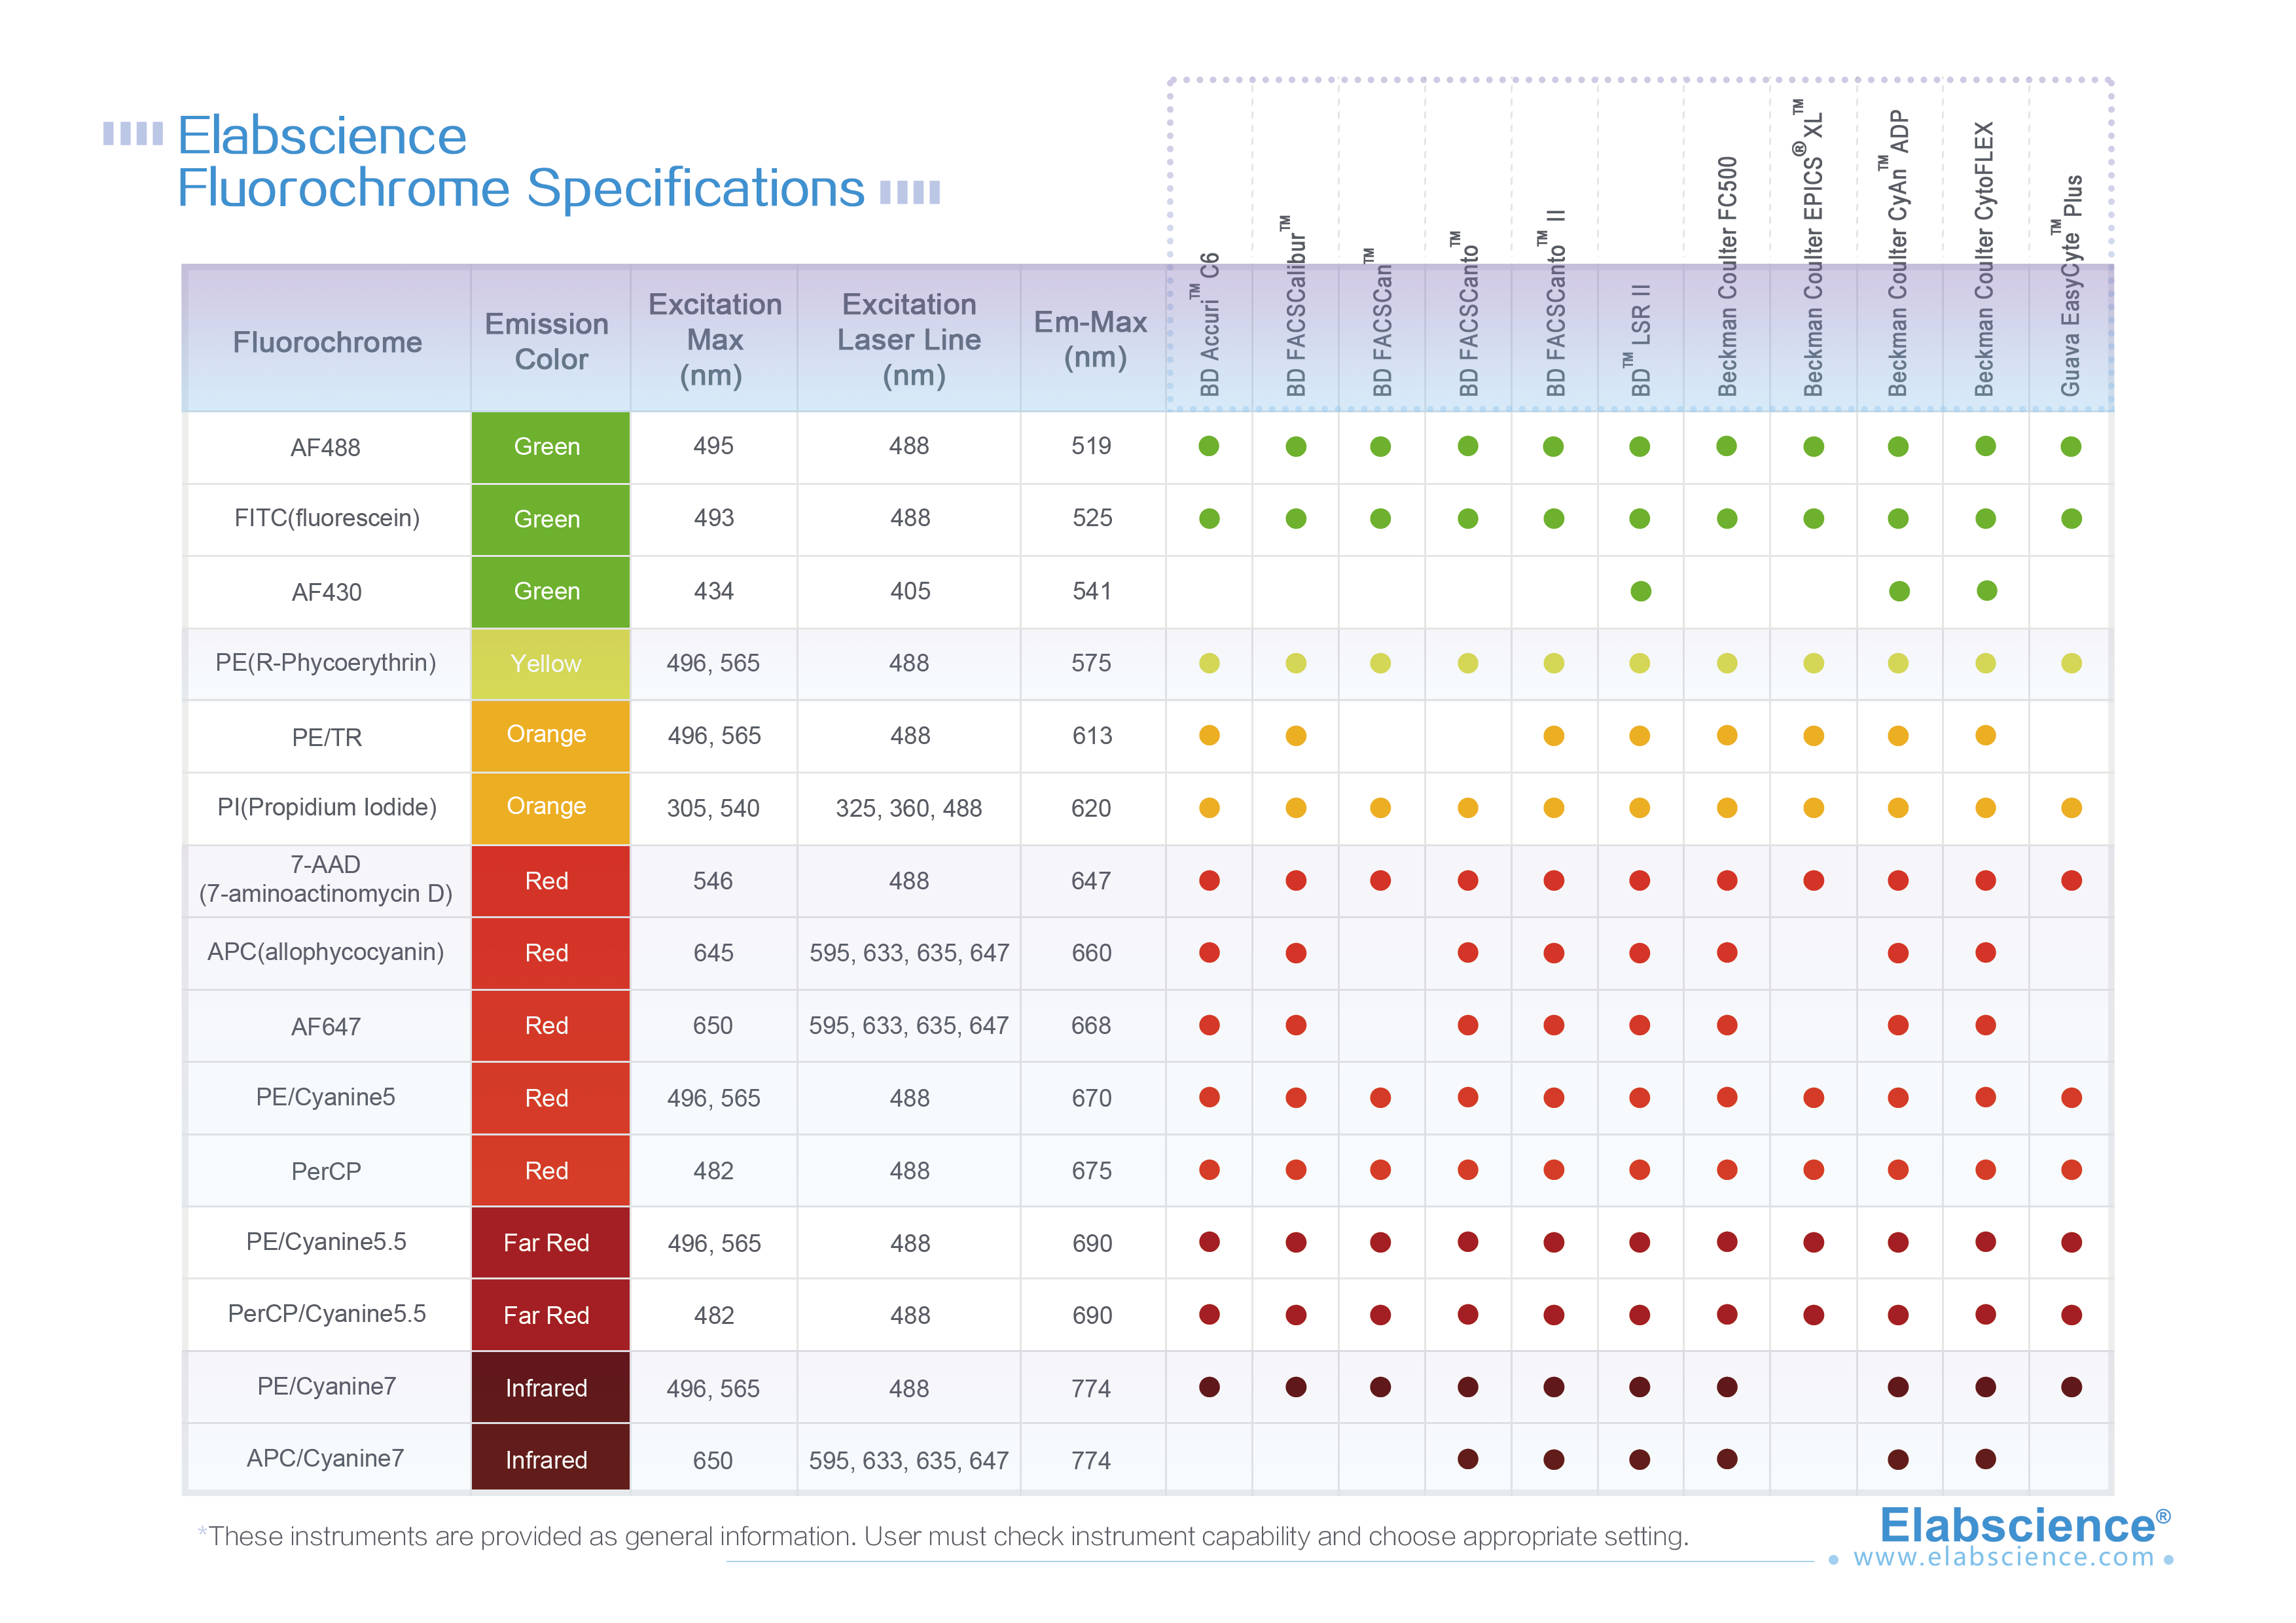
Flow cytometry can be used to detect apoptosis (Ex = 488 nm; Em = 530 nm).

Green fluorescence is usually detected by FL1 in FITC channel and red fluorescence by FL2 in PI channel.

Normal cells {FL-1 bright, FL-2 bright; R1}, apoptotic cells {FL-1 bright, FL-2 dark; R2}, the location of the gate is different with the type of root starch cells, experimental conditions and so on vary.

Negative control (untreated normal cells) and positive control (treated with CCCP) must be set during the experiment. The location of the gate is determined by two-parameter scatter plots of the negative and positive control groups.

Detection principle

Caspase (Cysteine-requiring Aspartate Protease) is a protease family that plays an important role in the process of apoptosis. Caspase exists in the form of prozyme in the normal state and has no activity. However, during the apoptosis stage, activated Caspase which cleavages the corresponding substrate of endochylema or cytoplasmic nuclear and eventually leads to apoptosis.

Caspase Activity Assay kit is used to conjugate Caspase sequence-specific peptides acetyl-peptide(Ac-peptide) to yellow group p-nitroaniline (pNA). When the substrate is cut by Caspase, the yellow group pNA is dissociated. pNA has an absorption peak at 405nm. Measure the OD value at 405 nm and then Caspase activity can be calculated accordingly.

Reagents not included:

PBS, Protein Quantitative Kit (Bradford, optional)

Experimental Procedure:

  1. Reagent preparation

1)Take out the Lysis Buffer ,dissolve fully, mix it and put on ice for use.

2)Lysis working solution preparation: Take 50 μL Lysis Buffer ,add 0.5 μL DTT , to the Lysis Buffer, mix it and put on ice for use.

2. Sample preparation

1)Suspension cells

a)Induce apoptosis of suspension cells with reagents of interest, centrifuge at 2,000 rpm for 5 min, discard the supernatant. Add appropriate PBS to resuspend gently and count the cells.

b)Centrifuge at 2,000 rpm for 5 min, discard the supernatant. Add 50 μL cold Lysis Buffer working solution to each 2 million cells to resuspend the cells. Incubate in ice bath for 30 min and oscillate 3~4 times during incubation.

2)Adherent cells

a)Adherent cells should be detached with trypsin and then collected sedimentary cells. Collect the cells and centrifuge at 2,000 rpm for 5 min, discard the supernatant. Add appropriate PBS to resuspend gently and count the cells.

b)Centrifuge at 2,000 rpm for 5 min, discard the supernatant. Add 50 μL cold Lysis Buffer working solution to each 2 million cells to resuspend the cells. Incubate in ice bath for 30 min and oscillate 3~4 times during incubation..

3)Tissue

a)Take 50 mg tissue, cut to small pieces, then add 200 μL cold Lysis Buffer working solution and homogenize the sample on ice.

b)Transfer the tissue homogenate to a 1.5 mL centrifuge tube, then incubate in ice bath for 5 min.

c)Centrifuge at 12,000 rpm for 10~15 min at 4°C.

d)Take the supernatant to a new tube, put it on ice for test.

e)Carry out the assay immediately or store the samples at-70°C. Meanwhile, you could also determine the concentration of protein with Bradford method [E-BC-K168, please contact the local distributors].

3. Caspase 3 activity detection

1)Take Ac-peptide-pNA and 2 ×Reaction Buffer, dissolve fully and put on ice for use.

2)2 ×Reaction working solution preparation: Add 0.5 μL DTT to each 50 μL 2 ×Reaction Buffer.

3)Take 45 μL cell lysate or supernatant of tissue homogenate (contain 100~200 μg of protein), if the volume is less than 45 μL, add lysis buffer to 45 μL.

Operation table

Blank tube

Sample tube

2 ×Reaction working solution

50 μL

50 μL

Lysis working solution

45 μL

0 μL

Sample

0 μL

45 μL

Ac-peptide-pNA

5 μL

5 μL

Total

100 μL

100 μL

Tips:

  1. Add 2 ×Reaction working solution into the tube firstly, then add Sample or Lysis working solution. Mix and avoid bubble formation.
  2. Add Ac-peptide-pNA into the tube, Mix it and avoid bubble formation.

4)Incubate at 37℃ for 2~4 h. Measure the OD value (A405) at 405 nm with spectrophotometer (100 μL cuvette) or microplate Reader when the color changes obviously. The reaction time can be extended or stay overnight if the color doesn’t change significantly.

5)Calculate ODSample /ODBlank to determine the activity of Caspase 3.

Definition: One unit Caspase 3 activity is amount of enzyme that will cleave 1.0 nM of the colorimetric substrate Ac-peptide-pNA per hour at 37℃ under saturated substrate concentrations.

Introduction:

Cell surface markers can be used to define cell subsets based on developmental stage and analyzed by flow cytometry. These surface markers have different forms and functions. For example, CD4 is a surface marker for T helper cells that can be further differentiated based on expression of other chemokine receptors and cluster of differentiation (CD) markers. Live cells stained with antibodies can be sorted based on unique staining patterns and used for additional experiments.

Protocol–Cell Suspensions

  1. Prepare cells(More detail you can view Sample Preparation for Flow Cytometry)

1)  Collect the whole blood or tissue (spleen, lymph node, thymus or bone marrow), add cell staining buffer (or PBS with 0.1% BSA) to prepare monoplast suspension.

For cells stimulated in vitro, suspend the cells with cell staining buffer (or PBS with 0.1% BSA) after stimulation, then proceed to the 2)step.

2)  Fill up the tube with cell staining buffer (or PBS with 0.1% BSA), centrifuge at 300 g for 5 min at room temperature. Then discard supernatant.

  1. Erythrocyte lysis

1)  If you need to split red blood cells, such as the spleen or bone marrow, dilute the 10 x Red Blood Cell Lysis Buffer (Ammonium-Chloride-Potassium Lysing Buffer, ACK buffer ) with DI water to 1 x ACK buffer, and put it to room temperature. Then re-suspend the cells in 3 mL 1X ACK buffer and incubate at room temperature for 3-5 min.

If there is no need to split red blood cells,such as lymph node or thymus, go directly to the 3) step.

2)  Add 10 mL cell staining buffer (or PBS with 0.1% BSA) to terminate the ACK lysis, centrifuge at 300 g for 5 min at room temperature. Discard supernatant.

3)  Fill up the tube with cell staining buffer(or PBS with 0.1% BSA) to 15 mL, centrifuge at 300 g for 5 min at room temperature. Discard supernatant.

4)  Cells counting. Add cells staining buffer (or PBS with 0.1% BSA) to make cells suspension at concentration of 1×10⁷ /mL. Then aliquots 100 µL cell suspension into FACs tube.

  1. Block Fc receptor: 

Block Fc receptors may reduce nonspecific immunofluorescent staining.

For Mouse cells: purified Anti-Mouse CD16/CD32 antibody specific for FcγR III/II can be used to block nonspecific staining of antibodies. Thus, block Fc receptors by pre-incubating cells with 0.5-1µg Anti-Mouse CD16/CD32 in 100 µl volume for 10 min at room temperature.

For Human and Rat cells: Pre-incubate the cells with excess irrelevant purified Ig from the same species and same isotype as the antibodies used for immunofluorescent staining or serums from the same species as the antibody used.

  1. Cell surface staining:

1)  Add labeled fluorescent antibody according to the datasheet recommendation, and incubate at 4 ℃ for 30 min in the dark.

2)  Re-suspend the cells by adding 5 mL cell staining buffer (or PBS with 0.1% BSA), centrifuge at 300 g for 5 min, then discard supernatant.

3)  Add 0.5 mL cell staining buffer (or PBS with 0.1% BSA) to re-suspend the cells. Detect and analyze by flow cytometry.


Notices

  1. Antibody-binding kinetics is temperature-dependent. Staining on ice may require longer incubation times.
  2. Some antibodies may require non-standard incubation conditions that will be noted on the technical data sheet provided with the antibody.
  3. Fixed or delayed analysis may reduce the fluorescence signals. In order to get better results, it should be analyzed immediately after dyeing.

Introduction

A modification of the basic immunofluorescent staining and flow cytometric analysis can be used for simultaneous analysis of surface molecules and intracellular antigens at the single-cell level by flow cytometry. Typically, cells are fixed with formaldehyde to stabilize the cell membrane, then permeabilized with detergent or ethanol to allow antibodies against intracellular antigens, to access to stain intracellularly.

Protocol– intracellular (cytoplasmic) proteins

The following protocol is intended for intracellular antigens analysis at the single-cell level. In this protocol, permeabilization after fixation results in pores in the cell membrane. Thus, antibodies enter into cell cytoplasm. Considering surface staining is needed in some experiment, please follow the Staining Cell Surface Targets for Flow Cytometry protocol firstly, then fixate and permeate the cells and stain the intracellular proteins.

  1. Prepare cells(More detail you can viewSample Preparation for Flow Cytometry)

1) Collect the cells. Collect the cells which are stimulated and interdicted (refer to the literature), add cell staining buffer (or PBS with 0.1% BSA) to make cells re-suspended with the concentration of 1X10⁷ /mL.

2) Aliquot 100 µL cell suspension (about 1X10⁶ cells) and add it into the flow tube.

  1. Fixation 

1) If the cell surface staining is needed, follow the  Staining Cell Surface Targets for Flow Cytometry  protocol firstly, and then add 100 uL 1X Fixation /Permeablization buffer to the tube make the cells resuspended, then incubate the cells at room temperature, protect from light for 30 min.

2) Centrifuge at 300 g for 5 min at room temperature. Discard supernatant.

  1. Permeabilization

1) Add 2 mL 1X permeabilization buffer to re-suspend the cells, centrifuge at 300 g for 5 min at room temperature. Discard supernatant.

2) Repeat washing one time, centrifuge at 300 g for 5 min at room temperature. Discard supernatant.

3) Add 1 mL 1X permeabilization buffer, then incubate the cells at 4℃, protecting from light for 30 min. Centrifuge at 300 g for 5 min at room temperature. Discard supernatant.

  1. Intracellular staining

1) Add 100 uL 1X permeabilization buffer to re-suspend the cells, and add the Fluorescein-labeled antibody according to datasheet. Mix them and incubate the cells at 4℃, protecting from light for 30 min.

2) Add 2 mL of 1X permeabilization buffer to re-suspend the cells, centrifuge at 300 g for 5 min at room temperature. Discard supernatant.

3) Add 2 mL of cell staining buffer (or PBS with 0.1% BSA) to re-suspend the cells, centrifuge at 300 g for 5 min at room temperature. Discard supernatant.

4) Add 0.5 mL of cell staining buffer (or PBS with 0.1% BSA) to re-suspend the cells. Detect and analyze by flow cytometry.

Notice

  1. If the cell surface staining is needed, follow the Staining Cell Surface Targets for Flow Cytometry  protocol firstly, then fixed and Permeabilizated.
  2. It’s suggested that the type control should be used with intracellular antigens staining.

Elabscience® R&D Annexin V Fluorescent Double-Stained Cell Apoptosis Detection kit was used to identify apoptotic and necrotic cells.

Annexin V is a member of the annexin family of intracellular proteins that bind to phosphatidylserine (PS) in a calcium-dependent manner.  Annexin V-Flouorescent, which bind to the membrane of apoptotic cells through PS exposed outside cells, can detect apoptosis by flow cytometry or fluorescence microscopy

Specifical Staining Buffer which can specifically bind to double-stranded DNA and produces strong fluorescence, and it’s normally fails to penetrate cell membranes. Due to late apoptotic or necrotic cells loss of integrity of membrane, Specifical Staining Buffer can enter the cells to stain DNA. Cells at different apoptotic stages can be distinguished by using with Annexin V and Specifical Staining Buffer.

1. Suspension Cells

A. Suspension cells were induced to apoptosis according to the experimental scheme. Centrifuge at 300 g for 5 min, discard the supernatant. Add appropriate Cell Staining Buffer [Cat: E-CK-A171, please contact the local distributors] to re-suspend gently and count the cells.

B. Take 1-5 × 10re-suspend cells in step1. Centrifuge at 300 g for 5 min, discard the supernatant. Add appropriate Cell Staining Buffer [Cat: E-CK-A171] to wash the cells, centrifuge at 300 g for 5 min, discard the supernatant. Add 100 μL of 1 × Annexin V Binding Buffer to re-suspend the cells.

C. Add 5 μL of Annexin V-Fluorescent Staining Buffer and 5 µl of DNA dye (PI or 7-AAD) to each tube.

D. Gently vortex the cells and incubate at room temperature for 15-20 min in the dark.

E. Analyze the cells immediately with proper machine settings. Otherwise, place the cells on ice in the dark and analyze within 1 h.

Choosing high-quality and reliable fluorescent antibodies ensures the smooth running of flow cytometry and data analysis, especially multi-color flow cytometry that needs high resolution for color compensation. How to choose superior fluorescent antibodies for flow cytometry? Here are some key factors.

Three Key Factors

  1. Commonly used clone numbers
    There are usually several monoclonal antibodies with different clone numbers for a specific CD (clusters of differentiation) molecule. The more frequently the clone is used in flow cytometry, the more chance that you accomplish the experiments smoothly.
    2. High SI (Staining Index)
    High SI ensures good separation of the positive and negative cell populations, especially in experiments that need high resolution.
    3. Low background binding
    Though isotype antibodies or blocking reagents are usually used, sub-optimal conjugation of fluorescent dyes with antibodies significantly aggravate the background binding, especially with antibodies labeled by labeling kit without purification. Low background binding makes it much easier to determine the positive cell population from the negative one.

Why choose Elabscience flow cytometry antibodies?

Elabscience has selected commonly used clones as antibody source for flow cytometry
1. We have antibodies of six colors now and many more are on the way.

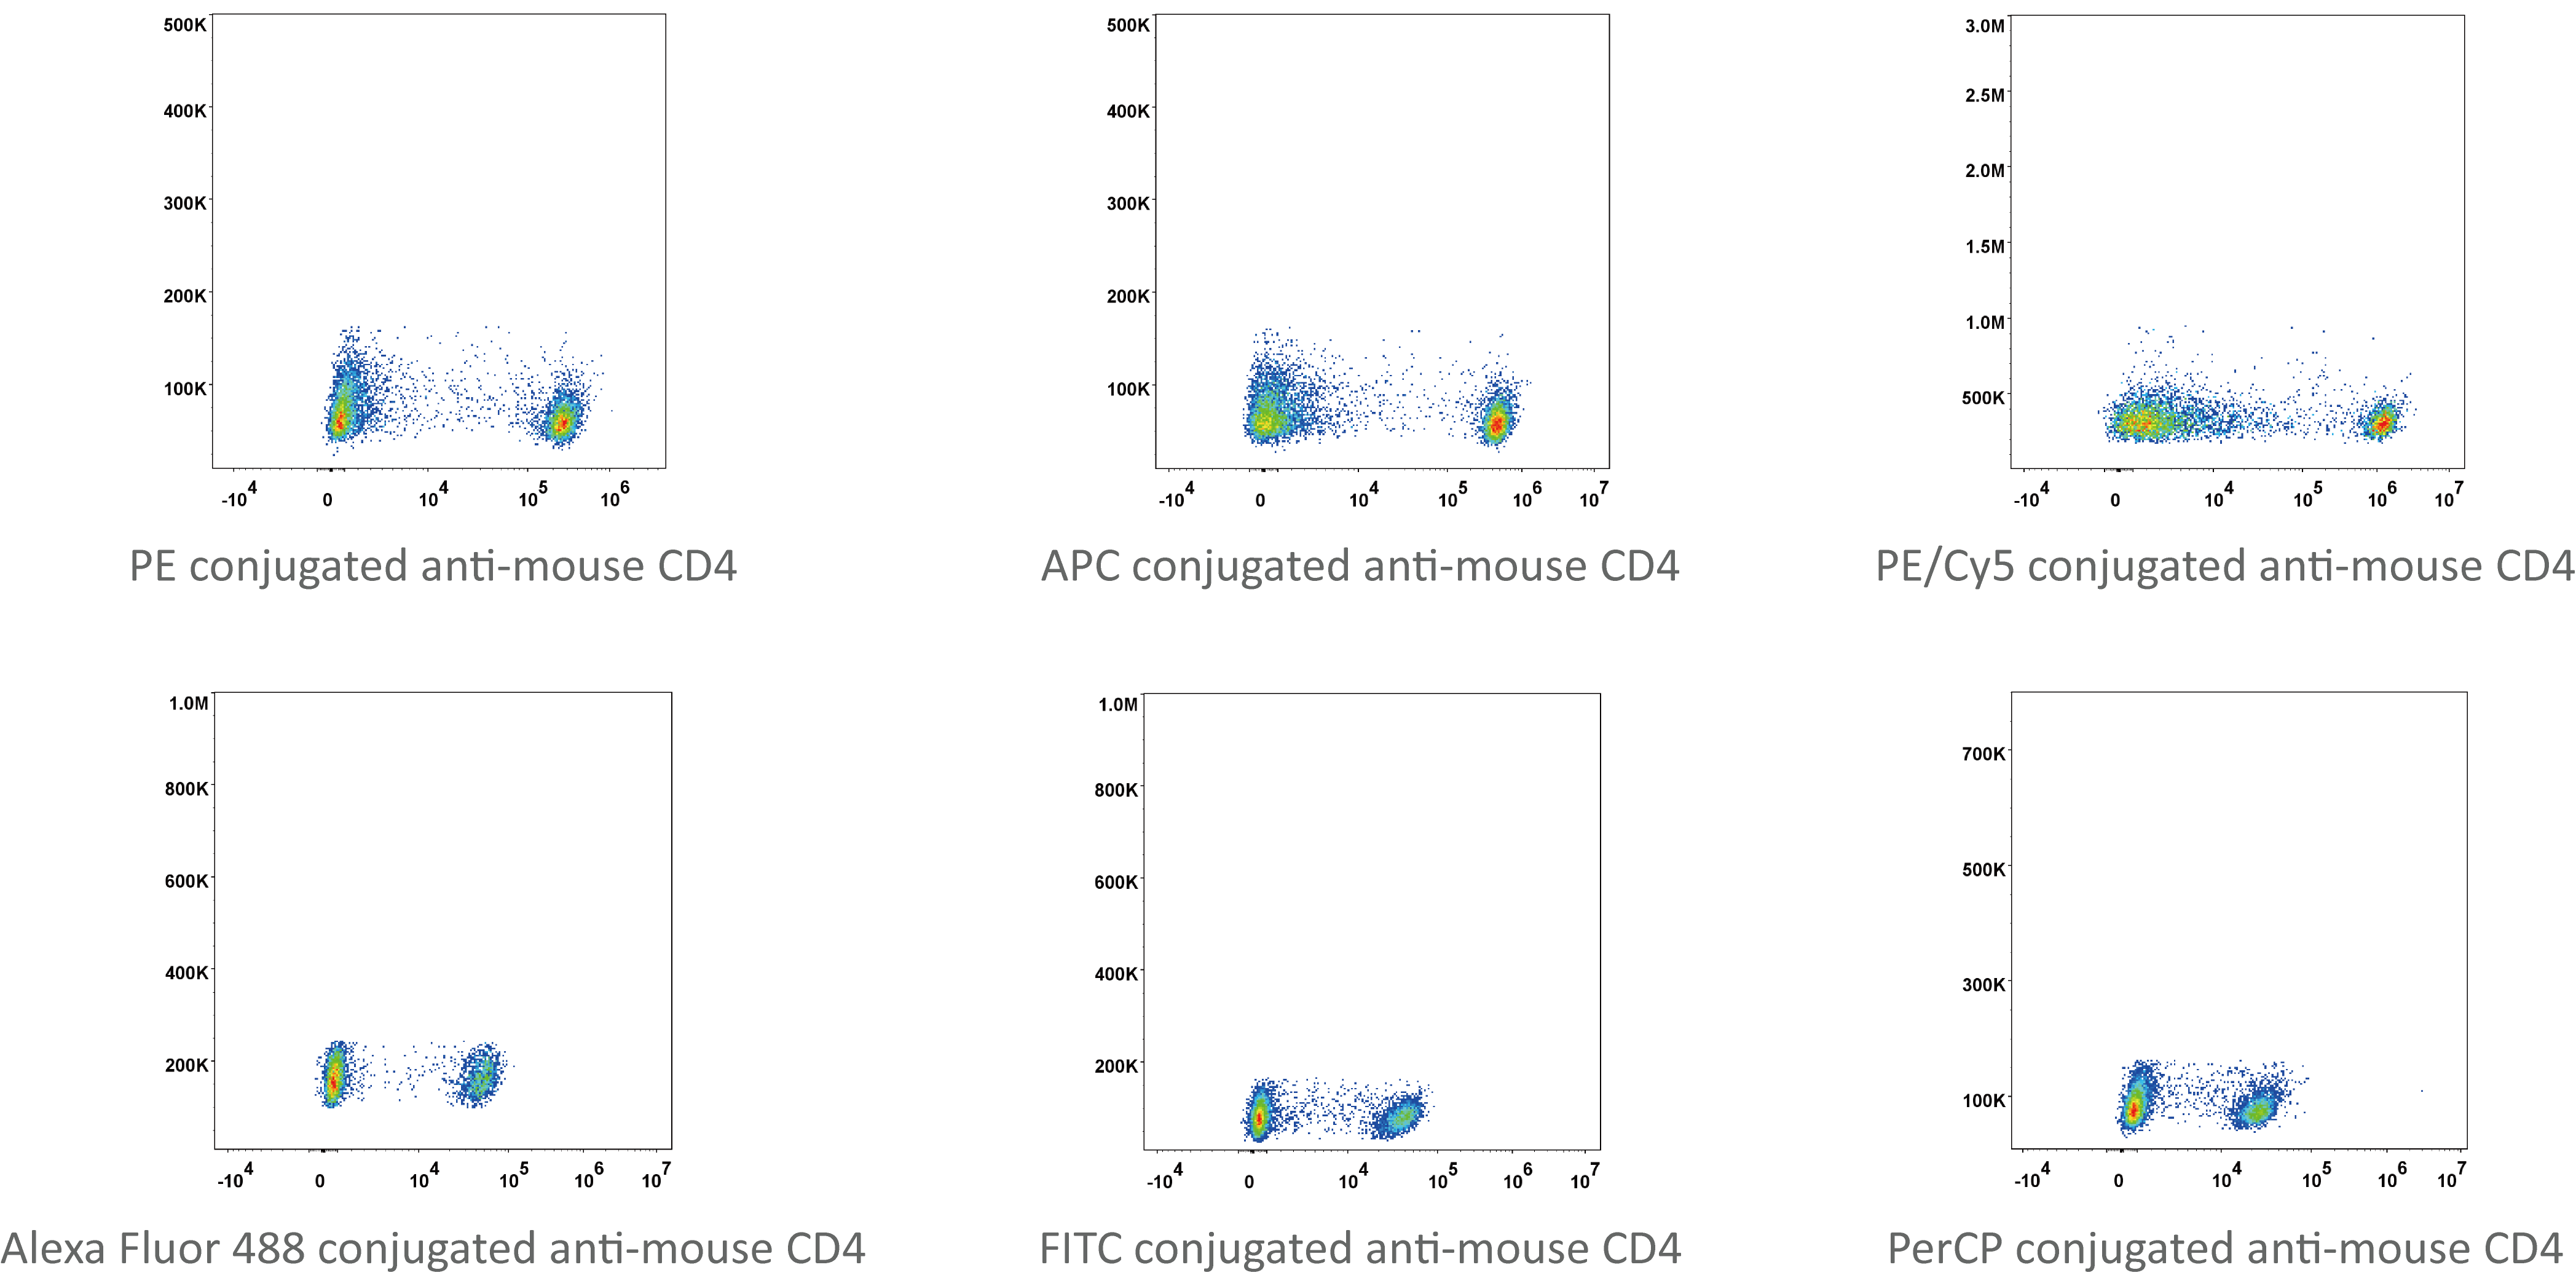
  1. Elabscience flow cytometry antibodies have considerable SI (stainging index)  
Fluorescent Dye Elabscience Manufacturer A
PE anti-mouse CD4 219 158
APC anti-mouse CD4 238 200
Alexa Fluor 488 anti-mouse CD4 66 92
FITC anti-mouse CD4 61 56
PerCP anti-mouse CD4 31 9

Table 1. Comparison of SI of Elabscience flow cytometry antibodies with other manufacturers.

3. Elabscience flow cytometry antibodies have low background binding   
With optimized conjugation technology, our flow cytometry antibodies can work with unstained cells instead of negative isotype control. Human blood lymphocytes stained with PE conjugated anti-human CD8a antibody. The negative population (empty blue curve) has nearly the same fluorescence level of the unstained cells (filled red curve).

Immune system is the essential part of the body to resist foreign invasion and clear transformed cells and tissue. It concerns the health and survival of life and have always been the focus and hot spot biological and medical research. In the process of pathophysiology, immune cells arrive at whole body from lymphoid organs through vascular system and blood circulation. Flow cytometric analysis of immune cell in blood is one of the most used methods to examine the immune state of body in biological and medical research. Blood cells consist of mainly erythrocytes (red blood cells) and leukocytes (white blood cells). Immune cells refer to the leukocytes. Almost all of the immune responses in body is accomplished by the cooperation of all groups of leukocytes. As a result, they are the main subject of all kinds of research models, such as infection, inflammation, autoimmune diseases and transplantation.

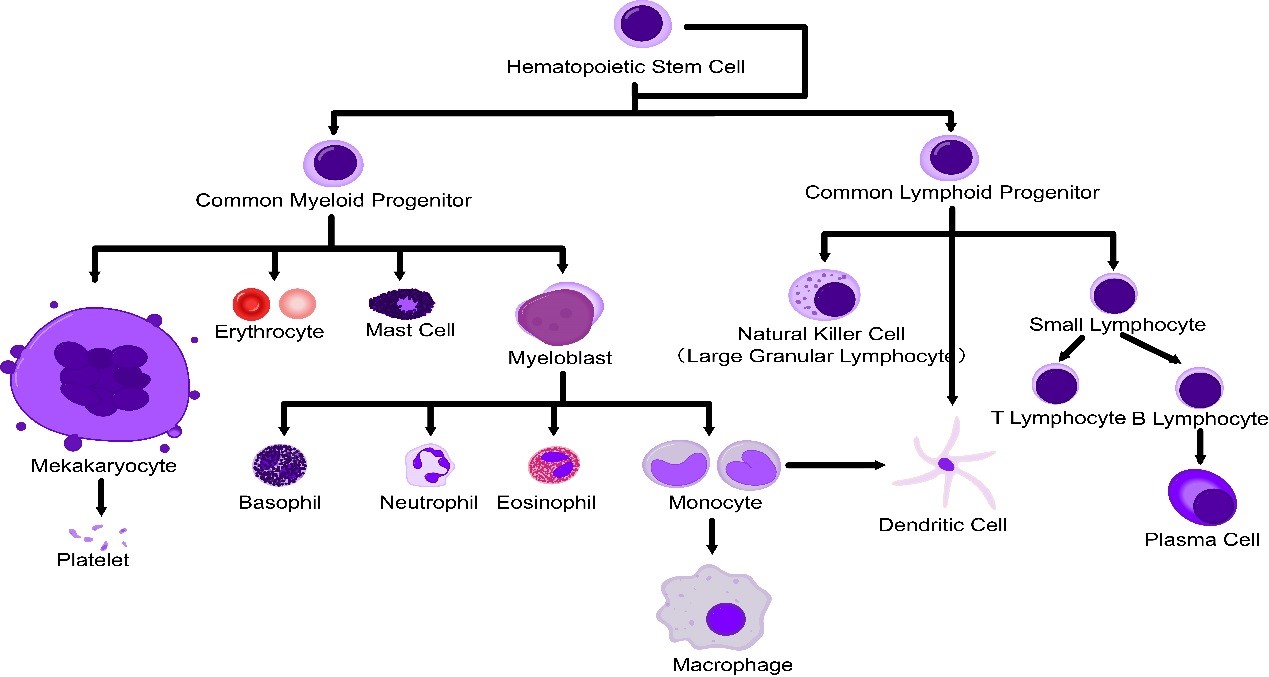
Leukocytes can be divided into lymphoid cells and myeloid cells according to the origin. All of the blood cells share a common ancestor, the hematopoietic stem cell (HSC). HSC differentiate into common lymphoid progenitors (CLP) and common myeloid progenitors, where the lymphoid cells and myeloid cells derived from respectively.

1.     Lymphoid cells

CLP differentiated mainly into different lymphocyte populations, of which B lymphocytes, T lymphocytes and natural killer (NK) cells are the most common. In the term of abundance, B lymphocytes and T lymphocytes have the absolute advantage. They are the main effectors of the acquired immunity. Both formed in the bone marrow, T cells move to thymus to mature and are circulated to lymphoid organs such as spleen and lymph nodes while B cells go to peripheral lymphoid organs directly after maturation in bone marrow. That is where the name B and T come from. NK cells are much scarcer, however, they have strong cytotoxicity and play important roles in innate immunity.

T cells secrete immune effective molecules (such as IFN-γ, IL-4, IL-10, IL-17, IL-21 and so on) or kill infected or transformed cell directly. CD3 is the most used cell surface marker of T cells. B cells are the source of antibodies. The activated B cells secreting antibodies, the so-called plasma cells, are the antibody factory of the body. The common surface marker of B cells is CD19. In flow cytometry, CD3 (human, Cat#E-AB-F1001; mouse, Cat#E-AB-F1013) and CD19 (human, Cat#E-AB-F1004; mouse, Cat#E-AB-F0986) are always used to identify T cell population and B cell population. The CD3+CD19-population is T cells while the CD3-CD19+population is B cells. In T cells, CD4 (human, Cat#E-AB-F1109; mouse, Cat#E-AB-F1097) and CD8 (human, Cat#E-AB-F1110; mouse, Cat#E-AB-F1104) are usually used to identify CD4+CD8-T helper cells (TH) and CD4-CD8+cytotoxic T cells (CTL). Specifically, THcells mainly secrete cytokines to regulate the activation of other leukocytes while CTL have the cytotoxicity.

NK cells are also called large granular lymphocytes due to that larger cell diameter and the massive granular vesicles in the cytoplasm inside which there are immune effective molecules of cytotoxicity, such as Granzyme B. NK cells, similar to CTL, mainly recognize and kill transformed or infected self-cells. In contrast to CTL, NK cells can recognize cells that lost MHC I. Surface markers of human and murine NK cells have much difference, so the antibodies used to identify human and murine NK cells are quite different. CD56 (Cat#E-AB-F1006) and CD16 (Cat#E-AB-F1005) are used to identify human blood NK cells. CD49b (Cat#E-AB-F0988) is the common surface marker of murine NK cells while specifically for C57BL/6, the most used mouse strain in immunological studies, NK1.1 (CD161c, Cat#E-AB-F0987) is a surface marker of high specificity. In combination with CD3 (Cat#E-AB-F1013), murine NK cells can be identified as CD3-NK1.1+or CD3-CD49b+.

2.     Myeloid cells

Myeloid cells of blood consist ofmonocytes/macrophages, dendritic cell and granulocytes. Monocytes are immature precursor cells. Once retained in tissue from blood, monocytes differentiate into macrophages or dendritic cells, both belonging to the so-called professional antigen-presenting cells (APC). Granulocytes consist of neutrophils, eosinophils and basophils. Neutrophils make up the majority of blood leukocytes while eosinophils and basophils account for less than 1% of leukocytes.

Blood monocytes is responsive to damage and inflammation in the body, usually reaching the lesion within 8~12 hours. In murine blood, monocytes can be identified with CD11b (Cat#E-AB-F1081) and CD115 (Cat#E-AB-F1107) as double positive while human blood, monocytes express high level of CD14 (Cat#E-AB-F1084) and low level of CD16 (Cat#E-AB-F1005). Human monocytes upregulation the expression of CD16 and downregulation CD14 when differentiated into macrophages. Murine macrophages express high level of F4/80 (Cat#E-AB-F0995) and can be identified as CD11b+F4/80+. Macrophages, as the name indicated, can clear infected, transformed, apoptotic and necrotic cells by phagocytosis. Known as the scavenger of the body, macrophages have such strong digestion ability that antigens are over-digested for peptide presenting, resulting into limited antigen-presenting ability. However, the other descendant of monocyte, dendritic cells, have modest digestion ability and high abundance of MHC II (human, HLA-DR, Cat#E-AB-F1111; mouse, H-2, Cat#E-AB-F0990) and co-stimulatory molecules. Dendritic cells are the most potent APC in body. They can digest antigens into peptides of appropriate lengths for MHC II. With the help of co-stimulatory molecules, dendritic cell can strongly activate T cells through peptide-MHC II complexes, inducing the proliferation and cytokine secretion of T cells. Besides high level of MHC II, CD11c (human, Cat#E-AB-F1009; mouse, Cat#E-AB-F0991) is another surface marker of high expression level on dendritic cells. In flow cytometry, dendritic cells can be identified as CD11chiMHC II+.

In granulocytes, the most studied population is neutrophil which involves into all kinds of infection and inflammation. Neutrophils, also called microphage, have a typical morphology different with other leukocytes. They have massive vesicles inside and multilobed nuclei. Therefore, neutrophils usually have much higher SSC signals than other cells. Inside the vesicles of neutrophils, multiple cytotoxic proteins, such as myeloperoxidase, lysozyme, defensin and bactericidal permeation enhancing protein, are stored for resisting the invasion of bacteria. In flow cytometry, human neutrophils can be identified as CD66+while murine neutrophils can be identified as Ly-6G+(Cat#E-AB-F1108).


The above is just a rough phenotyping of blood immune cells. In fact, with the deepening of understanding and the continuous improvement of detection technology, scientists have found that all the immune cells mentioned above can be further subdivided into more sub-populations based on function and surface markers. We will continue to publish a series of articles to discuss the characteristics and surface markers of different sub-populations of different immune cells, so stay tuned!

Single cell is a prerequisite for analysis and detection of cells with flow cytometry (FCM). Therefore, solid tissue must be prepared into single cell suspension. In FCM, the preparation of single cells is an important step. It requires that tissue should be dispersed into single cells, but also that the single cells should maintain their inherent biochemical components and biological characteristics.


The basic principles of flow cytometry sample preparation are as follows.

1). Make sure that the cell samples are fresh, and sample preparation and detection should be finished as soon as possible.

2). Appropriate washing, enzyme digestion or EDTA treatment should be applied for different cell samples to remove impurities and detach adhesive cells to form single cell suspension.

3). Enzyme digestion, mechanical dispersion and chemical dispersion can be applied to tumor tissue to obtain single cell suspension.

4). The paraffin embedded tissue should be cut into 40~50 μm thick slices first. After dewaxing to water, the single cell suspension can be prepared with the previous method.

5).The number of single cells in suspension should not be less than 107/mL.

The experimental operation of flow cytometry can be divided into five steps.

1). Sample acquirement. Select typical surgical or biopsy tissue. For example, for the surgical tumor the vigorously growing part should be the first option. The tissue and other specimens should be kept fresh after separation. Usually the samples should be treated within 1 h at room temperature or preserved in fixative or at low temperature in time.

2). Staining cells with fluorescence antibodies stain the cells.

3).Loading samples for detection and data acquirement with software program provided by the manufacturer.

4). Quantitative analysis of the data.

5). Evaluation of the biological and medical significance the results.

1.     Preparation of peripheral blood samples

1)      General preparation of peripheral blood samples

a. Collect peripheral blood with heparin anticoagulation. Samples should be stored at room temperature (25°C), and treated within 6 h.

b. ACK buffer should be restored to room temperature before use.

c. Add 200μLperipheral blood into the flow tube, then add 3 mL ACK buffer into the tube and incubate for 3~5 min at room temperature.

d. Add 10 mL cell staining buffer (or PBS with 0.1% BSA) to stop lysis.

e. Centrifuge at 300 g for 5 min at room temperature. Discard the supernatant.

f. Repeated the above washing step for another time.

g. Re-suspend the cells with cell staining buffer (or PBS with 0.1% BSA) and adjust the concentration to 1X10⁷/mL.

2)       Preparation of mononuclear cells with peripheral blood samples

a. Collect 2 mL peripheral blood with heparin anticoagulation and bring the volume to 4 mL with physiological saline.

b. Add 4 mL (or equal volume of the peripheral blood sample to be treated) lymphocyte separation solution to the 15 mL conical tube.

c. Add equal volume of peripheral blood along the wall of the tube slowly to make sure that the peripheral blood is above the liquid level of the lymphocyte separation solution. Do not add too fast to prevent the blood from mixing with the separating solution.

d. Centrifuge at 400 g for 20~30 min at room temperature (The centrifuge conditions are according to the blood samples, it is suggested to find out the best separation condition before the experiment). After centrifugation, the blood in the tube is clearly divided into 4 layers. The upper layer is the plasma, the second is the white Lymphocytes, the third layer is the transparent separating solution and the bottom is the red blood cells.

e. Collect the second layer (i.e. lymphocytes) carefully to another tube and wash the cells with cell staining buffer (or PBS with 0.1% BSA) for 2 times, by centrifugation at 300 g for 5 min at room temperature, discard the supernatant.

f. Re-suspend the cells with cell staining buffer (or PBS with 0.1% BSA) and adjust the concentration to 1X10⁷/mL.

2.      Preparation of marrow cells

1)       General preparation of marrow cells

a. Aseptic extraction of 0.5 mL bone marrow fluid with heparin anticoagulation.

b. ACK buffer should be restored to room temperature before use.

c. Add 3 mL ACK buffer into the bone marrow fluid and incubate 3~5 min at room temperature.

d. Add 10 mL cell staining buffer (or PBS with 0.1% BSA) to stop lysis.

e. Centrifuge at 300 g for 5 min at room temperature. Discard the supernatant.

f. Repeated the above washing step for another time.

g. Re-suspend the cells with cell staining buffer (or PBS with 0.1% BSA) and adjust the concentration to 1X10⁷/mL.

2)       Preparation of mononuclear cells with peripheral blood samples

a. Aseptic extraction of 0.5 mL bone marrow fluid with heparin anticoagulation.

b. Bring the volume to 10 mL with PBS.

c. Add 5 mL (or equal volume of the marrow fluid to be treated) lymphocyte separation solution to the 15 mL conical tube.

d. Add equal volume of peripheral blood along the wall of the tube slowly to make sure that the peripheral blood is above the liquid level of the lymphocyte separation solution. Do not add too fast to prevent the blood from mixing with the separating solution.

e. Centrifuge at 400 g for 20~30 min at room temperature (The centrifuge conditions are according to the blood samples, it is suggested to find out the best separation condition before the experiment). After centrifugation, the blood in the tube should be clearly divided into 4 layers. The upper layer is the plasma, the second is the white Lymphocytes, the third layer is the transparent separation solution and the bottom is the red blood cells.

f. Collect the second layer (i.e. lymphocytes) carefully to another tube and washing the cells with cell staining buffer (or PBS with 0.1% BSA) for 2 times, by centrifugation at 300 g for 5 min at room temperature, discard the supernatant.

g. Re-suspend the cells with cell staining buffer (or PBS with 0.1% BSA) and adjust the concentration to 1X10⁷/mL.

3.     Preparation of body fluid, lavage fluid or suspension-culture cells

a. Collect the body fluid, lavage fluid or suspension-culture cells in conical tubes.

b. Centrifuge the samples at 300 g for 5 min at room temperature. Discard the supernatant.

c. Wash the cells with cell staining buffer (or PBS with 0.1% BSA) for 2 times, each time by centrifugation at 300 g for 5 min at room temperature.

d. If there is obvious tissue lumps in suspension, remove the lumps with 200~300 mesh strainers, and wash the cells withcell staining buffer (or PBS with 0.1% BSA) for 1~2 times.

e. Re-suspend the cells with cell staining buffer (or PBS with 0.1% BSA) and adjust the concentration to 1X10⁷/mL.

4.     Preparation of adherent cells

a. Remove supernatant of the culture medium and rinse with PBS free of calcium and magnesium ions.

b. Take 25 mL medium as an example, add 1mL digestive solution (0.1% trypsin), digest the cells at room temperature (25°C) or 37°C for2~5 min. Or add 1mL EDTA(0.02%, pH7.4) todigest the cells on ice for 5~10 min.

c. Observe with inverted microscope, if the cytoplasm is retracted and the gap is increased. Removes the digestive solution immediately and add medium with serum to terminate digestion.

d. Absorb the fluid in the bottle with straw and blow the cell wall repeatedly. Please blow gently to avoid bubbles.

e. Transfer to centrifuge tube, centrifuge at 300 g for 5 min at room temperature.

f. Add cell staining buffer (or PBS with 0.1% BSA) to wash the cells 2 times, each time centrifuge at 300 g for 5 min at room temperature, discard supernatant.

g. Re-suspend the cells with cell staining buffer (or PBS with 0.1% BSA) and adjust the concentration to 1X10⁷/mL.

5.     Preparation of tissue sample

1)       Shredding and grinding method

a. Rinse the tissues with PBS or serum-free medium.

b. Place the tissue in a dish and cut it into small particles (1~2 mm3) with ophthalmic scissors.

c. Grind the tissue with syringe plunger to obtain single cell suspension.

d. Mix the cells with appropriate amount of PBS or serum-free medium.

e. Remove tissue lumps with 200~300 mesh strainer bycentrifugation at 300 g for 5 min at room temperature, discard the supernatant.

f. Wash the cells with cell staining buffer (or PBS with 0.1% BSA) for 2 times, each time by centrifugation at 300 g for 5 min at room temperature, discard the supernatant.

g. Re-suspend the cells with cell staining buffer (or PBS with 0.1% BSA) and adjust the concentration to 1X10⁷/mL.

2) Mesh screen rubbing

a. Fasten 300 mesh nylon screens on a small beaker.

b. Put the shredded tissue on top of the mesh screen, gently rub the tissue with tweezers and flush with PBS until the tissue is rubbed out.

c. Collect the cell suspension, centrifuge at 300 g for 5 min at room temperature, discard the supernatant.

d. Wash the cells with cell staining buffer (or PBS with 0.1% BSA) for 2 times, each time by centrifugation at 300 g for 5 min at room temperature, discard the supernatant.

e. Re-suspend the cells with cell staining buffer (or PBS with 0.1% BSA) and adjust the concentration to 1X10⁷/mL.

3) Grinding method

a. Cut the tissue into 1~2 mmlumps.

b. Put the tissue lumps into grinder, with 1~2 mL PBS added.

c. Grind the tissue until the suspension is homogeneous.

d. Add 10mL PBS to rinse the grinder.

e. Collect cell suspension, and remove tissue lumps by 200~300mesh cell strainer.Centrifuge at 300 g for 5 min at room temperature, discard the supernatant.

f. Wash the cells with cell staining buffer (or PBS with 0.1% BSA) for 2 times, each time by centrifugation at 300 g for 5 min at room temperature, discard the supernatant.

g. Re-suspend the cells with cell staining buffer (or PBS with 0.1% BSA) and adjust the concentration to 1X10⁷/mL.

Note:The above methods are mechanical and usually used to treat soft tissues, such as thymus or lymph nodes. For hard tissue or fibrous tissue, the method should be avoided for the cells might be damaged.

For the animal spleen, the red blood cells can be disrupted after grinding. After centrifugation at 300 g for 5 min at room temperature, re-suspend the cell pellet with 3 mL ACK buffer and incubate for 3~5 min at room temperature. Then add 10 mL cell staining buffer (or PBS with 0.1% BSA) to stop lysis. The remaining steps are the same as the grinding method.

4) Trypsin digestion

This method is suitable for tissue with little mesenchyme, such as epithelium, liver and kidney, ect. The calcium ion or serum will inhibit the trypsin digestion, so the buffer containing the ion or serum should be excluded during tissue digestion. The digestion time should be adjusted according to specific conditions. For low temperatures, large tissue messes and low trypsin concentration, the digestion time should be longer. Otherwise, the digestion time will be short. Trypsin is often mixed with EDTA (0.02%) at the rate of 1:1 to improve digestion efficiency. The stepwise protocol is as follows.

a. Rinse the tissue with PBS free of for calcium and magnesium ions.

b. Place the tissue in a dish and cut it into small lumps (1~2 mm3) with ophthalmic scissors.

c. Add trypsin (0.1% trypsin with 0.02% EDTA) to 30 times the volume of the tissue for digestion .

d. Transfer the tissue and digest to a triangular flask with pipette, digest for 20~60 min in 37°Cwater bath or incubator and shake the triangular flask every 5~10 min. If the digestion time is very long, 2/3 of the digestion supernatant can be transferred to a conical tube every 15 min. The cells in supernatants can be protected with ice bath. Or the digestion can be stopped by centrifugation to remove trypsin followed by adding the serum containing medium. New digests are added to the triangle flask to continue the digestion.

e. Filter the digest through 200~300 mesh cell strainer to remove lumps.Centrifuge the digest at 300 g for 5 min at room temperature, discard the supernatant.

f. Wash the cells with cell staining buffer (or PBS with 0.1% BSA) for 2 times, each time by centrifugation at 300 g for 5 min at room temperature, discard the supernatant.

g. Re-suspend the cells with cell staining buffer (or PBS with 0.1% BSA) and adjust the concentration to 1X10⁷/mL.

5)       Collagen enzyme digestion

This method is suitable for the separation of cells from fibrous tissue, epithelium and cancer tissue. Calcium and magnesium ions can’t inhibit the digestion, so the PBS or serum containing medium can be used to increase cell viability.

a. Rinse the tissue with PBS.

b. Place the tissue in a dish and cut it into small lumps (1~2 mm3) with ophthalmic scissors.

c. Add collagen enzyme containing medium(collagen enzyme at 0.1~0.3 μg/mL) to 30 times the volume of the tissue for digestion.

d. Transfer the tissue and digest to a triangular flask with pipette, digest 4~48 h in 37°Cwater bath or incubator and shake the triangular flask every 5~10 min. If the digestion time is very long, 2/3 of the digestion supernatant can be transferred to a conical tube every 15 min. The cells in supernatants can be protected with ice bath. Or the digestion can be stopped by centrifugation to remove trypsin followed by adding the serum containing medium. New digests are added to the triangle flask to continue the digestion.

e. Filter the digest through 200~300 mesh cell strainer to remove lumps.Centrifuge the digest at 300 g for 5 min at room temperature, discard the supernatant.

f. Wash the cells with cell staining buffer (or PBS with 0.1% BSA) for 2 times, each time by centrifugation at 300 g for 5 min at room temperature, discard the supernatant.

g. Re-suspend the cells with cell staining buffer (or PBS with 0.1% BSA) and adjust the concentration to 1X10⁷/mL.

Note:These are the most common sample preparation methods for the tissues. Mechanical methods may cause a certain degree of cell damage and low single cell production. While enzyme and chemical methods (enzyme mixed with EDTA) may have unpredictable effects on the chemical composition of the cells though they are better for dispersing and depolymerizing the solid tissue. Choose a suitable method for the single cell suspension preparation according to the experimental purposes.

6.     Preparation of paraffin-embedded tissue samples for flow cytometry

Most tissues obtained from surgery are paraffin-embedded. The preparation of single cell suspension from paraffin-embedded tissue expands the scope of application for flow cytometry.

a. Cut 3~5 tissue slices of 40~50 μm thick off from the paraffin-embedded tissue. Or use the mortar to grind the paraffin-embedded tissue to lumps of 0.5 mm in diameter. Put the slices or the lumps into a 10 mL tube.

b. Add 5~8 mL xylene to the tube, for dewaxing at room temperature for 1~2 days. Replace the xylene for 1~2 times until the paraffin wax is moved out completely. Discard the xylene.

c. Hydration: Replace the medium in order with 5 mL 100%, 95%, 70%, 50% ethanol gradient, 10 min each time.

d. Replace the ethanol with 3~5 mL distilled water 3~5 mL for 10 min, then discard the water.

e. Digestion: Add 2 mL 0.5% trypsin digestion trypsin (pH1.5~2.0) to digest the tissue for 30 min at 37°C. During this period, shake the tube every 10 min.

f. Add the serum containing medium to terminate digestion.

g. Remove the undigested lumps with 300 mesh strainer.Undigested tissue can be digested for the second time.

h. Centrifuge the digest at 300 g for 5 min at room temperature, discard the supernatant.

i. Wash the cells with cell staining buffer (or PBS with 0.1% BSA) for 2 times, each time by centrifugation at 300 g for 5 min at room temperature, discard the supernatant.

j. Re-suspend the cells with cell staining buffer (or PBS with 0.1% BSA) and adjust the concentration to 1X10⁷/mL.

Notice

a. Fresh tissue specimens should be treated and preserved in time to avoid the tissue necrosis or cell self-melting after placed at room temperature for long to time which will affect the results of FCM.

b. When enzymatic method is used, please pay attention to the conditions and influence factors. The influence of enzyme solvent, digestion time, pH value and concentration of the enzyme will affect the results.

c. Specific methods should be chosen for different tissues to get high quality mono-dispersed cells. For example, if the tissues are rich in cells such as lymphosarcoma, optic neuroblastoma, brain tumor, undifferentiated tumor, medullary tumor, and some soft tissue sarcoma, the simple mechanical methods will be a recommended choice to obtain massive high-quality mono-dispersed cells.

d. For enzymological methods, we should pay attention to the enzyme used. For example, tumors rich in connective tissues, such as esophageal, breast and skin cancers, collagen enzyme should be the best choice.
  1. Weak fluorescence signals or no fluorescence expression
Possible causes Suggestions
Improper storage or operation of antibody Store at 2~8℃ and protect from prolonged exposure to light, avoid freeze/thaw circles.
Fluorescence quenching Fluorescent antibody and sample added with fluorescent antibody should avoid to light.
High auto-fluorescence Change the fluorescent dyes to avoid dyes that emit light the same with cell auto-fluorescence.
Incorrect dyeing time or temperature Adjust the dyeing time and temperature properly.
Staining intracellular proteins with wrong way In order to get the best intracellular protein staining, the correct buffer system should be used for cell immobilization and membrane rupture to detect the proteins presented in cytoplasm or nuclear.
Secretory proteins In flow cytometry detect secretory proteins such as cytokines, chemokines and growth factors must be retained in cells.
Protein is down regulated, internalized, or shear cut from cells Make sure that the stimulating conditions adopted will not affect protein localization.
The target protein is low expressed in the sample For the antigen with low expression, the brightest fluorescent dye must be used in dyeing. Sometimes two step staining can improve sensitivity, for example, using biotin-Labeled antibody first, and then using fluorescence to combine with antibody.
Antigens damaged by  cell separation or frozen storage Enzyme used to collect cells from solid tissues or from cell dishes may destroy surface proteins, so try to prepare cells with none enzymatic reagents to make sure the reagents will not affect antigens.
Abnormal performance of laser Use flow cytometer to set up and track (CS&T) microspheres to check laser calibration and function.
Incorrect use of filter Check the excitation wavelengths and emission wavelengths of the fluorescent dyes to make sure that the correct laser and filter used to collect the data.
Overcompensation of data Using single staining control and Fluorescence Minus One (FMO) control to set compensation each time.
Incorrect cell gate Ensuring the correct setting of cell group, use reactive dyes and set up gate for single cell group can significantly reduce false positive.
Incorrect data analysis In order to show the rare cells or dyed gloomy cells excellently, dual parameters were used to observe the cells.
  1. High background of fluorescence
Possible causes Suggestions
High auto-fluorescence Samples with the same stimulus condition but without any staining are used as controls for auto-fluorescence.
Antibodies bind to dead cells Use active dyes to exclude dead cells.
Cy5 dyes Cy5 and other blue dyes will combine with some cell Fc receptors, such as mononuclear cells and macrophages, please use other fluorescent dyes.
High concentration of antibody Make sure the dosage of the antibody is suitable.
The dyeing time is too long According to the expression of the cell protein, optimizing the antibody concentration and incubation time.
Insufficient washing Increase washing times after dyeing.
Insufficient compensation regulation Using single staining control and Fluorescence Minus One (FMO) control to set compensation for the experiment.
  1. Fluorescence abnormality
Possible causes Suggestions
Incorrect isotype control concentration Use the same concentration of isotype control as detection antibody.
The isotype control and detect antibody from different manufacturers Use the isotype control and the detection antibody from the same manufacturer.
Cell adhesion or dead cells are included in the analysis Set up cell group gate and use active dyes to exclude adhesion and dead cells.
The immobilized and broken membrane fluid may affect the cell characteristics Adjust the FSC/SSC voltage to keep the cells in the visible range.
Stimulation conditions change cell characteristics Use identified cells to set up gate. Adjust the FSC/SSC voltage to keep the cells in the visible range.

SUPPORT

outstanding technical support

PRODUCT

we offer a full product guarantee

DELIVERY

we offer free delivery to UK universities and non profit organisations