Based in Cambridge, one of Europe’s largest bioscience hubs, Biorbyt has a simple yet challenging mission: to provide the best service to the global scientific community.

As a team of scientists with many years of bench experience, they know firsthand the issues you face every day. That’s why they have been working with some of the world’s finest researchers and academics to develop products of the highest quality and that is why they carefully manufacture and meticulously test a wide range of reagents to meet your needs, whatever they are.

Their dedication doesn’t stop there. They also collaborate, swap ideas and offer reagents that have been extensively tested in areas some of their competitors can’t offer. So whether you need antibodies or Elisa kits, biochemicals or a custom request, you can depend on Biorbyt to do things differently.


Product Categories

Tips & Tricks

Peptide solubility guidelines

Determining the best solvent for dissolving synthetic peptides can often be a challenge. While many peptides have good solubility in aqueous solutions, others encounter low solubility and insolubility. This is a particular challenge when peptides have long sequences of hydrophobic amino acids. The guide below provides some suggestions to assist in predicting peptide solubility.

  • It is best to aliquot and test a small quantity of peptide first to determine optimum conditions.
  • Ensure you understand the appropriate concentration at which the peptide should be dissolved. Please see this link to a great molarity calculator to help you determine the proper concentration.
  • Depending on peptide composition, there are different solvents that are needed to dissolve your lyophilized peptide. Please confirm solubility with 2-3 different sources (publications, suppliers). A detailed flowchart can be found here.
  • Some general guidelines include:
    a. Peptides shorter than five residues are usually soluble in water or aqueous buffer, except when the entire sequence consists of hydrophobic amino acids (e.g., W, L, I, F, M, V, Y).
    b. Hydrophilic peptides containing > 25% charged residues (e.g., D, K, R, H and E) and 25% hydrophobic amino acids are usually soluble in water or aqueous buffers.
    c. Peptides containing 50% and more hydrophobic residues might be insoluble or only partly soluble in aqueous solutions.
    d. Please consult literature pertaining to your specific protein as the above are only general guidelines.
  • Warming your solution (< 40°C) may aid in dissolving your peptide.
  • The table below may help in determining the characteristics of your particular peptide.
Peptide Solubility
Hydrophilic D,E,H,K,Q,R,S,T, hydroxy-proline, pyro-glutamic acid
Hydrophobic A,F,I,L,M,P,V,W,Y, alpha-amino butyric acid, beta-amino alanine, norleucine
Peptide Stability
Oxidation in mild conditions C,M
De-amidation, Dehydration, cyclization to pGlu N, Q, C-terminal residues, N-terminal Q
Degradation during preparation M,W
Peptide Charge
Positive K,R,H, N-terminus
Negative D,E,Y, C-terminus

ELISA (Enzyme Linked Immunosorbent Assay) kits identify and quantify specific protein sequences and other research targets within a sample. Good ELISA kits support and validate your research by producing accurate, quantitative results. Samples suitable for use with ELISA kits include: plasma, serum, saliva, cell lysates and cell culture supernatants. Choose the right type of kit for your research, usually: direct, indirect, sandwich or competitive ELISA. A good quality kit will be carefully designed to help you achieve the best results and will be able to withstand a reasonable amount of variance in technique. Our team is happy to advise you.

Your time is valuable, to get the best out of your ELISA kit, we help you avoid the pitfalls and provide helpful tips and tricks. Our informed insights are based on years of experience, understanding and listening.

Biorbyt continue to support the scientific community to achieve the best results possible. Our tips and tricks save time and effort and support you to produce reliable and accurate results enabling you to research and publish with confidence.

1) Kit Compatibility

Before choosing your kit, ensure it is compatible with your target and the nature of your sample. Ideally, the kit you select should have been characterized in the same matrix as the sample you are testing, i.e. plasma, serum, urine, tissue culture, saliva etc. Check the assay detection ranges and sensitivity of the kit are suitable and that it is able to detect the target in the species in which you’re working.

2) Have a Complete Understanding of the Assay Before You Begin Testing

Each kit is created for detection of specific targets and with specific capabilities, it is not ‘one size fits all’. Knowing the sensitivity and specificity of your ELISA kit, and how to augment each step with precision, will generate an accurate and reliable standard curve displaying quantification of your target. Each kit will contain target specific reagents and buffers. You need to know and understand each set of parameters at the start, e.g. type of antibody, incubation times, temperatures and reporter system. Familiarizing yourself with this in advance will save a lot of time and frustration.

3) Sample Preparation

Before performing your main experiments, establish the correct dilution range by using a small sample. Your samples must be compatible with the microtiter plate assay format. The amount of biological marker being tested will vary. Use the guidelines within the kit as a reference point, you are aiming for data that fits within your sample standard curve. Be aware, samples which contain interference factors such as Bilirubin will produce inaccurate results.

4) Antibodies

If you are developing your own ELISA test, your choice of antibody will depend on your requirements for specificity and affinity. Monoclonal antibodies, by definition are likely to give more specific binding leading to decreased background signal. Monoclonals can be used on their own or in combination with polyclonals. Polyclonals will generate a higher signal but there will be a higher level of non-specific binding. You will need to carry out thorough testing each time as polyclonals will show more batch-to-batch variation. ‘Matched pairs’ refers to a combination of monoclonal, polyclonal or both which are used within an assay for the detection of a single antigen and have been validated to work together, binding to different epitopes and working as a good ‘capture’ and ‘detection’ pair.

5) Maximize Your Samples

To get the most out of your kit, Biorbyt would advise that you carry out a couple of test assays using control samples at a range of dilutions to obtain standard curves. Conserve your most valuable samples until you have a clear idea of the right dilutions to use. Once you know the samples and dilutions to use you can plan the best layout of your plate. Use all wells, following the kit’s guidelines. Add more detection reagent if necessary according to the information provided.

6) Reproducibility

Ultimately, you are aiming for accuracy and reproducibility to create usable and valuable data. To achieve consistency, optimized performance and accurate results, be fully cognizant of the protocol throughout. Remain consistent and be systematic in your approach.

  • Before running the assay, allow about 30 minutes for the kit reagents to reach room temperature or the temperature stated in the information provided. Frozen samples should also be allowed to thaw completely before being used and repeated freeze-thaw cycles should be minimized to less than three times.
  • Keep environmental conditions, e.g. temperature and humidity constant throughout the assay and between assays.
  • Ensure all equipment is calibrated including pipettes, plate washers and readers.
  • Use sufficient quantities of antibody.
  • Substrate solutions should be freshly prepared, not stored for hours ahead of use.
  • Handle samples consistently throughout testing and follow the same procedures each time.
  • Throughout the process, visually inspect the tips and wells to check aspiration, addition of reagents and withdrawal. Levels should be equal.
  • Don’t be tempted to mix lots between kits to get more out of your reagent. ELISA kits are each prepared so that the contents work together. Mixing lots between assays could adversely affect performance.
  • Once a reagent has left the bottle, it should not be returned.
  • Don’t allow the wells to dry out once testing has begun, keep the tray sealed to prevent drying.

7) Washing

Careful washing is necessary to reduce background signal caused by unbound, conjugated antibody. It will therefore increase the assay’s signal-to-noise ratio. Washing at each step will help to maintain purely the specific binding events. Ensure wash volume is high enough to remove all traces of antigen or antibody from the wells and hence, reduce unwanted background signal. Maintain the recommended distance between the bottom of the well and the wash tips to reduce residual antibody/antigen containing fluid being created that will affect your signal. Floating heads are more flexible and easier to obtain a complete wash. Repeat wash cycles enough to ensure unwanted antigen and antibody are removed but the bound antibody remains in place. Follow the guidelines but Biorbyt recommends three washes after each incubation. This will need to be altered depending on whether your plate is manufacturer coated or if you have coated it. You may need to increase the number of wash cycles if you have coated your own plate.

8) Buffers

Use the buffers and diluents provided within the kit or those that are specified in the protocol. Buffers can be single or multi-function. They are used throughout the assay for coating, blocking, washing and for dilution. Coating is the process of adding a buffer to stabilize the antigen or antibody then incubating overnight to cause adsorption of the diluted antigen or antibody to the surface of the well. Biorbyt also provide multi-purpose, universal ELISA buffers that could potentially save time and energy, speeding the process up without compromising function.

9) Blocking

There are many blocking buffers available, some offering additional benefits such as increased stability, enhanced blocking, reduced cross-reactivity and reduced non-specific binding. A blocking buffer containing an unrelated protein can be used to prevent non-specific binding of the detection antibodies to the plate. Blocking buffers usually contain BSA or milk proteins dissolved in PBS. Biorbyt’s range of Blocking buffers will include the perfect solutions for your assay.

10) Cross Contamination

Forgive us for stating the obvious, but working in a clean and organised manner is the first step. Before beginning the assay, establish the amount of reagents you will need to use. Prepare the right amount of reagent and discard any excess. Avoid cross contamination of samples or reagents by changing pipette tips between each sample, standard or reagent addition. Be extra careful during liquid removal and washing. For each transfer, use new, disposable reagent reservoirs.

13) Color Development

After your careful preparation, optimize color development to display your results in the clearest way possible. Follow the guidelines within the kit for incubation times. Substrates used in ELISA kits for color detection are usually photometric. If you are using a colorimetric assay, all color development must take place in total darkness. If your protein is not being detected you could try increasing its concentration by diluting it less. If you detect a high background signal there are a number of things to investigate: contamination, ineffective washing, timings not adhered to, too much detection reagent, antibody concentration needs changing, wrong blocking buffer used, non-specific antibody binding or failure to follow any stage of the manufacturer’s guidelines.

14) Data Analysis

To maximise the potential of the data you have obtained, it’s worth the time and effort to get this stage right. Your assay instructions will suggest software for data analysis. Follow the suggested guidelines for best wavelength to read the plate. It is possible to apply factors to your calculations to correct for background, this should be included in the guide. The manual will also outline how to plot the data and generate a standard curve. Use a template spreadsheet to generate your curve automatically.

11) Accuracy

Accuracy throughout the procedure will increase confidence in your data. You are aiming to generate more than one standard curve with a high degree of accuracy. You will need to test your samples in duplicate at minimum, and preferably in triplicate. You need the smallest possible coefficient of variability (%CV) between each replicate. Outliers will be more obvious so can be investigated before being included in calculations and affecting your results. One possible cause of outliers is ‘Edge Effect’ caused by issues with production of multiwell plates or with assay processes that affect the outer wells. Things that will affect your CV include: incorrect storage and/or preparation of samples, bubbles in wells, incomplete plate washing, poor mixing of reagent, temperatures not controlled and poor pipetting technique. Samples with optical densities (OD) above or below the linear range of the standard curve will result in target concentrations being underestimated or overestimated, respectively.

12) Obtaining Reliable Standard Curves

It is crucial to follow the manufacturer’s recommendations for storage, handling and pipetting. Always use the recommended diluents, reagents and detergents, and keep to the correct conditions of pH, temperature and strengths for your kit. Check vials don’t contain any undissolved residue after spinning. Assays will not be identical, but there is a range of variation that is acceptable. A standard curve should be produced for each set of samples assayed. Generate each standard curve within the manufacturer’s recommended dilution range and ensure that you have sufficient data points. There are no benefits to trying to extend the curve, the antibodies used for binding will only produce data within a set range. If you notice the ‘Hook Effect’ in your results the probable cause is not enough analyte to bind with the quantity of antigen in your sample. This issue is also resolved by testing first at a range of dilutions. If you are finding sensitivity is low, it is worth checking:

  • That the kit was stored correctly
  • Your detection reagent is fully functioning
  • Your sample type and buffers are compatible
  • You had an adequate concentration/amount of target protein and of substrate
  • The adsorbance wavelength settings of your plate reader are correct
  • Incubation times are long enough
  • Your ELISA kit had the right level of sensitivity for your assay.

9 Tips to Successful Immunohistochemistry

Immunohistochemistry (IHC) is an invaluable tool for researchers in clinical settings and laboratories. A combination of IHC techniques results in clear imaging of specific tissue components. Labeled antibodies are used to bind to specific target antigens in situ and combined with optimized staining, cells and components are visualised with clarity. IHC can provide accurate data revealing distribution, quantity and intensity of expression to enhance and validate your research. Your protocol design will affect your results, the choices within the protocol will impact the quality of the results you achieve. Use Biorbyt’s experience, along with our vast range of high quality products, to support your research at every stage.

Applications of Immunohistochemistry

IHC is used by researchers globally to diagnose disease, in drug development and in a wide range of biological research. Identification of cells, components, their origins and pathology can be visualised in glorious colour using IHC in isolation or combined with other techniques. Cellular activity in response to specific chemicals can be observed and quantified to understand efficacy during drug development. Modern IHC techniques allow high-throughput, multiparametric, accurate data analysis at all levels of research.

The basic steps of immunohistochemistry are:

  • Obtain your tissue sample treated by formalin-fixing and embedding in paraffin or flash-freezing.
  • Incubate with an antibody specific to the protein you are studying.
  • Use a chromogenic substrate or fluorescent dye to detect signal viewed using light or fluorescence microscopy.

This sounds straightforward but there are many pitfalls to avoid. Optimizing your IHC protocol will save valuable time and money and produce reliable results. Biorbyt have a wealth of knowledge and experience alongside the perfect solutions to guide your protocol. We are constantly developing our product range to keep you at the forefront of research and our experts are here to support you. Access our in-depth protocol guide sheet. Our protocol optimization advice service can help you tailor your protocol to your specific research and we can recommend positive controls for a more robust research outcome.

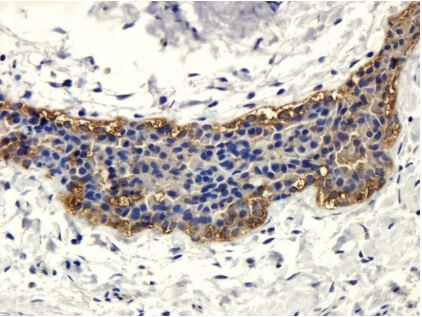
Immunohistochemical staining of human mammary fibroma tissue using anti-CD206 (dilution of primary antibody – 1:100)

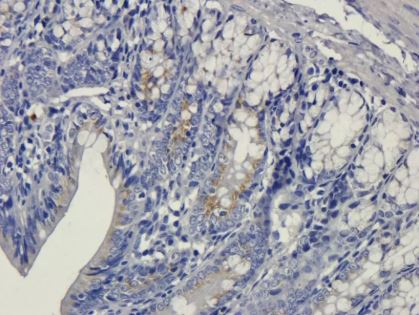
IHC-P image of rat colon tissue using anti-VEGFA (5 ug/ml)

IHC Protocol Tips

  1. Choose the right antibody and Test it
    Review the validated applications listed for the antibodies you are considering, our datasheets will help you. Optimally, your selection should be an antibody that is validated in IHC. Choosing antibodies without IHC validation will introduce an element of risk. To help inform your choices, when selecting antibodies from Biorbyt we make it clear whether the product has been validated in paraffin (IHC-P) or in frozen section (IHP-Fr) and whether it is validated in Western Blot (WB). Biorbyt’s team can recommend which species have been tested and advise you whether a particular antibody might work in a different species based on sequence identity to the immunogen. If required, we will run the blast and make a recommendation. Once selected, you will need to test the antibody at different concentrations to establish the correct antibody concentration for your experiment. Because diluent choice will affect antibody performance, Biorbyt’s diluents are specifically matched to given antibodies to make things easier.
  2. Preparation of Tissue
    Either by freezing or fixing in formalin and embedding in paraffin. Your choice is important as both IHC-P and IHP-Fr methods will affect your tissue, there are pros and cons to each method. Freezing tissue will result in morphological changes while embedding in paraffin will cause some shrinkage, creating a falsely high density of antigens. If your tissue section was frozen, we would recommend utilising cryostat for smooth sectioning. If embedded in paraffin, a microtome would be the method of choice, your section needs to be as uniform as possible.
  3. Control
    The validity and importance of these cannot be emphasised enough. Carrying out controls will lead to a more robust research outcome and make it easy to troubleshoot when unexpected results arise. At every opportunity within your experiment, controls will improve confidence in your data and enable you to see results of interest more clearly. You, and your audience will have more confidence in your results if controls were used well throughout experimentation. Biorbyt are happy to recommend positive controls to include in your protocol.
  4. Tissue Fixation
    The solution and methods you choose will affect the quality of staining achieved. The methodology you choose will be dictated by the tissue type, its age as well as the target antigen. Research which methods will suit your sample, factors to consider include: the type and concentration of fixative used, length of time of fixation, pH as well as which additives are used if any. Again, Biorbyt can provide advice.
  5. Antigen Retrieval
    Important to get this right to achieve a good quality staining. Your tissue will need to be treated either with heat or using enzymes to allow your antibody to access your antigen. The use of heat could create artificial changes to your tissue so an appropriate control procedure should be set up alongside. The process of fixation can mask the antigen making binding impossible. In most cases, heating the tissue in an acidic buffer solution is less likely to affect the integrity of the antigen of interest. Biorbyt can guide you, we have the benefit of experience and feedback from our research community about what works best. Ultimately, a good antigen retrieval results in the best staining. Repetition of this stage should also include using an alkaline antigen retrieval buffer.
  6. Blocking
    This is the process of blocking unwanted components that your tissue might express such as biotin, alkaline phosphatase and peroxidase which can affect your results. Biotin detection systems could detect endogenous biotin and to avoid this you will need to implement a biotin blocking system. Similarly, if using horseradish peroxidase (HRP) or alkaline phosphatase conjugated secondary antibodies, peroxidases and alkaline phosphatase may be expressed leading to misleading results. To avoid this you should use an IHC tissue primer, Biorbyt can advise you of the best choice to suit your protocol.
  7. Non-specific Binding
    Fc receptors, among others, can cause non-specific binding by your antibody. Blocking of these receptors can be done before incubation with the primary antibody. It is important to use a serum from the same species as that used to raise your secondary antibody. Another option is to use an IHC background blocker which will decrease the background signal. This can also be achieved by increasing the blocking time.
  8. Detection System Choice
    There are a range of systems available to detect the location and abundance of your protein using a fluorescent dye or chromogenic substrate. For IHC the most frequently used systems are streptavidin-biotin and avidin-biotin. The methodology you have used throughout will influence the effectiveness of your detection system. Perfect methodology could be wasted by the use of a detection system that will not display the results to their full potential. Your choice will depend on your target and its level of expression. Direct detection methods utilise labeled primary antibodies. With indirect detection the primary antibody is unlabeled and a labeled secondary antibody is used that has been raised against the host species of the primary antibody. This indirect method is more commonly used in IHC. Conjugated secondary antibodies can amplify signals so are the preferred option if proteins are of low abundance. If you do have high levels of protein expression, conjugated primaries are a better choice. Your choice of method will depend on your methodology, Biorbyt can provide guidance according to your individual protocol.
  9. Staining
    To achieve an intensity and accuracy of staining, your choice of chromagen needs to be perfect for the tissue section, the target, any other stains being used and the mounting media. As well as staining, counterstaining will increase contrast and perspective. Our wide range of chromogens is designed to provide solutions for every set-up. We know what works best and will be able to recommend the optimum solutions to maximize the hard work you have already put in.

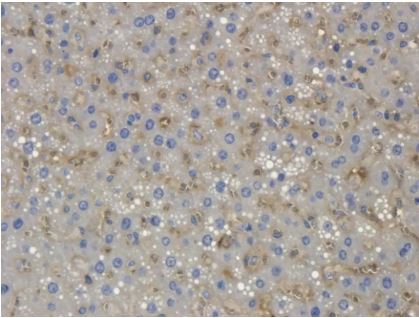
Immunohistochemical staining of rat liver tissue using Collagen X antibody (2.5 ug/ml)

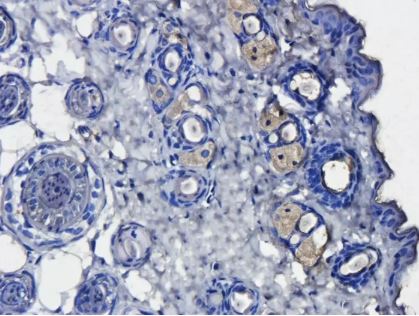
Immunohistochemical staining of paraffin embedded mouse skin tissue using CD163 antibody (primary antibody at 1:200)

What is Western Blot?

If you need to identify specific amino-acid sequences from a sample, Western Blotting is the technique you should choose. Target proteins are marked using carefully selected primary and secondary antibodies that enable you to visualize the specific protein you are interested in. Western Blotting, like any other laboratory technique, needs to be carried out with precision and understanding at each stage to achieve the best results. With years of experience behind us, we have learned what works best. Biorbyt aim to provide guidance to save you time and frustration and make the process easier and more accurate optimizing your results.

With Western blot, you are aiming for the clearest results via an increased signal-to-noise ratio; displaying clearly the specific bands and minimizing the presence of non-specific bands. There are many steps that can be taken to achieve that goal.

Western blotting protocol in a nutshell:

  • Extraction of protein using cell lysis
  • Separation of molecules according to size/weight using electrophoresis
  • Transfer molecules to solid membrane
  • Incubation with primary and secondary antibodies to visualise target protein by marking
  • Washing off unbound antibodies
  • Detection of protein of interest

WB analysis of rat heart (lane 1), mouse stomach (lane 2), rat liver (lane 3), rat spleen (lane 4), rat lung (lane 5), human breast cancer (lane 6) using Mlkl antibody (1 ug/ml)

Antibody Selection

  1. Select Western blot validated primary antibody specific to your protein of interest.
  2. Choose the correct secondary antibody for detection.
  3. Biorbyt are happy to advise you on antibody selection and our secondary antibody selection tool is here to help you.
  4. Establish the optimum antibody concentration. Concentration of antibody to antigen, pH and temperature are some of the factors that affect the rate of binding. You can experiment with a range of antibody concentrations by varying antibody dilution. Biorbyt recommends that antibody titration is carried out each time your conditions are changed. Our data sheets provide a dilution factor range as a guide and we recommend you start with a concentration close to the middle of the range, titrating up or down as required.
  5. In some cases, titration of secondary antibodies is also indicated. Examples are HRP-labeled secondaries used for chemiluminescent detection. Variations in concentration will produce variations in result, it is worth the effort before-hand to obtain clear and accurate results.

Protein Extraction Tips

1. During extraction of protein from tissue or cells keep tissue culture dish cooled to a temperature of -4°C

2. After centrifuging the mixture you will need to add lysis buffer and protease inhibitor cocktail. You may need to repeat this process with differing concentrations of protease inhibitor cocktail to obtain a high enough protein concentration

Sample Preparation

1. Use a Bradford, Lowry or BCS assay to establish protein concentration then ensure you load a uniform amount of protein

2. Each well should contain approximately 20 – 40 ug of protein extract.

3. Add the same volume of sample buffer to each empty well

4. Ensure the volume in each lane is equalized to a total volume of µL

WB analysis of rat lymph node (lane 1), rat spleen (lane 2), rat lung (lane 3), mouse brain (lane 4), human breast cancer (lane 5), human ovarian cancer (lane 6) using CD19 antibody (1 ug/ml)

Preparation of Gel

1. The quality of your gel must be good to get a good transfer to membrane

2. To obtain a uniform gel see our protocol guide for recommended acrylamide percentage

3. For gel solidification, prepare the rack for the 10% stacking gel solution. Biorbyt recommends that you add the gel slowly using a pipette

4. 10% AP or TEMED will cause solidification, therefore only add these reagents at the end of gel preparation

5. Remove excess water with an absorbent towel using capillary action

6. Keep some gel in a test-tube to check its state of solidification


Electrophoresis

1. Once your running buffer is in the electrophorator and is covering the gel, connect the power supply, connectors: red to red and black to black

2. Samples and markers are added to the gel after careful removal of the combs

3. Ensure you check that you select the correct voltage on the power pack for the gel you are using


Electrotransfer

1. The most commonly used membranes are PVDF (polyvinylidene fluoride) and nitrocellulose, both have a range of different versions and your choice will affect your results. Nitrocellulose membranes also have a range of pore sizes on offer, which you can select according to the sizes or protein you’re needing to separate.

2. Biorbyt can guide you to the perfect choice to fit your protocol. It is worth some experimentation with membrane types to identify the membrane that will provide you with the optimal results.

3. PVDF is a better choice if you plan to strip and re-probe your blot. It is resilient and stable and better for protein retention. Nitrocellulose can be blocked easily and will provide a good signal-to-noise ratio.

4. When adding the methanol soaked PDVF membrane to the gel, ensure no excess liquid and that there are no air bubbles

5. Maintain a 4°C temperature by keeping the transfer apparatus on ice

6. The membrane should be in between the gel and the positive electrode

7. Ensure you use the optimal running time for the thickness of your gel

Western blot analysis of rat brain (lane 1), mouse stomach (lane 2), rat kidney (lane 3), mouse lung (lane 4)using Filaggrin antibody (1 ug/ml)

Blocking

1. There are a wide range of blocking buffers available, each of which works differently in different conditions. There will be one that is the best choice for your antibody-antigen.

2. Your blocking buffer will contain endogenous biotin, glycoproteins and enzymes if it is milk-based. These chemicals will affect your signal.

3. Membrane blocking should be carried out for one hour

4. Biorbyt’s blockers are optimised for specific conditions, we are happy to advise you.


Antibody Incubation

1. We would recommend adding your primary antibody in 5% bovine serum albumin then incubating on a shaker for 12 hours at 4°C


Secondary Antibody

1. See protocol for guidance. After adding secondary antibody, incubate for one hour.

2. Follow this step by repeating the washing procedure then use a pipette to completely the memberane with ECL mix. Incubate for one to two minutes

Western blot analysis of rat heart (lane 1), mouse skeletal muscle (lane 2), rat testis (lane 3), mouse colon (lane 4), rat thymus (lane 5), mouse liver (lane 6) tissue using anti-PGC1 alpha antibody (0.5 ug/ml)

Washing

1. Continue working on a shaker for this stage to continue agitation. Wash at least three times with TBST for five minutes each time.

2. More washing adjustment options: Altering the washing time or volume of liquid, changing detergent strength.

3. A slight increase of Tween-20 concentration is a good way to fix a high background signal


Visualisation

1. We advise you run a few tests using different exposure times to obtain the clearest results possible. A long exposure time may result in the background appearing too strong.

2. Like with all other stages of Western Blotting, there are many choices available, enabling you to fine-tune your experimental design for increased accuracy and clarity of results. Biorbyt supply a wide range of chemiluminescent reagents and alternatives to allow you to find the perfect option. Consider if you need longer-lasting signal for greater reproducibility, we can provide a more sensitive reagent.

3. We would recommend choosing a film that is designed for chemiluminescent detection. Exposure times can also be changed, we recommend including a range of exposure times within your protocol.


Exosome Research

What are exosomes? Extracellular vesicles (EVs) 30 – 200 nm in size were once thought to be natural cellular debris; Read More...

Monoclonal Antibodies

At Stratech, we specialise in providing a comprehensive range of monoclonal antibodies (mAbs) for scientific research. We partner with state-of-the-art Read More...

Autophagy

What is Autophagy? Autophagy (namely self-eating) is a highly conserved process for disassembling intracellular excess and dysfunctional components such as Read More...

Apoptosis

What is Apoptosis Apoptosis is a form of programmed cell death that occurs in multicellular organisms and has multiple functions Read More...

WNT Pathways

What is the Wnt Pathway? The Wnt pathway is a highly conserved signally pathway regulated by a series of Wnt Read More...

BIORBYT COVID-19

Research Solutions for Coronavirus – Biorbyt

Contact usPlace an Order Coronavirus In our societies where global travel has become the norm, the large scale transmission of Read More...