LSBio ELISA Development Kit Guide

Introduction to ELISA

ELISA (enzyme-linked immunosorbent assay) is a type of immunoassay used for the detection and quantification of analytes within a sample. Analytes can include anything that an antibody can detect, such as peptides, proteins, antibodies, or small molecules, while samples can including plasma, serum, saliva, urine, tissue culture media, cells lysates, tissue extracts and more, making ELISA a useful tool to measure changes in biological processes in vivo or in vitro.

Although there are many ways in which to build an ELISA, the general principle is to use the binding specificity of antibodies to capture the analyte, then wash away non-specific components. Detect the captured analyte by using a signaling system that enables measurement.

A typical ELISA is performed in 96-well polystyrene plates, allowing for the high-throughput analysis of experimental samples. The inclusion of analyte control samples, often in serial-dilution, allow for the either qualitative or quantitative detection of results.

In the following guide, we will step through the various types of ELISA; detailing how they are constructed and what you need to know in order to build specific, sensitive ELISAs to fit your particular needs.

LS Bio Devkit ELISA Development and Accessories

LSBio offers tens of thousands of ready-to-use ELISA kits, but there are advantages to being able to develop your own ELISA. Off-the-shelf kits may not be available to your particular analyte of interest, or you may require specificity for a different species. You may need to optimization conditions in order to run a particular type of sample, or have greater signal amplification for detecting low abundance analytes. Perhaps you need to have greater control over assay availability and reproducibility, or need to reduce the cost per assay for a long-term project. Look to LSBio’s DevKit product line to provide you with all the resources you need to build your ELISA today.

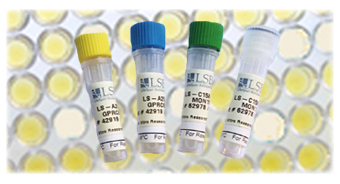
DevKit Duo Kits include the most critical components of the ELISA, the capture and detection antibody pair (biotinylated or non-biotinylated). Each antibody pair has been selected for specificity to their target, validated for use in ELISA, and provide researchers with the foundation upon which to build their own customized ELISA. Researchers can couple these antibodies with standards, conjugates, and substrates of their own choosing in order to optimize their assay for specific applications.

DevKit DuoPlus kits include the capture antibody, detection antibody (biotinylated or non-biotinylated), as well as the standard (typically a full-length recombinant protein) used to validate the antibodies. These development kits provide the foundational elements of an ELISA and save the hassle of having to source and validate a standard, but allow the research the freedom to select a signaling system particular to their specific needs.

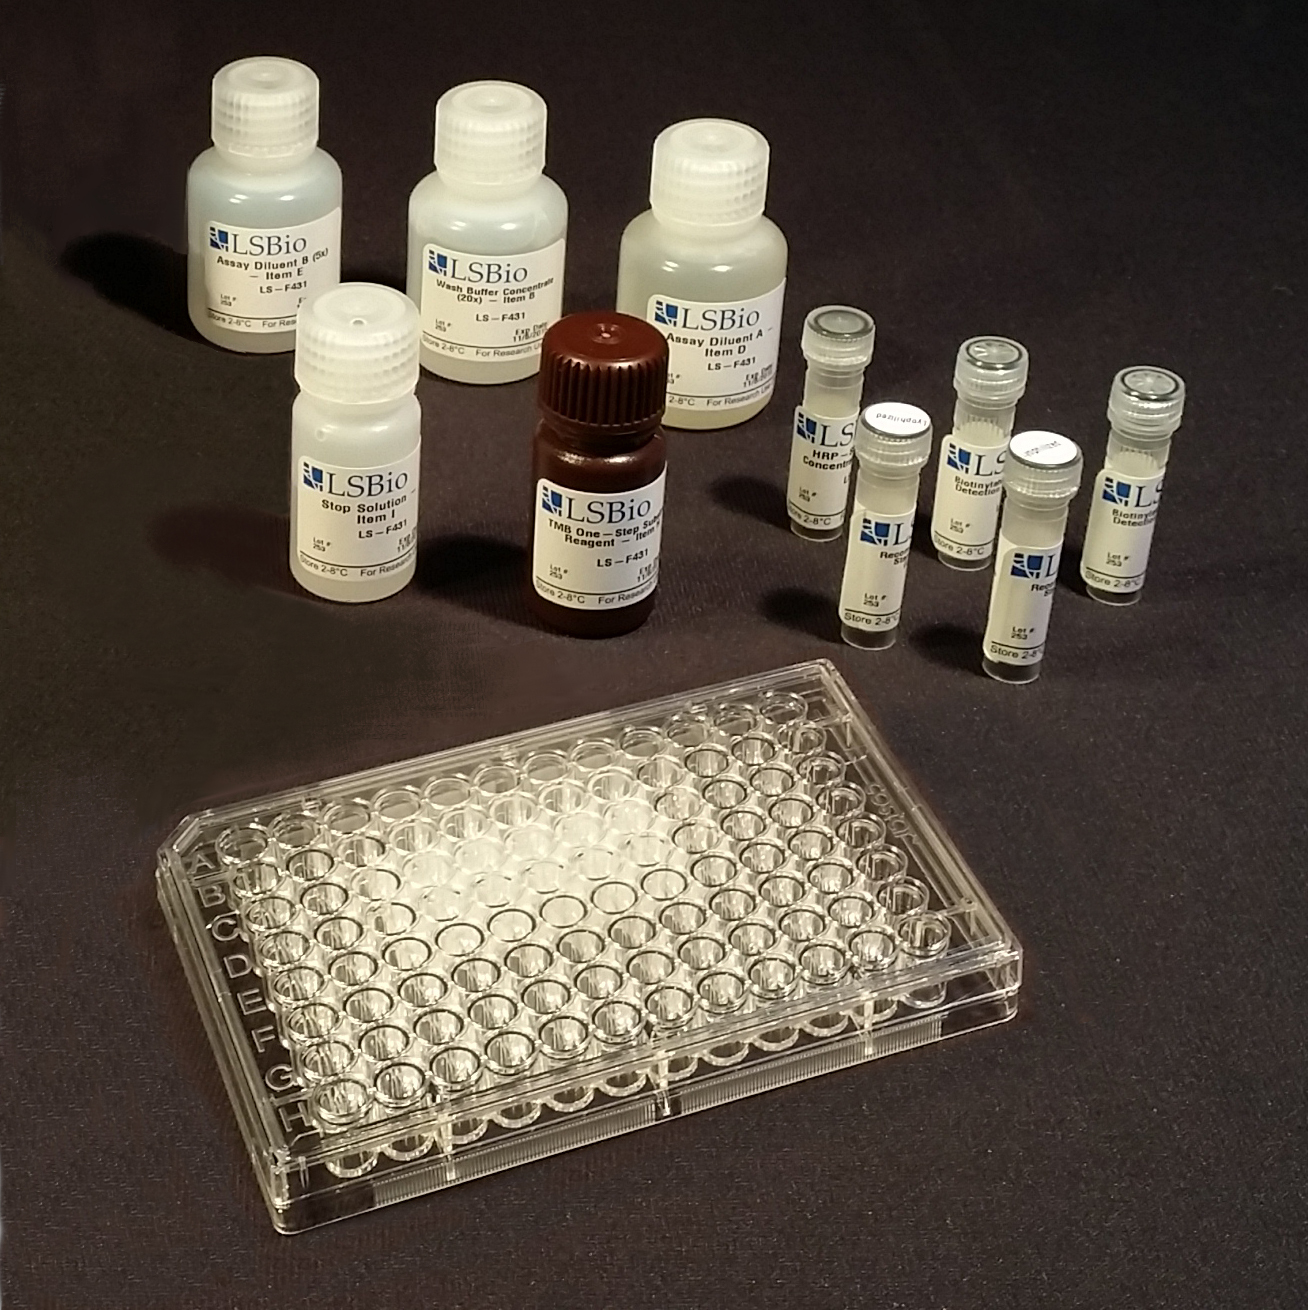
DevKit Core kits contain all four key components required to construct reliable Sandwich ELISA’s for the quantitative measurement of target antigen. Each kit contains the capture antibody, a biotinylated detection antibody, an antigen standard, and Avidin-HRP or Streptavidin-HRP conjugate for use with ABTS or TMB substrates respectively. Each kit contains enough material to assay 2 or 5 standard 96-well ELISA plates.

LSBio offers all the reagents and accessories you’ll need in order to build a better ELISA assay. Our catalog of coating buffers, blocking buffers, wash buffers, substrates, diluents, and much more allow the most flexibility for your research needs. Our reagents are specifically formulated to help you achieve the best signal while decreasing background noise. Explore the reagents and accessories we have that will help build your ELISA assay every step of the way.

Types of ELISA

The first step in an ELISA is to immobilize the analyte in a sample to the microtiter plate well surface. This can be done either by direct absorption or indirectly by coating the plate surface with an analyte-specific capture antibody. After a series of blocking and washing steps, the analyte is then detected using a detection antibody. The detection antibody is either directly conjugated with an enzyme (direct detection), or detected itself by an enzyme-labeled secondary antibody or enzyme-labeled Avidin-Biotin Conjugate (indirect detection). Alkaline phosphatase (AP) or horseradish peroxidase (HRP) are commonly used enzymes because they react with a large number of substrates. The choice of substrate depends upon the desired assay sensitivity and signal detection method (colorimetric, fluorometric, or luminous).

There are four primary types of ELISA, indirectdirectsandwich and competition, each having its own advantages and disadvantages.

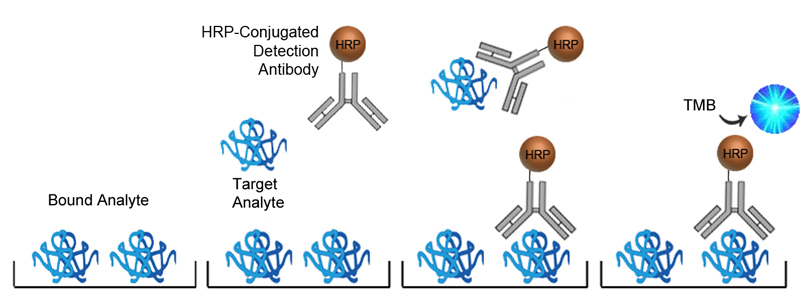
Direct ELISA is the fastest and simplest of the ELISA assay principles. The sample containing the analyte is immobilized directly to the surface of the assay plate and an enzyme-conjugated detection antibody – specific to the analyte -binds to the analyte. A substrate is then added which produces signal that is directly proportional to the amount of bound antibody present which directly correlates with the quantity of analyte present. Direct ELISA are often used for testing antibody affinity and specificity.

Figure 1: Typical Direct ELISA configuration.

The advantages of Direct ELISA are its ease of use and speed. Its disadvantages include a higher potential background due to the non-specific capture of the analyte to the plate and the diversity of proteins bound to the plate Also, sensitivity may be limited due to the use of a single antibody rather than paired antibodies, or other amplification systems. Direct ELISAs are less amenable to High-throughput (HTS) screening owing to the fact that each antibody needs to be conjugated individually.

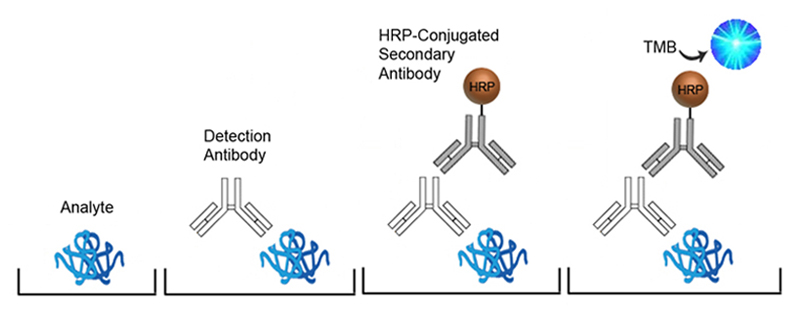
Similar to the Direct ELISA, Indirect ELISAs start by immobilizing the analyte containing sample directly to the surface of the assay plate, however, the detection antibody used to bind the analyte is unconjugated. An enzyme-conjugated secondary antibody is then bound to the detection antibody, followed by a substrate to produce signal. Indirect ELISAs are often used for the detection of endogenous antibodies.

Figure 2: Typical Indirect ELISA configuration.

The advantages of Indirect ELISAs are increased sensitivity and flexibility. Because more than one secondary antibody can bind to the detection antibody, the signal is amplified to a degree. The secondary antibody used typically targets the species-specific region of the detection antibody, therefore multiple primary antibodies can be used with a single labeled secondary antibody. The use of a secondary antibody does however introduce the possibility of non-specific antibody binding, and the added step makes the assay longer that direct ELISAs.

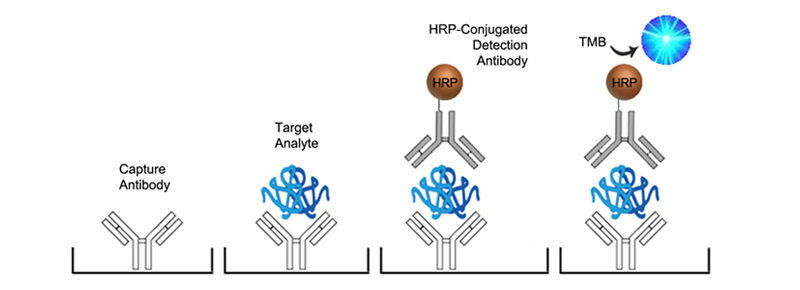
The Sandwich ELISA is the most common and specific type of ELISA. Each assay uses a pair of matched antibodies, for capture and detection, each targeting non-overlapping epitopes of the analyte. The capture antibody is used to coat the assay plate well. Analyte from the sample binds to the capture antibody immobilizing it to the plate. An enzyme-conjugated detection antibody is then added, binding to a different epitope of the analyte. Finally, a substrate is added to produce measurable signal.

Figure 3: Typical Sandwich ELISA configuration.

The greatest advantage of the Sandwich ELISA is the specificity gained from the use of two specific antibodies. It is suitable for use with complex samples such that the antigen does not require purification prior to measurement, and additional amplification can also be gained by using indirect detection methods (described below). These assays are however more difficult to develop due to the need for two analyte-specific antibodies that do not recognize the same epitope, and they typically have longer protocol times.


All LSBio DevKits are designed based on the Sandwich ELISA assay principle because it offer researchers the greatest degree of specificity and is amenable to bot direct and indirect detection

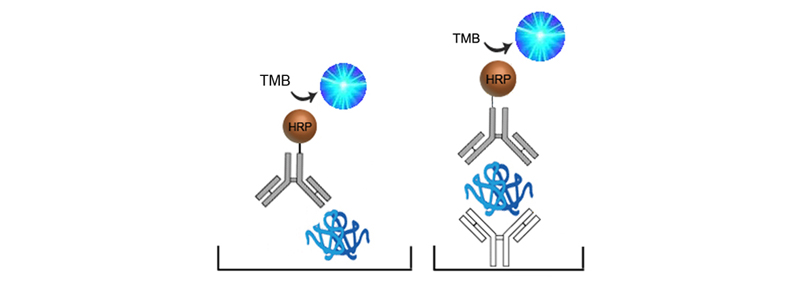
Competitive ELISAs, also known as inhibition or blocking ELISAs, are often used in place of Sandwich ELISAs when only one analyte-specific antibody is available or if the analyte is too small to efficiently bind two antibodies. Competitive ELISAs come in many different configurations but all are based on the principle of the analyte within the sample competing with a reference analyte for binding to a labeled antibody or antigen. The more analyte present in the sample, the less enzyme will be bound to the plate, and when the substrate is added the signal produced will be inversely proportional to the amount of analyte present in the sample.

Figure 4: Competitive ELISA in which the samples analyte competes with reference analyte bound to the plate for binding to free enzyme-conjugated detection antibodies.
Figure 5: Competitive ELISA in which the samples analyte competes with enzyme-conjugated reference analyte for binding to analyte specific antibody bound to the plate.

The advantage of Competitive ELISA is its simplicity of design needing only one analyte-specific antibody, and its utility in detecting small molecules. It can also be very sensitive to compositional differences in complex antigen mixtures. It can however be less specific than Sandwich ELISAs and may require conjugation of a reference analyte, depending upon the configuration selected.

Direct and Indirect Detection

The terms Direct and Indirect also refer to the method of signaling used in an ELISA. If the enzyme is conjugated directly to the detection antibody, this is called Direct Detection. Direct detection has the least number of steps, has less potential for non-specific binging or background, but do not offer any advantage of amplification.

Figure 6: Examples of direct detection, Enzyme-conjugated antibody binding directly to the analyte.

When an enzyme-conjugated secondary antibody, or a biotinylated detection antibody coupled with enzyme-conjugated avidin (forming what is known as an Avidin-Biotin Complex) is used, this is referred to as Indirect Detection. Indirect detection makes for a longer, more complicated assay, but sensitivity can be increased greatly due to amplification. The complexity does however increase the potential for non-specific binging or background.

Figure 7: Examples of indirect detection. Detection antibodies detected by enzyme-conjugates secondary antibodies or Avidin-Biotin Complex.

LSBio DevKit antibody pairs are a combination of unconjugated and biotinylated detection antibodies.

Interpreting ELISA Results

ELISAs can be designed to yields three different types of results, quantitative, qualitative and semi-quantitative.

The precise amount of analyte in a test sample can be determined by comparing its values to those generated from a serial dilution of a known, purified analyte (a Standard Curve). This type of result is particularly useful when measuring the effect on a system in response to changing experimental conditions.

Qualitative assessment simply indicates whether an analyte is present in the sample or not, as compared to a negative and positive control run in parallel. This type of result is commonly used for diagnostic tests, such as detecting the presence of immune response to a particular pathogen.

Semi-quantitative results indicate the relative amount of analyte within a sample because the strength of the signal obtained will vary proportionately with analyte concentration.

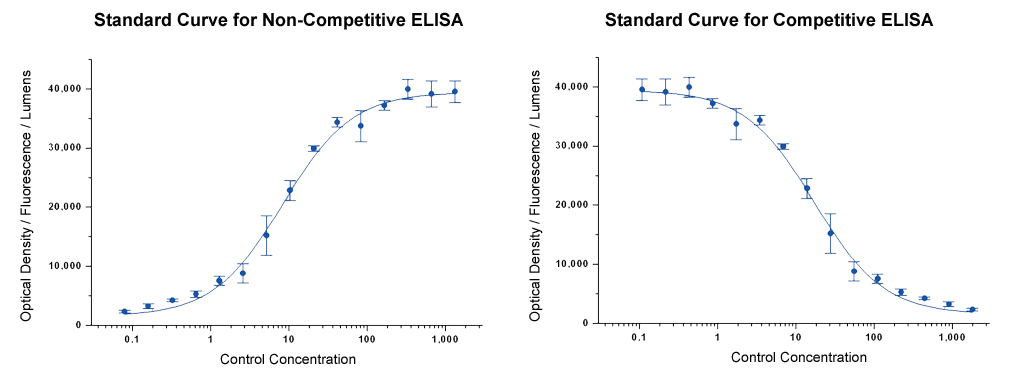
For quantitative and semi-quantitative ELISAs, a Standard Curve is generated using a serial dilution of Standard with a known concentration. The signal reading (optical density, fluorescence, or lumens) of each concentration is graphed vs log concentration to produce a sigmoidal curve (Figure 8). The relatively long linear region of the curve is most accurate and reproducible and is used to generate a linear equation. The OD of a sample with an unknown analyte concentration can then be applied to this linear equation to determine analyte concentration. It is for this reason that test samples should be titrated so that their OD falls within this linear region. Although calculations can be made by hand many ELISA plate readers come with the necessary curve fitting software. Standard curves should be regenerated each time samples are run, and it is recommended that serial-dilutions are run in triplicate.

Figure 8: Standard curves examples for both competitive and non-competitive ELISA.

Quality Assurance

In order to develop an ELISA that will produce results that are reliable, care needs to be taken to assure the following:

Specificity is a kit’s ability to detect the desired analyte with minimal cross-reactivity with other targets that may be present in the sample. Selection of antibodies is the first step in insuring specificity. Antibodies should be rigorously tested to show that they don’t bind to unintended epitopes, such as conserved regions of close family members and isoforms. It is also important to demonstrate that the antibodies will effectively bind with the multiple forms in which the analyte can be found. For example, when detecting a protein, the purified or unpurified recombinant protein form should be tested as well as its native form, in simple media and complex matrices. Specificity of antibody binding can also be modulated by adjusting assay conditions, such as using different assay and wash buffers.

The sensitivity of an ELISA is a function of the affinity of the antibody(ies) to the analyte, the capture efficiency of the plate, signal amplification, buffer and wash conditions, substrate type and detection method and the nature of the sample type being tested. For instance, chemiluminescence and fluorescence are typically more sensitive than colorimetric detection. Sensitivity can reach the femtomole level but such levels require very high specificity and low background conditions in order to be reliable.

The Lower Limit of Detection (LLD), also known as Minimum Detectable Concentration (MDC), is the lowest measurable value that is statistically different from zero. It is calculated by adding two standard deviations to the mean optical density value of several zero standard replicates and determining the corresponding analyte concentration from the standard curve.

Testing Recovery and Linearity are means of determining a kit’s ability to accurately detect the concentration of analyte in various types of sample matrices and to see how the accuracy is affected by sample concentration.

Recovery is determined by spiking various sample matrices (typically serum, EDTA plasma, and heparin plasma) with a given amount of control analyte and measuring the average percent recovery. Generally, samples with expected recovery and linearity between 80-120% are acceptable.

MatrixRecovery Range (%)Average (%)
Serum (n=5)92-10195
EDTA plasma (n=5)89-10498
Heparin plasma (n=5)86-10495

Similarly, linearity is determined by spiking various sample matrices (typically serum, EDTA plasma, and heparin plasma) with a given amount of control analyte, performing four two-fold serial dilutions of each, and then measuring the average percent recovery.

Sample1:21:41:81:16
Serum (n=5)91-98%82-96%78-104%83-92%
EDTA plasma (n=5)93-105%89-101%88-97%80-93%
Heparin plasma (n=5)90-103%96-105%97-105%96-105%

In both cases, spiked matrices should be run in replicates of five. It is recommended that linearity and recovery testing be conducted with the intended test sample type if possible. In the event of poor recovery or linearity, steps can be taken to minimize the Matrix Effect, such as diluting the sample prior to testing

In order to have confidence in the results obtained from a single assay plate, or to be able to compare results obtained from different plates, it is critical to test the assay’s Precision and Reproducibility.

Intra-Assay Precision is a measurement of reproducibility between wells within an assay. This allows the researcher to run multiple replicates of the same sample on one plate and obtain similar results. Typically, intra-assay precision is tested by running three samples with low, medium, and high analyte levels 20 times each on a single plate.

Inter-Assay Precision is a measurement of reproducibility between the wells of different assay plates over time. This gives the researcher the ability to compare results obtained from different plates run at different times. Typically, inter-assay precision is tested by running three samples with low, medium, and high analyte levels on three different plates, eight replicates per plate.

In both cases, Precision is measured as a coefficient of variation (CV) from the mean value. Ideal CV values are <10% for Intra-assay Precision and <15% for Inter-assay Precision.

CV(%) = SD/meanX100
Intra-Assay: CV<10%
Inter-Assay: CV<15%

Sandwich ELISA Components

LSBio’s collection of ELISA DevKits, reagents, and accessories provide researchers with the tools needed to assemble and optimize Sandwich ELISAs specific to their particular needs. In the following section we review each of the core kit components and how they can be used to customize the final ELISA format. These include:

Most commonly, ELISAs are preformed using flat-bottomed 96-well plates made from clear polystyrene or polyvinyl chloride. Clear plates are optimal for assays based on colorimetric substrates, such as TMB, for which optical density readings will be made. Alternatively, assays based on fluorescent or chemiluminescent signaling require opaque plates in order to minimize signal interference upon reading. Plates are available in 96-well microtiter or 96-well ELISA strip plate formats. Strip-wells provide the greatest flexibility, allowing the researcher to use only those wells needed to conduct their experiment, while unused wells can be saved for future experiments. In contrast, fixed microtiter plates require all 96-wells to be run at the same time.

It is important to only use plates specifically designed for ELISA testing because they are manufactured to minimize edge-effect, for optimal optical specifications, consistent low background readings, and to have optimal antibody/antigen binding efficiencies. Standard polystyrene ELISA plates capture ~100-200 ng of IgG/cm2 but higher efficiency plates are also commercially available.

In addition to ELISA plates, LSBio also offers plate accessories such as foil storage bags and plate sealers.

The first step in setting up an ELISA assay is coating the surface of the ELISA plate well with the capture antibody or analyte. This is achieved by incubating each well with the antibody or analyte diluted in coating buffer. During this incubation the antibody or analyte passively bonds to the surface of the well. There are a number of conditions that can affect this binding efficiency, such as the antibody or analyte concentration, the incubation temperature and time, and the coating buffer composition. It is essential that the coating buffer contain no additional proteins as these will compete with the antibody or analyte for binding sites on the plate.

Plate Coating

Typical coating conditions call for incubating each well of a 96 well plate with 100 µl of coating buffer containing 1-10 µg/ml of antibody or analyte overnight at 4°C or for 1-3 hours are 37°C. It is important that the plate be covered during incubation using a plate sealer to minimize the effects of evaporation. Researchers should experiment with concentrations, volumes, temperatures, and incubation times in order to optimize the plate coating for their particular experiment.

Antibody Selection

The most critical step in the development of an ELISA is the selection of antibodies, and the criterium upon which each antibody is selected is based upon its function within the particular ELISA format selected.

In Sandwich ELISAs for example, a capture and detection antibody are needed. These antibodies can be either monoclonal or polyclonal but the pros and cons of each type should be considered. Monoclonal antibodies are highly specific for a single unique epitope on their target antigen. For this reason they cannot be used as both the capture and detection antibody in the same assay as they would compete for the same binding site. This highly selective binding characteristic can make monoclonal antibodies highly specific, but potentially at the cost of sensitivity as fewer binding sites are availabl on the target analyte. Monoclonals are also highly reproducible, making them ideal for developing assays intended for long term production. In contrast, each polyclonal antibody is a heterogeneous collection of antibodies, targeting multiple binding sites on the target analyte, from stable distinct peptide regions to tertiary structural epitopes that can change with assay conditions. For this reason, polyclonal antibodies have the potential to be less specific than monoclonals, but the fact that they target multiple epitopes make them more flexible in their use, and less sensitive to changing assay conditions.

The specificity of each antibody used in an ELISA also depends upon its intended role. For example, in a Sandwich ELISA, a more specific monoclonal antibody may be used as the capture antibody to ensure that only the target antigen is captured, while a less discriminating polyclonal antibody is used for detection ensuring maximum signal detection.

Antibody Conjugation

Depending upon the type of ELISA format selected, and the availability of antibodies, it may be necessary to conjugate antibodies directly with an enzyme, such as Horseradish Peroxidase (HRP) or alkaline phosphatase (AP), or with Biotin. Contact us at technical@stratech.co.uk to inquire about recommended conjugation kits.

Antibody Titration

Once an antibody pair has been selected, it is recommended to determine the optimal concentration of each by running a dilution matrix assay.

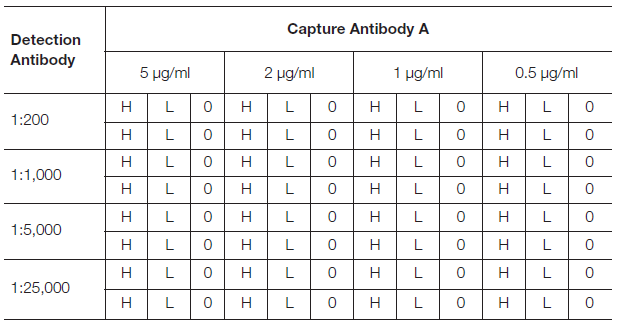
Prepare 4-step dilutions of the capture antibody in coating buffer (5, 2, 1, and 0.5 μg/ml) and coat the wells of a 96-well plate as per Table 1. Next, follow the standard procedure for a Sandwich ELISA using high and low concentrations of your analyte that reflect the expected working range, and a blank. At the detection stage, prepare a dilution series of the detection antibody in dilution buffer (1:200, 1:1,000, 1:5,000, and 1:25,000) and apply as per Table 1.

Including a high and low concentration of the analyte helps to determine the dynamic range. The low concentration analyte indicates the sensitivity of the assay. The blank will indicate non-specific binding. The optimal combination will have the maximum signal-to-noise ratio/largest difference between low and high analyte concentrations.

If the blank samples indicate high background, readings above 0.2 absorbance units, consider changing the ELISA plate type, the blocking buffer, and/or the washing buffers used. If sensitivity is not high enough, consider modifying the sample buffer to limit matrix effect, wash conditions, and incubation times.
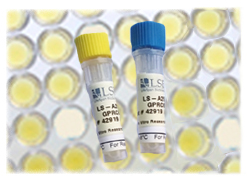
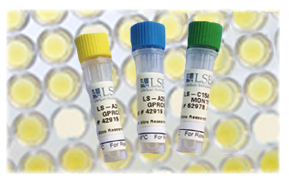
Table 1. Dilution matrix assay plate layout to determine optimal antibody concentrations.

Finding the right pair of antibodies for use in an ELISA can be a time-consuming and costly process. LSBio offers thousands of antibody pairs that have been selected and tested for specificity and affinity in ELISA, accelerating your research!

DevKit Duo (Antibody Pairs)

DevKit Duo Kits include the most critical components of the ELISA, the capture and detection antibody pair (biotinylated or non-biotinylated). Each antibody pair has been selected for specificity to their target, validated for use in ELISA, and provide researchers with the foundation upon which to build their own customized ELISA. Researchers can couple these antibodies with standards, conjugates, and substrates of their own choosing in order to optimize their assay for specific applications.

DevKit DuoPlus (Antibody Pairs plus Standard)

DevKit DuoPlus kits include the capture antibody, detection antibody (biotinylated or non-biotinylated), as well as the standard (typically a full-length recombinant protein) used to validate the antibodies. These development kits provide the foundational elements of an ELISA and save the hassle of having to source and validate a standard, but allow the research the freedom to select a signaling system particular to their specific needs.

DevKit Core (Antibody Pairs plus Standard and Conjugate)

DevKit Core kits contain all four key components required to construct reliable Sandwich ELISA’s for the quantitative measurement of target antigen. Each kit contains the capture antibody, a biotinylated detection antibody, an antigen standard, and Avidin-HRP or Streptavidin-HRP conjugate for use with ABTS or TMB substrates respectively. Each kit contains enough material to assay 2 or 5 standard 96-well ELISA plates.

When an ELISA plate is coated with a capture antibody, the surface is never entirely coated. Open hydrophobic sites on the plastic can later bind sample, standard, or detection antibody during the assay, causing non-specific background signal. It is therefore imperative to block these site using a blocking buffer before beginning the assay. Blocking buffers come in a number of different formulations including protein-based, detergent-based, or synthetic. Protein blocks, such as 1% BSA dissolved in PBS, bind permanently to the plate while the effect of detergents are more temporary. Synthetic formulations have been more recently developed and in many cases can provide more optimal blocking than traditional methods. It is often difficult to predict which type of blocking buffer will work best for a particular assay, therefore multiple different blocking buffers are typically tested during assay optimization in order to identify the one that affords the most optimal signal-to-noise ratio.

LSBio offers a number of blocking buffers designed to deliver more or less blocking, depending upon the needs of your particular assay.

The role of the Standard in an ELISA is to serve as a positive control as well as for the development of a known concentration Standard Curve against which the unknown amount of analyte in a sample can be determined.

The type of Standard selected for use in an ELISA should be as similar to the form of analyte intended to be detected in test samples. For example, full-length recombinant proteins produced in mammalian expression systems are often used as Standards for ELISAs intended for detecting native proteins in human serum samples. A synthetic peptide, partial-length recombinant, or non-mammalian expression vector protein would make less optimal Standards.

Standard Preparation

The following are instructions for the preparation of a typical Standard dilution series which can be used to generate a Standard Curve. Sufficient volumes should be calculated based upon the volume needed per well, and to run the dilution series in triplicate. Prepared standard dilutions should be used immediately and not stored for future use.

Prepare the Standard Stock Solution (D1) with an analyte concentration equal to the high end of the intended detection range of the assay. In the following example, the intended range is 40 to 0.625 ng/ml, therefore the Standard Stock Solution is 40 ng/ml. Prepare 6 tubes, labeled D2-D7, each containing 250 µl of sample diluent. Transfer 250 µl from D1 to D2 and mix thoroughly. Next transfer 250 µl of D2 to D3 and mix thoroughly. Repeat this process through D7.

D1(40 ng/ml):500 μl
D2(20 ng/ml):Pipette 250 μl of D1 into 250 μl of Sample Diluent
D3(10 ng/ml):Pipette 250 μl of D2 INTO 250 μl of Sample Diluent
D4(5 ng/ml):Pipette 250 μl of D3 into 250 μl of Sample Diluent
D5(2.5 ng/ml):Pipette 250 μl of D4 into 250 μl of Sample Diluent
D6(1.25 ng/ml):Pipette 250 μl of D5 into 250 μl of Sample Diluent
D7(06.25 ng/ml):Pipette 250 μl of D6 into 250 μl of Sample Diluent

Use Sample Diluent alone as a blank (Zero).

When preparing samples for an ELISA assay, you must optimize the dilution factors of both your sample and detection antibodies. If the concentration of either of these is too high, there is a risk in saturating the assay and decreasing the specific signal. If they aren’t concentrated enough, the signal will be too weak to be detected.

Sample diluents are used to dilute ELISA test samples so they read within the functional range of the assay. The correct sample diluent will help in limiting false-positives and decreasing background noise while also increasing overall sensitivity and reducing sample variation.

Assay diluents are designed to also reduce background noise while also equalizing differences between sample matrixes in serum, plasma, or cell culture media. They reduce background noise by limiting non-specific interactions between sample matrix proteins and the plate surface.

LSBio offers an assortment of Sample and Assay Diluents to fulfill any variations a researcher may need for their experiments.

One of the crucial steps of an ELISA assay is the ability to quickly and effectively wash away unbound materials. This allows ELISA assays to detect specific analytes from samples, and enables researchers to identify and quantify almost any analyte.

One of the most important parameters is the wash volume. The amount of wash solution that is used in the ELISA wells is important: not enough and unbound analyte may increase background noise; too much, and you risk washing away specifically bound analyte. As a rule of thumb, the wash volume should be at least as high as the coating volume. A commonly used industry standard is 200 µl, and LSBio typically recommends 300 µl wash volumes.

Another major parameter to consider is the number of wash cycles used. Classically, a wash step is required with every addition of a new reagent, save for the transition from detection reagent to stop solution. If there are not enough wash cycles, a high background is likely and with too many, signal strength is potentially reduced.

Consistently using ELISA Wash Buffer will reduce background noise, increase the specific signal, and reduce variability between assays contributing to the overall success of your assay.

In order for data to be collected, the analytes that are bound to wells must be detected in a way that signal strength corresponds in a linear manner to the analyte concentration. In immunoassays, the two most common enzymes used for detection are Alkaline Phosphatase (AP) and Horseradish Peroxidase (HRP). Owing to their distinct enzymatic properties these two enzymes require different substrates. The advantage to using enzyme in the detection step is that they create high sensitivity that amplifies signal output even when there are low levels of target protein or antigen.

In direct detection ELISAs, the detection antibody is directly conjugated with the enzyme, typically HRP or AP.

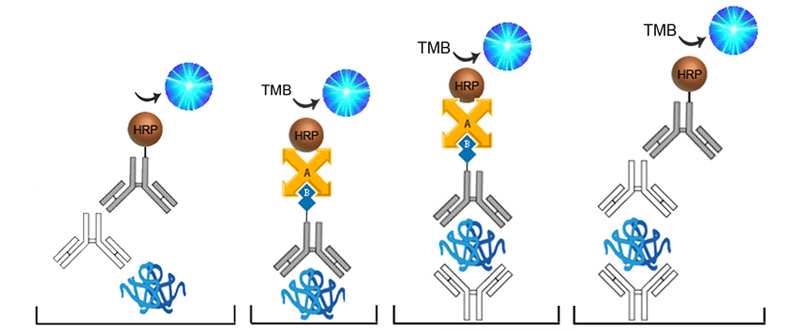
In an indirect detection assay, an enzyme-conjugated secondary antibody that binds to the detection antibody is often used. Alternatively, the detection antibody can be conjugated with Biotin, which then binds with added avidin-HRP conjugate, creating an Avidin-Biotin Complex (ABC). The use of avidin/streptavidin is advantageous due to its high affinity to bind with biotin and the amplified signal produced.

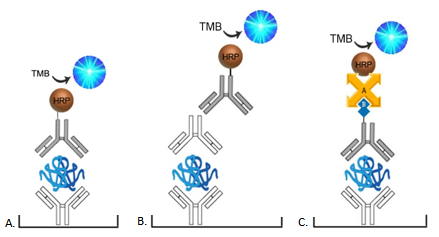
Figure 9: A. Enzyme-conjugated detection antibody (direct detection), B. enzyme-conjugated secondary antibody (indirect detection), C. biotinylated detection antibody and enzyme-conjugated avidin (ABC indirect detection).

It is important to note that when working with HRP as a conjugate, avoid using products that contain sodium azide as a preservative, as it is known to inactivate the enzyme.

LSBio DevKits contain either an unconjugated or a biotinylated detection antibody. Unconjugated detection antibodies should be coupled with an appropriate LSBio HRP-conjugated secondary antibody, either anti-rabbit, mouse, goat, or human. The biotinylated secondary antibodies however should be coupled with LSBio’s HRP-conjugated streptavidin.

If appropriately conjugated antibodies are unavailable for your particular application, Contact technical@stratech.co.uk to inquire about recommended conjugation kits.

Stabilizers provide optimal conditions for the enzyme-conjugated antibody complex, reducing the potential for degradation which in turn reduces specific signal and increases background. Stabilizers are available for both HRP and AP enzyme conjugates.

Substrates are used in ELISA to generate a measurable signal, either as chromogen optical density, fluorescence, or luminescence. The most common type used in ELISA are chromogenic substrates.

When chromogenic substrates are catalyzed by an enzyme, in this case either HRP or AP, they change their chemical structure and color. This change is detected by absorption of specific light wavelengths using a spectrophotometer. The intensity of the signal generated is correlative to the amount of catalyzed substrate present and the strength of the particular substrate.

There are a number of different chromogenic substrates used in ELISA:

  • TMB (3,3′,5,5′-Tetramethylbenzidine)
  • TMB is one of the most versatile, most widely used substrates for ELISA assays. It is typically used in conjunction with HRP and results in a blue color reaction.
  • BCIP (5-Bromo-4-chloro-3-indolyl phosphate)/NBT (Nitro blue tetrazolium)
  • BCIP/NBT is used to detect alkaline phosphatase in immunoblotting techniques.
  • pNPP (Para-Nitrophenylphosphate)
  • pNPP is used to detect alkaline phosphatase in ELISA kits.

Stop solutions are used to deactivate the enzyme and terminate any further color development of the substrate in an ELISA assay. Depending on the type of substrate used, a specifically formulated stop solution may be needed in order to arrest the enzymatic reaction.

LSBio offers Stop Solutions for both Alkaline Phosphatase and HRP substrates.

Sample Preparation

Before use in an ELISA, it is important to prepare samples in order to minimize the potential for background or loss of sensitivity. The following are suggested sample preparation protocols for sample types commonly analyzed by ELISA.

Centrifuge samples for 20 minutes at 1,000 × g to remove particulates. Collect the supernatant for assaying. Store undiluted samples at -20°C or below. Avoid repeated freeze-thaw cycles.

Collect and pellet the cells by centrifugation and remove the supernatant. Wash the cells 3 times with PBS* then resuspend in PBS*. Lyse the cells by ultrasonication 4 times. Alternatively freeze the cells to -20°C and thaw to room temperature 3 times. Centrifuge at 1,500 × g for 10 minutes at 2-8°C to remove cellular debris. Collect the supernatant for assaying. Store undiluted samples at -20°C or below. Avoid repeated freeze-thaw cycles.

Collect plasma using EDTA or heparin as an anticoagulant. Centrifuge samples for 15 minutes at 1,000 × g at 2-8°C within 30 minutes of collection. Collect the supernatant for assaying. Store undiluted samples at -20°C or below. Avoid repeated freeze-thaw cycles.

Centrifuge whole blood for 20 minutes at 1,000 × g to pellet the cells and remove the supernatant. Wash the cells 3 times with PBS* then resuspend in PBS*. Freeze (-20°C)/thaw (room temperature) the cells 3 times. Centrifuge at 5,000 × g for 10 minutes at 2-8°C to remove cellular debris. Collect the supernatant for assaying. Erythrocyte lysates must be diluted with Sample Diluent before running. Store undiluted samples at -20°C or below. Avoid repeated freeze-thaw cycles.

Collect plasma using EDTA as an anticoagulant. Centrifuge samples for 15 minutes at 1,000 × g at 2-8°C within 30 minutes of collection. It is recommended that samples should be centrifuged for 10 minutes at 10,000 × g for complete platelet removal. Collect the supernatant for assaying. Store undiluted samples at -20°C or below. Avoid repeated freeze-thaw cycles.

Allow semen to liquefy at room temperature or 37°C. After liquefaction, centrifuge at 2,000 × g for 10-15 minutes. Collect seminal plasma supernatant for assaying. Wash the precipitated protein 3 times with PBS* then resuspend in PBS*. Lyse the cells by ultrasonication then centrifuge at 2,000 × g for 10-15 minutes. Collect the supernatant for assaying. Store undiluted samples at -20°C or below. Avoid repeated freeze-thaw cycles.

Use a serum separator tube and allow samples to clot for 2 hours at room temperature or overnight at 4°C before centrifugation for 20 minutes at approximately 1,000 × g. Collect the supernatant for assaying. Store undiluted samples at -20°C or below. Avoid repeated freeze-thaw cycles

Because preparation methods for tissue homogenates vary depending upon the tissue type, users should research tissue-specific conditions independently. The following is one example only. Rinse tissues in PBS* to remove excess blood and weigh before homogenization. Finely mince tissues and homogenize them in 5-10 ml of PBS*with a glass homogenizer on ice. Lyse the cells by ultrasonication or freeze (-20°C)/thaw (room temperature) 3 times. Centrifuge homogenate at 5,000 × g for 5 minutes. Collect the supernatant for assaying. Store undiluted samples at -20°C or below. Avoid repeated freeze-thaw cycles.

Centrifuge samples for 20 minutes at 1,000 × g to remove particulates. Collect the supernatant for assaying. Store undiluted samples at -20°C or below. Avoid repeated freeze-thaw cycles.

Aseptically collect the first urine of the day (mid-stream), voided directly into a sterile container. Centrifuge to remove particulate matter and collect the supernatant for assaying. Store undiluted samples at -20°C or below. Avoid repeated freeze-thaw cycles.

*1x PBS (0.02 mol/l pH 7.0-7.2)

Matrix Effects

Matrix Effect is when components within the sample interfere with analyte binding to the capture or detection antibodies. It most commonly causes reduced sensitivity but can also increase non-specific or background signal. This effect is typically encountered with plasma or serum samples and is often identified as an issue during Recovery and Linearity testing, during which analyte spiked serum and plasma samples are used. Interfering matrix components can include endogenous components such as phospholipids, carbohydrates, and metabolites.

Efforts to reduce matrix effect include sample centrifugation and dilution. Centrifugation can separate matrix components from soluble antigens, reducing the concentration of matrix components and their effect on results. Increasing the dilution factor 2-5 fold will reduce matrix component binding and mitigate the matrix effect.

Recommended ELISA Protocols

LSBio DevKits are available with either an unconjugated or biotin-conjugated detection antibody. The following Sandwich ELISA protocols are recommended for each.

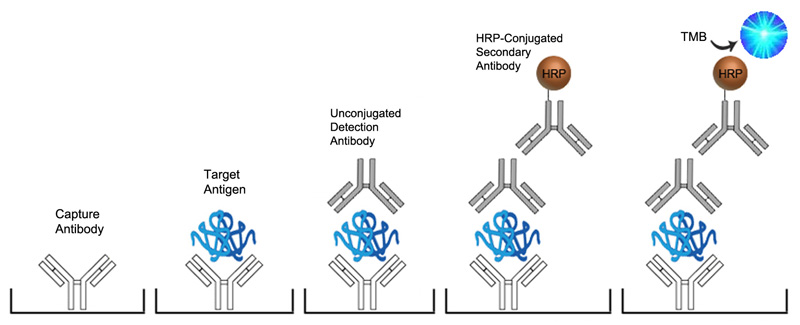
Figure 10: Indirect detection using HRP-Conjugated Secondary Antibody
  1. Capture Antibody Coating
    1. Dilute the capture antibody to a final concentration of 1-10 μg/ml in bicarbonate/carbonate antigen-coating buffer (100 mM NaHCO3 in deionized water; pH adjusted to 9.6).
    2. Pipette 100 μl of diluted antibody to each well of a microtiter plate.
    3. Cover the plate with adhesive plastic and incubate at 4°C overnight (or 37°C for 30 minutes).
    4. Remove the coating solution and wash the plate 3X with 200 μl PBS (Phosphate Buffered Saline) buffer (10 mM Na2HPO4 and 1.8 mM NaH2PO4 in deionized water with 0.2% Tween 20; pH adjusted to 7.4) for 5 minutes each time. The coating/washing solutions can be removed by flicking the plate over a sink. The remaining drops can be removed by patting the plate on a paper towel or by aspiration. Do not allow the wells to dry out at any time.
  2. Blocking
    1. Pipette 200 μl of selected blocking buffer per well to block residual protein-binding sites.
    2. Cover the plate with adhesive plastic and incubate for 1-2 hour(s) at 37°C (or at 4°C overnight).
    3. Remove the blocking solution and wash the plate 2X with 300 μl PBS for 5 minutes each time. Flick the plate and pat the plate as described in Step 1.d.
  3. Reagent Preparation
    1. Prepare the dilutions of Standard to generate the Standard Curve using sample diluent in sufficient volumes to run the series in triplicate.
    2. Dilute the samples to be tested using the same sample diluent used to prepare the Standard Curve samples. It may be necessary to perform a titration of the samples in order to determine the optimal dilution such that the resulting OD falls within the range of the assay.
  4. Sample/Standard Incubation
    1. Pipette 100 μl of each of the diluted sample solutions and control to each empty well.
    2. Cover the plate with adhesive plastic and incubate for 2 hours at room temperature.
    3. Remove the content in the wells and wash them 3X with 300 μl PBS buffer for 5 minutes each time. Flick the plate and pat the plate as described in Step 1.d.
  5. Detection Antibody Incubation
    1. Pipette 100 μl of diluted detection antibody to the wells with control, standard solutions, and diluted samples.
    2. Cover the plate with adhesive plastic and incubate for 1 hour at 37°C (or 2 hours at room temperature). These incubation times should be sufficient to receive a strong signal. However, if a weak signal is observed, perform incubation overnight at 4°C for a stronger signal.
    3. Remove the content in the wells and wash them 3X with 300 μl PBS for 5 minutes each time. Flick the plate and pat the plate as described in Step 1.d.
  6. Secondary Antibody Incubation
    1. Pipette 100 μl of diluted secondary antibody to the wells with control, standard solutions, and diluted samples.
    2. Cover the plate with adhesive plastic and incubate for 1 hour at 37°C (or 2 hours at room temperature). These incubation times should be sufficient to receive a strong signal. However, if a weak signal is observed, perform incubation overnight at 4°C for a stronger signal.
    3. Remove the content in the wells and wash them 3X with 300 μl PBS for 5 minutes each time. Flick the plate and pat the plate as described in Step 1.d.
  7. Substrate Detection
    1. Prepare TMB substrate solution immediately before use. TMB substrate must be equilibrated to 37°C for 30 minutes prior to use.
    2. Pipette 90 μl of substrate solution to the wells with the control, standard solutions, and diluted samples.
    3. Incubate the plate at 37°C in the dark.
    4. Shades of blue will be observed in the wells with the most concentrated solutions. Other wells may show no obvious color. Color should develop in positive wells after 15 minutes. After sufficient color development, pipette 100 μl of stop solution to the appropriate wells.
    5. Determine the optical density (OD value) of each well immediately using a microplate reader set to 450 nm.
  8. Data Analysis
    1. Prepare a standard curve using the data produced from the diluted standard solutions. Use absorbance on the Y-axis (linear) and concentration on the X-axis (log scale).
    2. Interpret the sample concentration from the standard curve.
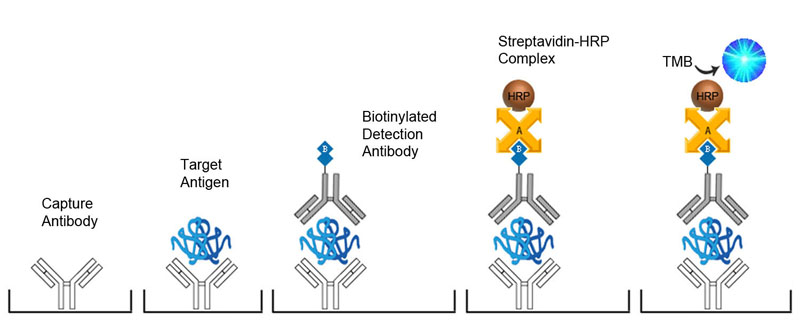
Figure 11: Indirect detection using Avidin-Biotin Complex amplification
  1. Capture Antibody Coating
    1. Dilute the capture antibody to a final concentration of 1-10 μg/ml in bicarbonate/carbonate antigen-coating buffer (100 mM NaHCO3 in deionized water; pH adjusted to 9.6).
    2. Pipette 100 μl of diluted antibody to each well of a microtiter plate.
    3. Cover the plate with adhesive plastic and incubate at 4°C overnight (or 37°C for 30 minutes).
    4. Remove the coating solution and wash the plate 3X with 300 μl PBS (Phosphate Buffered Saline) buffer (10 mM Na2HPO4 and 1.8 mM NaH2PO4 in deionized water with 0.2% Tween 20; pH adjusted to 7.4) for 5 minutes each time. The coating/washing solutions can be removed by flicking the plate over a sink. The remaining drops can be removed by patting the plate on a paper towel or by aspiration. Do not allow the wells to dry out at any time.
  2. Blocking
    1. Pipette 200 μl of selected blocking buffer per well to block residual protein-binding sites.
    2. Cover the plate with adhesive plastic and incubate for 1-2 hour(s) at 37°C (or at 4°C overnight).
    3. Remove the blocking solution and wash the plate 2X with 300 μl PBS for 5 minutes each time. Flick the plate and pat the plate as described in Step 1.d.
  3. Reagent Preparation
    1. Prepare the dilutions of Standard to generate the Standard Curve using sample diluent in sufficient volumes to run the series in triplicate.
    2. Dilute the samples to be tested using the same sample diluent used to prepare the Standard Curve samples. It may be necessary to perform a titration of the samples in order to determine the optimal dilution such that the resulting OD falls within the range of the assay.
  4. Sample/Standard Incubation
    1. Pipette 100 μl of each of the diluted sample solutions and control to each empty well.
    2. Cover the plate with adhesive plastic and incubate for 2 hours at room temperature.
    3. Remove the content in the wells and wash them 3X with 300 μl PBS buffer for 5 minutes each time. Flick the plate and pat the plate as described in Step 1.d.
  5. Biotinylated Detection Antibody Incubation
    1. Pipette 100 μl of diluted antibody to the wells with control, standard solutions, and diluted samples.
    2. Cover the plate with adhesive plastic and incubate for 1 hour at 37°C (or 2 hours at room temperature). These incubation times should be sufficient to receive a strong signal. However, if a weak signal is observed, perform incubation overnight at 4°C for a stronger signal.
    3. Remove the content in the wells and wash them 3X with 300 μl PBS for 5 minutes each time. Flick the plate and pat the plate as described in Step 1.d.
  6. ABC Incubation
    1. Pipette 100 μl of diluted ABC solution to the wells with control, standard solutions, and diluted samples.
    2. Cover the plate with adhesive plastic and incubate for 30 minutes at 37°C.
    3. Remove the content in the wells and wash them 3X with 300 μl PBS buffer for 5 minutes each time. Flick the plate and pat the plate as described in Step 1.d.
  7. Substrate Detection
    1. Prepare TMB substrate solution immediately before use. TMB substrate must be equilibrated to 37°C for 30 minutes prior to use.
    2. Pipette 90 μl of substrate solution to the wells with the control, standard solutions, and diluted samples.
    3. Incubate the plate at 37°C in the dark.
    4. Shades of blue will be observed in the wells with the most concentrated solutions. Other wells may show no obvious color. Color should develop in positive wells after 15 minutes. After sufficient color development, pipette 100 μl of stop solution to the appropriate wells.
    5. Determine the optical density (OD value) of each well immediately using a microplate reader set to 450 nm.
  8. Data Analysis
    1. Prepare a standard curve using the data produced from the diluted standard solutions. Use absorbance on the Y-axis (linear) and concentration on the X-axis (log scale).
    2. Interpret the sample concentration from the standard curve.

Helpful Hints

  1. Applying Solutions: All solutions should be added to the bottom of the ELISA plate well. Avoid touching the inside wall of the well with the pipette tip.
  2. Assay Timing: The interval between adding sample to the first and last wells should be minimized. Delays will increase the incubation time differential between wells, which will significantly affect the experimental accuracy and repeatability. For each step in the procedure, total dispensing time for addition of reagents or samples should not exceed 10 minutes
  3. Incubation: To prevent evaporation and ensure accurate results, proper adhesion of plate sealers during incubation steps is necessary. Do not allow wells to sit uncovered for extended periods of time between incubation steps. Do not let wells dry out at any time during the assay.
  4. Washing: Proper washing procedure is critical. Insufficient washing will result in poor precision and falsely elevated absorbance readings. Residual liquid in the reaction wells should be patted dry with absorbent paper during the washing process. Do not put absorbent paper directly into the reaction wells.
  5. Controlling Substrate Reaction Time: After the addition of the TMB Substrate, periodically monitor the color development. Stop color development before the color becomes too deep by adding Stop Solution. Excessively strong color will result in inaccurate absorbance reading.
  6. Reading: The microplate reader should be preheated and programmed prior to use. Prior to taking OD readings, remove any residual liquid or fingerprints from the underside of the plate and confirm that there are no bubbles in the wells.
  7. Mixing: During incubation times, the use of a micro-oscillator at low frequency is recommended. Sufficient and gentle mixing is particularly important in producing reliable results.
  8. Carry-Over Controls: Due to inter- and intra-assay variability, it is recommended that appropriate carry-over controls be included between assays.
  9. Lab Conditions: To minimize external influence on the assay performance, operational procedures and lab conditions (such as room temperature, humidity, and incubator temperature) should be strictly controlled. It is also strongly suggested that the whole assay is performed by the same operator from the beginning to the end.
  10. Stability: Each kit component should be individually tested for stability over time.
  11. All solutions prepared from concentrates should be used only once
  12. Do not prepare Standard dilutions directly in wells.
  13. Always centrifuge tubes briefly prior to opening.
  14. All solutions should be gently mixed prior to use.
  15. Ensure that pipettes are calibrated. Pipetting volumes of less than 10 μl is not recommended.
  16. To avoid contamination, change pipette tips between uses.
  17. To avoid contamination, use separate reservoirs for each reagent.
  18. TMB Substrate solution is easily contaminated; sterility precautions should be taken. TMB Substrate solution should also be protected from light.
  19. Stop Solution is acidic, therefore proper precautions should be taken during its use, such as protection of the eyes, hands, face, and clothing.

SUPPORT

outstanding technical support

PRODUCT

we offer a full product guarantee

DELIVERY

we offer free delivery to UK universities and non profit organisations