exalpha Resources
exalpha Resources
Categories
IgY is an immunoglobulin first described in 1893 when Klemperer1 reported that immunized chickens produce antibodies detectable in their egg yolks as well as their blood. He noted that the concentrations of antibody were similar in both egg yolk and blood, although more recently, it’s been reported that yolk concentrations of IgY are higher2. When Klemperer described chicken immunoglobulins in the late 1800’s, he didn’t name them IgY. For the better part of the 20th century, the predominant immunoglobulin found in chicken blood and egg yolk was known as IgG. It wasn’t until more than 70 years later that the term IgY was coined by Leslie and Clem3, not because the immunoglobulin was found in the yolk, but rather because the avian antibody was sufficiently different and antigenically distinct from the mammalian immunoglobulin counterpart (IgG). It’s now known that IgY is the major immunoglobulin class in birds, reptiles, amphibia and lungfish.
References:
- Klemperer, F. (1893). Über natürliche Immunität und ihre Verwertung für die Immunisierungstherapie. Archiv für Experimentelle Pathologie und Pharmakologie 31: 356-382.
- Larsson, A., Balöw, R-M., Lindahl, T.L. & Forsberg, P-O. (1993). Chicken antibodies: taking advantage of evolution. A review. Poultry Science 72: 1807-1812.
- Leslie, G.A. and Clem, L.W. (1969) Phylogeny of Immunoglobulin Structure and Function. III. Immunoglobulins of the Chicken. J. Exp. Med. 130 : 1337-1352.
Advantages
There are several advantages to choosing chickens, rather than rabbit or goats to produce your polyclonal antibodies.
- Chickens are not mammals and therefore are more apt to make high-avidity antibodies to mammalian antigens (especially highly conserved mammalian proteins). To our knowledge, it is the most humane way to produce polyclonal antibodies. There is no need to bleed the chicken. Simply collect the eggs.
- A single chicken can produce an enormous amount of antibody, up to 3 grams of IgY per month, which is 10-20 times the amount of a rabbit.
- Furthermore, compared to rabbits, chickens produce antibody much quicker – high-titre antibody is available from eggs as early as day 25. Our custom IgY production services will deliver 0.5 gram of purified IgY to you within 50-60 days.
- Fc region of chicken IgY is sufficiently different from mammalian IgG:
- Reduces background by not binding to mammalian rheumatoid factors or other naturally occurring anti-mammalian antibodies (e.g. HAMA)
- Does not activate mammalian complement systems
- Does not bind to mammalian Fc receptors
- Does not bind to standard immunoglobulin-binding proteins such as protein A (Staphylococcus aureus), protein G (Streptococcus sp.), or protein L (Peptostreptococcus magnus)
- By having the immunoglobulin Y (IgY) packaged conveniently in eggs, eggs can be stored over a long period of time and the IgY purified from the eggs of desired titre/avidity.
- It is cheaper to feed and house chickens than rabbits.
- IgY is a stable antibody sharing the following characteristics with mammalian IgG:
- Divalent
- Degraded by papain to yield divalent Fab fragment
- May be enzyme-labeled, biotinylated and gold–labeled by standard procedure

Yolk IgY Purification Kit
Instructions
- It is important that Reagents A and B and your eggs are at 4°C before use.
- Separate cold egg yolk from the white using the egg separator. Rinse yolk with distilled water and roll on paper towel to remove adhering egg white. Puncture yolk membrane with Pasteur pipette and allow yolk to drain into tared beaker. Note the weight of the yolk. Assume that 1 ml of yolk is equal to 1 gram.
- Add 5 volumes of cold reagent A to the yolks very slowly while stirring gently and continuously until well mixed. Avoid foaming.
- Allow diluted yolk to stand for at least 2 hours or up to 24 hours at 4°C. Mix gently before adding to centrifuge tubes. Centrifuge at 4000 x g (or higher) for 15 min. at 4°C. Use longer centrifugation time for lower speed.
- Collect supernatant into graduated cylinder. The supernatant should be colourless and translucent. If particulates are present, centrifugation step should be repeated and if necessary, filtered. Measure volume.
- Transfer supernatant into a beaker and add equal volume of cold Reagent B while stirring with stir bar. Continue stirring for 2 min. and allow suspension to stand in the cold for 1 hour.
- Centrifuge at 4000 x g (or higher) for 15 minutes at 4°C and discard the supernatant. Use longer centrifugation time for lower speed.
- Dissolve precipitate in volume of PBS equal to original egg yolk volume and filter sterilize. IgY concentration will be between 4 and 7 mg/ml with purity of 90% or greater.
- Store your IgY in the refrigerator for a year (or longer) with no loss of activity.
Why Choose Our IgY Purification Kit?
Why Choose?
The answer is simple.
Compared to the competition, not only is our chicken antibody purification kit cheaper to buy (per mg IgY purified) but the IgY yield obtained per gram egg yolk is, on average, 50% higher.
Unlike other IgY purification kits, our kit is polyethylene glycol (PEG) – free. High molecular weight PEG may interfere with your antibody assay and is difficult to remove.
Our antibody purification kit comes with detailed instructions and technical support is always available. Please Email us with any questions you may have.
Kit Contents
EggsPress IgY Purification Kit (5 yolks) (Cat. No. IK 500)
- Reagent A (500 ml)
- Reagent B (500 ml)
- Egg Separator
- Instructions
EggsPress IgY Purification Kit (20 yolks) (Cat. No. IK 2000)
- Reagent A (4 x 500 ml)
- Reagent B (4 x 500 ml)
- Egg Separator
- Instructions
EggsPress IgY Purification Kit (40 yolks) (Cat. No. IK 4000)
- Reagent A (3.8 L)
- Reagent B (3.8 L)
- Egg Separator
- Instructions
EggsPress IgY Purification Kit (80 yolks) (Cat. No. IK 8000)
- Reagent A (2 x 3.8 Litres)
- Reagent B (2 x 3.8 Litres)
- Egg Separator
- Instructions
Kit Storage Conditions
- Keep at room temperature until ready to use.
- Reagents A and B must be refrigerated before use.
What you will need
- Egg yolks
- Distilled Water
- Phosphate-buffered saline (PBS)
- Pasteur pipette
- Balance
- Beaker, graduated cylinder
- Stir plate and stir bar
- Refrigerator
- Centrifuge
Separate Kit Components Available
Perhaps a 90% pure IgY preparation is not necessary for your experimental procedure. Delipidation of the egg yolk provides the researcher with a diluted IgY solution (also containing other yolk proteins) which, concentrated and dialyzed, can be used for many applications. To delipidate your egg yolk only, egg separators and Reagent A are available separately.
Reagent B, our IgY precipitation reagent, is also available separately to purify IgY from other yolk proteins after delipidation.
Kit Description
Our IgY EggsPress Purification Kit enables researchers to quickly and efficiently purify chicken antibodies (IgY) from the eggs of their immunized chickens without loss of activity. There are many advantages in choosing chickens to raise your polyclonal antibodies.
The disadvantage of using hens is the difficulty of purifying the IgY from the lipid environment of the egg yolk. This problem is circumvented by using our IgY antibody purification kit. Two precipitation steps — one to remove the lipid and the second to precipitate the IgY — provide you with a 90% pure IgY fraction. Expect to purify between 4 and 7 mg IgY per ml egg yolk.
Simply follow the antibody purification Kit Instructions. The entire procedure takes about 4 hours but only 30 minutes is actual hands-on time.
Once you have your IgY, you can treat it like any immunoglobulin. You may wish to label or affinity-purify your antibody. Proceed as you would with any antibody fraction. Keep in mind that IgY does not bind to protein A, protein G, or protein L! Perhaps you want to use your IgY as a primary antibody in an ELISA test, Western blot or immunostaining procedure. A selection of labeled secondary reagents (anti-chicken immunoglobulins) and normal (pre-immune) IgY are available.
Many researchers are now choosing to make their custom polyclonal antibody in chickens. There are many reasons to do so. Some choose to immunize a hen and collect the eggs because it is the least invasive way to produce polyclonal antibodies. The eggs can be stored for up to 3 months in the refrigerator or the yolks separated and frozen in delipidation buffer (Reagent A of the Eggspress IgY Purification Kit). For some, the attraction is that chickens often produce better antibodies to conserved mammalian proteins. And for some, choosing hens means that a life-time supply of polyclonal antibody will be available to them after immunizing a single animal. One hen can produce as much antibody as 10 – 20 rabbits, and it’s so much easier to collect eggs than bleed 10 rabbits!
Making an IgY antibody in hens isn’t that different from producing a rabbit antibody, except that it’s easier because bleeding the animal is not necessary. Perhaps the most difficult part of raising antibodies in chickens is to provide a suitable environment for them. Hens prefer to roost on sticks at night, lay their eggs in a nesting box and have regular “dust baths” in sand or wood shavings.
The European Centre for the Validation of Alternative Methods (EVCAM) has reported on a workshop that validates the benefits of using chickens as laboratory animals to produce polyclonal antibodies.
Protocol - Hen Immunization
Hen Immunization Protocol
The following is an example of an immunization protocol that has been used for the successful generation of IgY polyclonal antibodies:
Collect a couple of eggs before immunization begins. IgY purified from these eggs will serve as your control IgY.
On day 0, inject between 0.02 and 0.5 mg antigen (with Freund’s complete adjuvant) subcutaneously and/or intramuscularly into the breast tissue of the hen at multiple sites. The total volume of antigen /adjuvant should be about 1 ml with the adjuvant making up between half and two-thirds the volume. Use a comparable amount of antigen that you would use to immunize a rabbit.
Repeat immunizations on day 10, 20 and 30 using incomplete Freund’s adjuvant and about half the amount of antigen. Specific antibody should be detected by day 30 in the eggs. For prolonged antibody production, hens should receive boosts every couple of months.
Individual hens will react differently to immunization with a particular antigen. Antibody titres will vary as will the time period in which the titres are stable.
IgY Purification from Chicken Egg Yolks
Once you’ve immunized your hens for IgY antibody production and collected immune eggs, the next step is to purify the IgY from the egg yolks. Unlike serum, which contains a number of immunoglobulin classes – IgG, IgM, IgD, IgA and IgE, yolk contains only one class of antibody – IgY. However, the egg yolk is a complex mixture of water (50%) lipids (32-35%) and proteins (16%)1 and for most experimental purposes, it is advisable to, at least, partially purify the IgY protein, by removing the bulk of the lipids and lipoproteins. Proteins residing within the yolk are of 4 types: lipovitellins, phosphorous-containing lipoproteins (40%), apovitellenins, containing less phosphorous but more lipid (37.3%), phosvitin, a phosphoprotein (13.4%) and the livetins (9.3%), of which IgY is part 1. Removal of the yolk lipids and lipoproteins leaves a water soluble fraction, containing IgY along with other proteins, which crudely could be compared to an animal serum, in terms of usability in immunoassays. A number of methods which remove most of the lipids/lipoproteins have been described (reviewed in Refs. 1, 2):
- Polyethylene Glycol precipitation3
- Dextran Sulphate Precipitation4
- Organic Solvent Lipid Solubilization5
- Natural Gums, Xantham/Carageenan Precipitation6
- Lipid Dilution/Ultrafiltration7
Following the delipidation of your egg yolk, the almost lipid-free solution can now be treated in a number of ways to concentrate/purify the IgY fraction:
- Polyethylene Glycol Precipitation3
- Sodium Sulphate Precipitation4
- Ultrafiltration/Ammonium Sulphate Precipitation7
- Preparative Electrophoresis8
References
- Kovacs-Nolan, J. and Y. Mine, 2004. Avian egg antibodies: basic and potential applications. Avian and Poultry Biology Reviews 15 (1), 2004, 25-46.
- Akita, EM and S. Nakai, 1993. Comparison of four purification methods for the production of immunoglobulins from eggs laid by hens immunized with an enterotoxigenic strain of E. coli. J. Immunol. Methods 160: 207-14.
- Polson, A., von Wechmar, M.B. and Fazakerley, G. 1980. Antibodies to proteins from yolk of immunized hens. Immunol. Commun., 9 :495-514.
- Jensenius, J.C., Anderson, I., Hau, J., Crone, M. and Kock, C. 1981. Eggs: conveniently packaged antibodies. Method for puri®cation of yolk IgG. J. Immunol. Methods, 46, 63-8.
- Bade, H. and Stegemann, H., 1984. Rapid method of extraction of antibodies from hen egg yolk. J. Immunol. Methods, 71, 421-6.
- Hatta, H., Kim, M. and Yamamoto, T.,1990. A novel isolation method for hen egg yolk antibody IgY. Agric. Biol. Chem., 54 : 2531-5.
- Akita, E.M. and Nakai, S. 1992. Immunoglobulins from egg yolk: Isolation and purification. J. Food Sci., 57, 629-34.
- Gee, Sarah C., Irene M. Bate, Theresa M. Thomas and Dennis B. Rylatt. 2003. The purification of IgY from chicken egg yolk by preparative electrophoresis. Protein Expr Purif 30:151-5.
Enzyme Linked Immunosorbent Assay (ELISA)
Described here is a Direct ELISA, a procedure which will provide you with a titre of your primary IgY antibody:
Reagents and Buffers:
Coating Buffer (0.05 M Carbonate Buffer, pH 9.6)
1.9 g Na2CO3*H2O
2.9 g NaHCO3
QC to volume of 1 L wtih distilled water and mix thoroughly. Check the pH, adusting if necessary. Store in fridge, indicating a 2-week expiry date.
1 M Potassium Phosphate Buffer, pH 7.3
660 ml 1 M K2HPO4
330 ml 1 M KH2PO4
Mix thoroughly. Check pH. Adjust if necessary (to lower pH, add more 1M KH2PO4; to raise pH, add more 1M K2HPO4). Store in fridge.
Phosphate Buffered Saline (PBS)
30 ml 5 M NaCl
10 ml 1 M Potassium Phosphate buffer, pH 7.3
QC to volume of 1 L wtih distilled water and mix thoroughly. Store in fridge.
Phosphate Buffered Saline-Tween, 0.05% (PBS-Tween)
Add 0.5 mL Tween 20 to 1 L PBS.
Blocking Buffer (2% milk in PBS-Tween)
Dissolve 2 g non fat dry milk powder in 100 ml PBS-Tween. Store in fridge for up to a week.
Diluent Buffer
Dissolve 0.3 g non fat dry milk powder in 100 ml PBS-Tween Store in fridge for up to a week.
0.1M Citric Acid
2 g citric acid
QC to volume of 100 mL wtih distilled water and mix thoroughly. Store in fridge.
0.1M Sodium Phosphate Dibasic (Na2HPO4)
14.2 g Na2HPO4
QC to volume of 100 mL wtih distilled water and mix thoroughly. Store in fridge.
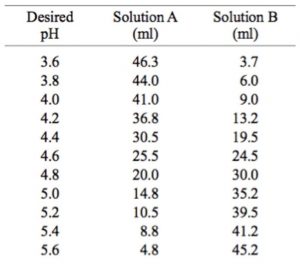
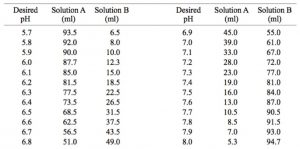
Citrate Phosphate Buffer, pH 4.0
Combine equal amounts of 0.1M Citric Acid and 0.1M Na2HPO4.
Mix thoroughly. Check pH. Adjust if necessary (to lower pH, add more citric acid, to raise pH, add more Na2HPO4).

Procedure
- Prepare your experiment by noting on your 96-well ELISA plate, which IgY lots are being tested. Make sure to include a negative control (wells with no antigen, just coating buffer) as well as a positive control (which may be an antibody that you know is positive OR your primary antibody diluted similarly to your antigen).
- Dilute the antigen to 2.0 ug/ml (peptide, 5 ug/ml) in Coating Buffer. Add 100 ul to each well, cover the plate and incubate overnight at 4° C.
- Next day, flick out contents of wells and wash once with PBS-Tween. Pat the plate dry on a paper towel.
- Block the rest of the protein binding sites on your plate by adding 200 ul Blocking Buffer to each well. Cover plate and incubate for 2 hours at room temperature. Wash plates 3 time with PBS-Tween.
- To each well add 100 ul Diluent Buffer. Dilute test antibodies to 300 ug/ml (in diluent buffer) and add 50 ul to appropriate wells in row A only. Serial dilute the antibody by mixing with micropipette contents of wells in row A, 8 times and removing 50 ul and adding to row B. Repeat down to row G, discarding the last 50 ul/well from row G. Leave row H blank. Incubate plate(s) for 1-2 hours at room temperature.
- Wash plates 3 times with PBS-Tween. To each well add 100 ul Horseradish Peroxidase (HRP) Donkey anti-IgY (Cat. # DAIgY-HRP), diluted 1 :5000 in Diluent Buffer. Incubate plate(s) for 1 hour at room temperature.
- Wash plates 3 times with PBS-Tween. Pat the plate dry on a paper towel. Now, develop the plates by adding the enzyme substrate. There are a number of substrates available commercially. We use ABTS (2,2′-Azinobis [3-ethylbenzothiazoline-6-sulfonic acid]-diammonium salt) (Sigma), adding 0.4 mg to Citrate Phosphate buffer. Just before adding 100 ul to each well, add 10 ul 30% hydrogen peroxide (H2O2) per 100 ml substrate solution. Incubate approximately 20 minutes or until green colour develops. Measure colour at 410 nm setting in ELISA reader.
| IgG | IgE | IgY | IgY (ΔFc) | |
| Species | Mammals | Mammals | Birds, Reptiles, Amphibians Lungfish | Anseriform Birds, Amphibians, Lungfish |
| Molecular Weight (kD) | 150 | 200 | 180 | 118 |
| Isoelectric Point (pI) | 6.4-9.0 (Ref. 1) | 5.2-5.8 (Ref. 2) | 5.7-7.6 (Ref. 3) | 5.2-7.3 (Ref. 4) |
| Extinction Coefficient* | 1.40 | 1.62 (Ref. 5) | 1.36 | 1.38 |
| No. Constant Domains | 4 | 4 | 3 | 2 |
| Carbohydrate Content (%) | 2-4 | 12 | 4 (Ref. 6) | 0.6 (Ref. 7) |
| Hinge Region | Yes | No | No | No |
| Antigen Valency | 2 | 2 | 2 | 2 |
| Major Serum Antibody | Yes | No | Yes | Yes |
| Source | Serum | Serum | Serum/Egg Yolk | Serum/Egg Yolk |
| Concentration (mg/ml) | 10-12 | 10-4 | Chicken: Serum: 8-10 (Ref. 10) Yolk: 10-20 (Ref. 9) | Duck: Yolk: IgY (ΔFc): 3-12 (Ref. 4) |
| Mammalian Complement binding | Yes | No | No | No |
| Rheumatoid Factor Binding | Yes | No | No | No |
| Fc receptor binding | Yes | No | No | No |
| Mediates Anaphylaxis | No | Yes | Yes | No |
| Binding to Protein A | Yes | No | No | No |
| Binding to Protein G | Yes | No | No | No |
| Binding to Protein L | Yes | Yes | No (Ref. 8) | No |
* optical density of a 1.0 mg/ml solution at 280 nm.
References
- Li G, Stewart R, Conlan B, Gilbert A, Roerth, P, Nair H. (2002) Purification of human immunoglobulin G: a new approach to plasma fractionation. Vox Sanguinis 83 : 332-338.
- Clerc, M. -F., Granato, D. A. and M. Horisberger, (1988). Labelling of colloidal gold with IgE. Histochemistry and Cell Biology 89 : 343-349.
- Dávalos-Pantoja L, Ortega-Vinuesa JL, Bastos-González D, Hidalgo-Alvarez R, (2000) A comparative study between the adsorption of IgY and IgG on latex particles. J Biomater Sci Polym Ed. 11:657-73.
- Chiou, Victor, 2003. Process for selectively isolating IgY antibodies from egg yolk of an anseriform bird and IgY antibodies obtained thereby. United States Patent Application Publication 20060223986.
- Liu, F.T., Bohn, J.W., Ferry, E.L., Yamamoto, H., Molinaro, C.A., Sherman, L.A., Klinman, N.R., and Katz, D.H. (1980) Monoclonal dinitrophenyl-specific murine IgE antibody preparation, isolation and characterization. J. Immunol. 124 : 2728-2736.
- Ohta M, Hamako J, Yamamoto S, Hatta H, Kim M, Yamamoto T, Oka S, Mizuochi T, Matsuura F., 1991, Structures of asparagine-linked oligosaccharides from hen egg-yolk antibody (IgY). Occurrence of unusual glucosylated oligo-mannose type oligosaccharides in a mature glycoprotein.
- Zimmerman, B., Shalatin, N. and H.M. Grey (1971). Structural studies on the duck 5.7S and 7.8S immunoglobulins. Biochemistry 10 : 482-488.
- Nilsson, E. Larsson, A. (2005) Chicken Anti-Protein L for the Detection of Small Amounts of Protein L in the Presence of IgG. Hybridoma. 24(2): 112-114
- Carlander, D. 2002.Avian IgY Antibody. In vitro and in vivo. Acta Universitatis Upsaliensis. Comprehensive Summaries of Uppsala Dissertations from the Faculty of Medicine 1119.53 pp. Uppsala. ISBN 91-554-5227-2
- Wang, Y.W., Cherian, G., Sunwoo, H.H and Sim. J.S. 2000. Dietary polyunsaturated fatty acids significantly affect laying hen lymphocyte proliferation and immunoglobulin G concentration in serum and egg yolk. Can. J. Anim. Sci. 80:597-604.
It’s easy to understand why IgY was first categorized as an immunoglobulin G – it’s similar to mammalian IgG (see Figure on right).
Like IgG, IgY also has 2 heavy and 2 light chains, shaped in the characteristic Y shape with an antigen valency of 2. IgY and IgG share a similar sedimentation coefficient of about 7S and both are eluted from DEAE cellulose with low ionic strength buffers. Functionally, they play a similar biological role as well. Both IgG and IgY are the major immunoglobulins providing defense against infectious agents and appear in blood at high concentrations following synthesis of a higher molecular weight antibody (IgM). There are striking differences however: There is little or no immunological cross-reactivity between IgY and mammalian IgG. IgY has a higher molecular weight due to an extra heavy chain constant domain, lacks a well-defined hinge region and has unique oligosaccharide sidechains1. It has been proposed that the extra domain (CH2) may be the evolutionary precursor to the mammalian IgG hinge region2. IgY is capable of mediating anaphylactic reactions, a function limited to IgE in mammals. In fact, other similarities between IgY and IgE (see Comparison of IgG, IgE, IgY and IgY (ΔFc) and Figure to the right), including similar intrachain disulphide bonding in their extra heavy chain domain, have led some to suggest that IgY is the ancestral molecule to both IgG and IgE3. Molecular genetic studies have confirmed this 4,5,6,7,8

References
- Ohta M, Hamako J, Yamamoto S, Hatta H, Kim M, Yamamoto T, Oka S, Mizuochi T., Matsuura F., 1991, Structures of asparagine-linked oligosaccharides from hen egg-yolk antibody (IgY). Occurrence of unusual glucosylated oligo-mannose type oligosaccharides in a mature glycoprotein. Glycoconj J. 8:400-13.
- Putnam, F.W., Takahashi, N., Tetaert, D., Debuire, B. and Lin, C., 1980, Amino acid sequence of the first constant region of the delta heavy chain of human IgD. PNAS 78 : 6168-6172.
- Warr, G.W., Magor, K.E. and D.A. Higgins, (1995) IgY : clues to the origins of modern antibodies. Immunology Today 16 :392–398.
- Hedges, S.B. (2002) The origin and evolution of model organisms. Nat. Rev. Genet. 3 : 838-849.
- Reisz, R.R. and Muller, J. (2004) Molecular timescales and the fossil record: a paleontological perspective. Trends Genet 20 : 237-241.
- Bininda-Emonds, O.R., Cardillo, M., Jones, K.E., MacPhee, R.D., Beck, R.M., Grenyer, R., Price, S.A., Vos, R.A., Gittleman, J.L. and Purvis, A. (2007) The delayed rise of present-day mammals. Nature 446 : 507-512.
- Vernersson, M., Aveskogh, M., and Hellman, L. (2004) Cloning of IgE from the echidna (Tachyglossus aculeatus) and a comparative analysis of epsilon chains from all three extant mammalian lineages. Dev. Comp. Immunol. 28 : 61-75.
- Vernersson, M., Aveskogh, M. Munday, B., and Hellman, L. (2002), Evidence for an early appearance of modern post switch immunoglobulin isotypes in mammalian evolution (II), cloning of IgE, IgG1 and IgG2 from a monotreme, the duckbilled platypus, Ornithorhynchus anatinus. Eur. J. Immunol. 32 : 2145-2155.
Protocols
Issue & Tips
Autofluorescence
- One method of checking for autofluorescence is to look at the slide with multiple filters. If the same signal is seen with multiple filters, it could be autofluorescence.
- To help decrease autofluorescence, add a Sudan Black step after the SA-FL incubation.
- Make up the Sudan Black at 0.2% in 70% Ethanol (mix for 2 hours in the dark).
- After the SA-FL incubation and wash step, add 100 µL of 0.2% Sudan Black to the slide.
- Incubate for 15 minutes at room temperature in the dark.
- Wash 8 X 1 minute using the wash buffer recommended in the assay specific protocol.
- Mount and view the slide under the microscope.
Suppressed Signal
If Sudan Black was used:
- While the use of Sudan Black can help decrease autofluorescence, it can also decrease signal. Sudan Black should be used with caution.
- The addition of 0.02% tween to the wash step following the Sudan Black incubation may help to increase the signal.
- Sudan Black should be made up fresh each time.
- Sudan Black can be tested at a lower concentration (e.g., 0.025%).
Additional tips:
- Completed slides should be stored in the dark when they are not in use.
- Slides should be analyzed shortly after the mounting media is dry.
The signal is difficult to find
- Use the bright field setting on the microscope to focus in on the correct section of the tissue prior to using the excitation wavelength listed in the kit specific protocol.
- Make sure that the work area surrounding the microscope is dark.
- Allow your eyes to adjust to the dark prior to viewing the slides.
Description
Ammonium sulfate precipitation is one of the most commonly used methods for protein purification from a solution. In solution, proteins form hydrogen bonds with water molecules through their exposed polar and ionic groups. When high concentrations of small, highly charged ions such as ammonium sulfate are added, these groups compete with the proteins to bind to the water molecules. This removes the water molecules from the protein and decreases its solubility, resulting in precipitation. Critical factors that affect the concentration at which a particular protein will precipitate include: the number and position of polar groups, molecular weight of the protein, pH of the solution, and temperature at which the precipitation is performed. The concentration at which antibodies precipitate varies among species; most rabbit antibodies precipitate with a 40% saturated solution, whereas mouse antibodies require 45-50% saturation.
Protocol
- Allow serum or ascitic fluid to thaw, determine total volume, and centrifuge at 3000g for 30 minutes.
- Transfer sample to a beaker containing a stir bar and place on a magnetic stirrer.
- While the sample is stirring, slowly add saturated ammonium sulfate to bring the final concentration to 50% saturation.
- Volume of ammonium sulfate needed is equal to the volume of sample.
- Adding the ammonium sulfate very slowly ensures that local concentration around the site of addition does not exceed the desired salt concentration.
- Once the total volume of ammonium sulfate is added, move beaker to 4°C for 6 hours or overnight.
- Transfer to conical tube and centrifuge the precipitate at 3000g for 30 minutes.
- Carefully remove and discard supernatant. Invert conical tube and drain well. For serum or ascites, resuspend pellet in 30%-50% of the starting volume in 1XPBS. For monoclonal antibody tissue culture supernatants, resuspend pellet in 10% of the starting volume in 1X PBS.
- Transfer antibody solution to dialysis tubing and dialyze versus three changes of 1XPBS/0.08% Sodium Azide. Be sure to allow enough space for expansion of the antibody solution during dialysis. Normally twice the re-suspended volume is sufficient.
- Remove antibody solution from the tubing and centrifuge to remove any remaining debris.
- Determine the concentration and store at -80°C for long-term storage.
Buffer Formulations
Acid precipitation solution for precipitation of nucleic acids
– 1 M HCl
– 0.1 M sodium pyrophosphate
– Nucleic acids can also be precipitated with a 10% (w/v) solution of trichloroacetic acid (TCA)
Ammonium Sulfate, Saturated (SAS)
– 76 g ammonium sulfate
– 100 ml H2O
– Heat with stirring to just below boiling point. Let stand overnight at room temperature.
Ammonium Acetate, 10M
– Dissolve 385.4 g ammonium acetate in 150 ml H2O
– Add water to 500 mls
ATP, 100mM
– 1 g ATP (adenosine triphosphate)
– 12 ml H2O
– Adjust pH to 7.0 with 4 M NaOH – Adjust volume to 16.7 ml with H2O – Store in aliquots indefinitely at −20°C
Carbonate buffer
– 1.6 g Na2CO3 (15 mM final)
– 2.9 g NaHCO3 (35 mM final)
– 0.2 g NaN3 (3.1 mM final) (optional as preservative)
– H2O to 1 liter
– Adjust to pH 9.5
– CAUTION: Sodium azide is poisonous; follow appropriate precautions for handling, storage, and disposal.
Church’s Buffer for Northern and Southern Blotting Hybridization
Preparation of 0.5 M phosphate buffer, pH 7.2
– 177.9 g Na2PO4-2H2O (1M), qs to 1 liter
– 137.99 g Na2PO4-H2O (1M), qs to 1 liter
Mix 342 ml of Na2PO4-2H2O (1M) with 158 ml of Na2PO4-H2O (1M), qs to 500 ml. Adjust pH to 7.2.
Preparation of 1 liter Church’s Buffer – 500 ml phosphate buffer pH 7.2
– 2 ml (0.5 M) EDTA (1mM final)
– 10 g BSA (fraction V) (0.1% final)
– 70 g SDS (7 % final)
Dissolve BSA by adding slowly while mixing to phosphate buffer. Dissolve SDS separately and add to BSA phosphate solution. Add SDS and EDTA – qs to 1 liter.
Sterilize by filtration
Calcium- and magnesium-free Dulbeccos phosphate-buffered saline (CMF-DPBS)
– 8.00 g NaCl (0.137 M)
– 0.20 g KCl (2.7 mM)
– 2.16 g Na2HPO4⋅7H2O (8.1 mM)
– 0.20 g KH2PO4 (1.1 mM)
– 0.10 g MgCl2⋅6H2O (0.5 mM)
– 0.10 g anhydrous CaCl2 (0.9 mM)
– H2O to 1 liter
– Store at room temperature
DTT (dithiothreitol), 1 M
– Dissolve 1.55 g DTT in 10 ml water and filter sterilize. Store in aliquots at −20°C
EDTA (ethylenediaminetetraacetic acid), 0.5 M (pH 8.0)
– Dissolve 186.1 g disodium EDTA dihydrate in 700 ml water.
– Adjust pH to 8.0 with 10 M NaOH (∼50 ml; add slowly).
– Add water to 1 liter and filter sterilize.
– Begin titrating before the sample is completely dissolved. EDTA, even in the disodium salt form, is difficult to dissolve at this concentration unless the pH is increased to between 7 and 8.
Eisen Buffer (10x PBS) (10 Liters)
– 80.0 g NaCl (876.6 gm)
– 2.4 g NaH2PO4 (25.62 gm)
– 14.4 g Na2HPO4 (225 gm)
– H2O to 10 liters
– Dilute 1:10 for use
HBSS (Hanks balanced salt solution)
– 0.40 g KCl (5.4 mM final)
– 0.09 g Na2HPO4⋅7H2O (0.3 mM final)
– 0.06 g KH2PO4 (0.4 mM final)
– 0.35 g NaHCO3 (4.2 mM final)
– 0.14 g CaCl2 (1.3 mM final)
– 0.10 g MgCl2⋅6H2O (0.5 mM final)
– 0.10 g MgSO4⋅7H2O (0.6 mM final)
– 8.0 g NaCl (137 mM final)
– 1.0 g D-glucose (5.6 mM final)
– 0.2 g phenol red (0.02%; optional)
– Add H2O to l liter and adjust pH to 7.4 with 1 M HCl or 1 M NaOH
– Filter sterilize and store up to 1 month at 4°C
HBSS may be made without Ca2+ and Mg2+ (CMF-HBSS).
Bottles should be kept tightly closed to prevent CO2 loss.
HEPES-buffered saline solution, 2× solution
– 16.4 g NaCl
– 11.9 g HEPES acid
– 0.21 g Na2HPO4
– 800 ml H2O
– Titrate to pH 7.05 with 5 M NaOH Add H2O to 1 liter
Filter sterilize through a 0.45-μm nitrocellulose filter Store at −20°C
If the solution is to be used for transfection, the pH should be between 7.05 and 7.12, and should be tested for transfection efficiency.
Lysogeny broth (LB) Medium
Per liter
– 10 g tryptone
– 5 g yeast extract
– 5 g NaCl
– 1 ml 1 M NaOH Autoclave 25 min
Although the pH is adjusted to near 7 with NaOH, the medium is not very highly buffered, and the pH of a culture growing in the medium drops as the culture nears saturation.
The medium may also contain antibiotics (e.g., 50 μg/ml ampicillin, 12 μg/ml tetracycline), galactosides (e.g., 20 μg/ml Xgal, 0.1 mM IPTG), or other nutritional supplements added after the medium has been autoclaved.
To make LB agar for LB plates, add 5 g/liter agar or agarose.
Phosphate buffer, pH 7.2
Preparation of 0.5 M phosphate buffer, pH 7.2
– 177.9 g Na2PO4-2H2O (1M), qs to 1 liter
– 137.99 g Na2PO4-H2O (1M), qs to 1 liter
Mix 342 ml of Na2PO4-2H2O (1M) with 158 ml of Na2PO4-H2O (1M), qs to 500 ml. Adjust pH to 7.2.
Sterilize by filtration
Phosphate-buffered saline (PBS) (1x)
– 8.00 g NaCl (0.137 M)
– 0.20 g KCl (2.7 mM)
– 0.24 g KH2PO4 (1.4 mM)
– 1.44 g Na2HPO4 (0.01 M)
– H2O to 1 liter
Phosphate-buffered saline (PBS) (10x)
– 80.0 g NaCl (137 mM)
– 2.0 g KCl (27 mM)
– 2.4 g KH2PO4 (2.0 mM)
– 14.4 g Na2HPO4 (0.1 M)
– H2O to 1 liter
Potassium acetate buffer, 0.1 M
– Solution A: 11.55 ml glacial acetic acid per liter (0.2 M) in water.
– Solution B: 19.6 g potassium acetate (KC2H3O2) per liter (0.2 M) in water.
Preparation of 0.1 M Sodium and Potassium Acetate Buffers
Potassium phosphate buffer, 0.1 M
– Solution A: 27.2 g KH2PO4 per liter (0.2 M final) in water.
– Solution B: 34.8 g K2HPO4 per liter (0.2 M final) in water.
Preparation of 0.1 M Potassium Phosphate Buffers
SDS electrophoresis buffer, 5× solution
– 15.1 g Tris base
– 72.0 g glycine
– 5.0 g SDS
Bring to 1 liter with distilled, deionized H2O. Store up to 1 month at 0° to 4°C. Dilute to 1× before use.
Do not adjust the pH of the stock solution; the pH is 8.3 when diluted to 1×.
SDS sample buffer
Preparation of SDS Sample Buffer
| 2x | 4x | Final conc. in 1x sol. | |
| 0.5 M Tris⋅Cl, pH 6.8 | 2.5 ml | 5 ml | 62.5 mM |
| SDS | 0.4 g | 0.8 g | 2% w/v |
| Glyercol | 2 ml | 4 ml | 10% v/v |
| Bromophenol Blue | 20 mg | 40 mg | 0.1% w/v |
| 2-mercaptoethanol | 400 µl | 800 µl | 300 mM |
| H20 | qs to 10 ml | qs to 10 ml | N/A |
TAE (Tris/acetate/EDTA) electrophoresis buffer, 10× solution
– 224.2 g Tris base
– 5.71 ml glacial acetic acid
– 3.72 g Na2EDTA⋅2H2O
Bring to 1 liter with H2O.
TBE (Tris/borate/EDTA) electrophoresis buffer, 10× solution
– 108 g Tris base
– 55 g boric acid
– 40 ml 0.5 M EDTA, pH 8.0
Bring to 1 liter with H2O.
TBS (Tris-buffered saline)
– 100 mM Tris-HCl, pH 7.5
– 0.9% (w/v) NaCl
Store up to several months at 4°C.
TE (Tris/EDTA) buffer
– 10 mM Tris-HCl, pH 7.4, 7.5, or 8.0
– 1 mM EDTA, pH 8.0
TEA (triethanolamine) solution
– 50 mM triethanolamine, pH ∼11.5
– 0.1% (v/v) Triton X-100
– 0.15 M NaCl
Add Triton X-100 from a 10% stock
Wash Buffer
20 mM Tris, pH 8.0 containing 0.2% Trition X100
Elution Buffer
Wash buffer containing 4% SDS (and also include protease inhibitors if required)
NOTE: The choice of wash and elution buffers should be empirically determined. The buffers listed here are for general use and will not be ideal for all proteins/systems. If phospho proteins are being pulled down the addition of a phosphatase inhibitor may be required to prevent degradation.
Procedure
- Centrifuge the cellular debris in an ultracentrifuge at 100,000 x g for 10 min to remove any non- soluble material that will interfere with the later assay.
- If sufficient sample is available it is prudent to clear by means of preliminary pass or mock pull down using a pre-column or gel.
- Incubate the cleared supernatant with specific antibody against the protein of interest (1 hour is generally sufficient but an overnight incubation may be required for some Ab-Ag interactions). Incubate at 4 degrees C for O.N. or 37 C for shorter periods.
- Incubate Sample/Ab mixture with an adequate amount of protein A (or G) speharose) 1h at 4 degrees C.
- Spin down the beads briefly in a microcentrifuge, 3-5 minutes 1000g, and remove and save supernatant to assay for unbound (depleted) fraction.
- Wash beads by adding wash buffer vortexing and spinning down as before. At least three cycles (preferably more) of wash are required to remove any unbound material from gel pellet.
NOTE: it may be advisable to ad 0.5 M NaCl to the wash buffer to aid in removal of any non-specific binding to the gel. - Spin one final time – remove supernatant and retain pellet.
- Add elution buffer to the tube and vortex. Let sit on ice with periodic vortexing for 15 minutes.
- Spin down, retain the eluted material /buffer (which will contains you’re your eluted protein of interest/sample. It may be required to repeat the elution step and poll or assay elutions separately as required – depending on the avidity of the antibody for ligand and protein A/G for your Ab.
- Analyze the various fractions obtained in the pull-down assay via Total protein staining or via Western blotting (remember that your sample will contain the monoclonal/polyclonal antibody eluted off the gel and perhaps protein A and G as well – if from a supplier other than Exalpha). If western blotting is performed, it is generally accepted that a separate Ab (not the one used to pull down) should be employed).
- A negative control should be included during the immunoprecipitation procedure using beads conjugated to a different antibody to ensure that the proteins co-immunoprecipitated are true positives.
Background
Bromodeoxyuridine (BrdU) is a thymidine analog that is used in cell proliferation studies. BrdU in culture is incorporated into DNA during DNA synthesis. Cellular incorporation of BrdU can be detected by anti-BrdU specific antibodies following membrane permeabilization by flow cytometry or immunohistochemistry. The molecular weight of BrdU is 307.1.
Preparation and Storage
Preparations of BrdU for in vivo or in vitro use should contain NO PRESERVATIVES. As such they should be handled under aseptic conditions. As with any biologic agent, avoid multiple freeze-thaws.
Store product at -80°C prior to use or for long-term storage of stock solutions.
Useful concentrations of BrdU stock solution for injection or in vitro use are 0.5 ml of a 10 mg/ml BrdU solution diluted in 1X DPBS. The BrdU solution, once thawed, is stable at 4°C for 2 weeks.
Application Notes / Recommended Assay Procedure
In order to detect BrdU immunostaining in proliferating cells it is first necessary to label the cells or tissue with BrdU. Labeling is either done in vitro for cell cultures or performed in vivo.
In vitro labeling of primary cells in culture and/or cell lines with BrdU
There are many different protocols for in vitro BrdU labeling of cells – one method is summarized here. As with all protocols, the method used should be optimized for your specific assay system before proceeding with experimental conditions.
Incubation of both primary cell cultures (PBMC’s etc) or cell lines with BrdU at a final concentration of 10 μM (diluted in cell culture medium) is an effective method for labeling a wide variety of cell lines from many different origins (human, mouse, rat, etc).
To label cells in vitro, add 10 μl of a 1 mM BrdU working solution (dilute BrdU Stock Solution 1:30 in tissue culture media to yield 1 mM solution) directly to each ml of tissue culture media. For labeling cells in 96 well plates it is convenient to make a 1:300 dilution of stock and add 10 ul per well of a 96 well plate containing 100 ul media. The cell culture density, in either case, should not exceed 2 x 10e6 cells/ml. Cells are incubated for 1-24 hours. The incubation time with BrdU is dependent on the cell rate of cell cycle (exact time should be empirically determined to achieve the optimal signal-to-noise ratio for your system). For example, an effective length of time for pulsing a rapidly proliferating cell line (e.g., HL60 cells ) is 30-45 minutes, (i.e., when the cells are in the logarithmic phase of cell growth). For primary cultures, such as peripheral blood lymphocytes with no exogenous stimulation (mitogen, etc.), an incubation time of 24 hours may be required. Investigators should empirically determine the incubation time that is optimal for their particular experimental system. Cells from the same population / treatment that are not BrdU-labeled should always be used as the negative cell staining control. This needs to be done with each experiment performed.
In vivo labeling of cells with BrdU
Two commonly used methods for in vivo BrdU labeling of tissues and cells include the intraperitoneal injection (IP) of a BrdU-containing solution into mice and the feeding of mice with BrdU that is added to their drinking water.
a) IP Method
A sterile solution of 10 mg/ml BrdU Dulbecos PBS is ideal for in vivo use. Inject mice i.p. with 100-200 μl (1-2 mg) of BrdU solution. Incorporation of BrdU can be detected in small intestine, thymus and bone marrow in as little as 0.5 hr post-injection. BrdU can be detected in most of the tissues 24 hrs post-injection, but this may be too long for rapidly dividing tissue such as the small intestine. Optimize treatment times by performing a time course for the tissue of interest before performing experiments.
b) Drinking Water Method
Dilute BrdU to 0.8 mg/ml in the drinking water. The BrdU mixture should be prepared freshly and changed daily. Long-term ingestion of BrdU will have toxic and/or lethal effects. For longer term studies, feeding mice with BrdU for 9 consecutive days followed by a rest period and feeding with water may be effective. BrdU incorporation may be detected in these cells past 70 days.
NOTE: BrdU has an unpleasant taste – a convenient trick is to add a bit of sucrose to the drinking water if the animals are not drinking the water containing BrdU.
Background
Sandwich ELISA’s are the tool of choice for measuring small quantities of antigen in complex biological mixtures. The principle involves ‘capturing’ an antigen/analyte between two ‘layers’ of antibodies which target separate epitopes on the target molecule (i.e. capture and detection antibody). The target molecule must of necessity contain more than one epitope for a sandwich ELISA to be performed. Small molecule’s or haptens should be measured in a competitive ELISA (to be covered in a separate application note.
Either monoclonal or polyclonal antibodies can be utilized as the capture and/or detection antibodies in Sandwich ELISA systems. Monoclonal antibodies inherently only recognise a single epitope and are more often used as capture antibodies. Polyclonal antibodies may be used to capture but since much of a poyclonal is non-antigen specific in nature, an immunoaffinity purified polyclonal should be used when ever possible
Warning
Sandwich ELISA procedures are often difficult to optimise especially when testing biological fluids (serum, plasma etc) and when ever possible, proven ‘match pair’ antibodies should be used.
Procedure Outline
Coating with Capture antibody
1. Coat the wells of a high binding microtiter plate with the capture antibody at a concentration of 1-10 μg/ml in either dI water or PBS (pH 7.4), 100 ul /well.
2. Cover the plate with an adhesive plastic plate cover or parafilm and incubate overnight at 4°C.
3. Remove the coating solution and wash the plate x3 by filling the wells with 200 μl PBS (the addition of a non-ionic detergent often required for complete washing). The solutions or washes are removed by flicking the plate over a sink. The remaining drops are removed by patting the plate on a paper towel or other absorbent material.
Blocking the plates
4. Block any remaining protein-binding sites in the wells to be utilized by adding 200 μl blocking buffer / well, 1-5% non fat dry milk or fatty acid free BSA in PBS.
5. Cover the plate with an adhesive plastic plate cover or parafilm and incubate 2-4 hours at RT or overnight at 4°C.
Samples
6. Add 100 μl of appropriately diluted samples to each well diluted in PBS BSA or other suitable diluent. For quantitative results, a standard curve should be constructed using an antigen of known concentration. Compare unknowns to the standard curve and perform regression analysis to calculate values for unknowns. Samples and standards should always be run in duplicate. Standards and blanks must be run with each plate to ensure accuracy. Incubate for 1-4 hours at RT, 4°C or 37°C (this should be determined empirically and will be different for each antibody pair and antigen.
You will need to optimize the concentration ranges to ensure a suitable standard curve and appropriate detection sensitivity.
7. After incubation, wash the plate x3 by filling the wells with 200 μl PBS (the addition of a non-ionic detergent often required for complete washing).
Detection antibody and Secondary antibody
8. Add 100 μl of diluted detection antibody to each well.
Ensure the secondary detection antibody recognizes a different epitope on the target protein than the coating antibody. Use proven matched pairs when possible.
9. Cover the plate with an adhesive plastic plate cover or parafilm and incubate for 1-4 h at room temperature.
10. Wash the plate as before.
11. Add 100 μl of conjugated (HRP, AP etc) secondary antibody, diluted at the optimal concentration (empirically determined) in blocking buffer immediately before use.
12. Cover the plate with an adhesive plastic plate cover or parafilm and incubate for 1-2 h at room temperature.
13. Wash the plate as before.
Detection
14. Dispense 100 μl (or 50 μl) of the substrate solution per well with a multichannel pipette or a multipipet.
There are numerous detection systems available. The choice of system will depend on sensitivity requirements and the type of reader/systems available in your laboratory. The main types of enzymes used for detection in ELISA are horse radish peroxidase (HRP) and alkaline phosphatase (ALP), with HRP being the more sensitive of the two.
For ALP, pNPP (p-Nitrophenyl-phosphate) is the most commonly used and readily available substrate. The yellow colour of nitrophenol can be measured at 405 nm after 30 min incubation/develoment at room temperature. This reaction can be terminated by adding equal reaction volume of 0.75 M NaOH.
NOTE: Shorter incubations often yield inconsistent results between the beginning of the assay plate and the end of the assay – front-to-back variability. Longer incubations generally only allow background to ‘creep’ up and lower overall sensitivity. If your assay develops too rapidly for a 30 min substrate incubation – optimization of primary and secondary antibodies is required.
The substrate for HRP is TMB (3,3’,5,5’-tetramethylbenzidine). Exalpha provides a ready to use liquid format TMB solution that offers excellent sensitivity while minimizing background.
TMB incubation should be for 30 min followed by addition of add equal volume of stopping solution (2 M H2SO4) and the assay is then read at OD 450 nm. NOTE: Shorter incubations often yield inconsistent results between the beginning of the assay plate and the end of the assay – front-to-back variability. Longer incubations generally only allow background to ‘creep’ up and lower overall sensitivity. If your assay develops too rapidly for a 30 min substrate incubation – optimization of primary and secondary antibodies is required.
Data Analysis
Prepare a standard curve from the data produced from the serial dilutions with the concentration on the x axis (log scale) vs absorbance on the Y axis (linear). Interpolate the concentration of the sample from this standard curve.
Lysate preparation
Lysate preparation will depend of the source of cells (Monolayer, Cell suspension or Tissue samples). In general, Cells are washed with cold 1xPBS, subsequently lysed with an appropriate buffer (i.e. RIPA buffer) containing freshly added protease inhibitors. Passed through a 21G needle to shear the DNA and then centrifuged at 10K rpm for 10min at 4°C. discarding the pellet. Determining the Protein concentration by BCA assay from Pierce.
Mix samples 1:1 ratio with 2x Sample loading buffer (Sigma S-3401) (10-60ug whole cell Lysate, 10-20µg nuclear extract, or 10-20ng purified protein per lane), and then boil the sample for 4 min. Unused samples can be stored at -20°C for up to several months.
Protein Separation and Detection
Separate protein samples and molecular weight markers by polyacrylamide gel electrophoresis.
Transfer protein samples from polyacrylamide gel onto nitrocellulose membrane using an electroblotting apparatus according to manufacturer’s protocols.
Block the nitrocellulose membrane for at least one hour at room temperature or overnight at 4°C on a rocking platform with TBST 5% non-fat dry milk solution using about 1 mL per cm2 of membrane.
Wash the nitrocellulose membrane 5 times in TBST for 10 minutes each on a rocking platform.
Incubate the nitrocellulose membrane for 60 minutes on a rocking platform with primary antibody diluted in TBST, 5% milk.
Wash the nitrocellulose membrane 5 times in TBST for 10 minutes each on a rocking platform.
Visualization
Incubate with second antibody enzyme conjugate diluted in 5% non-fat dry milk TBST for 60 minutes on a rocking platform. (Please see secondary antibody manufacturer’s recommendations for appropriate dilution)
Wash the nitrocellulose membrane 5 times in TBST for 10 minutes each on a rocking platform.
From our experience when using secondary Antibody conjugated to HRP, we recommend the use of SuperSignal West Femto Maximum Sensitivity Substrate from Pierce, when faced with a low expression of proteins in the Lysate.
A beginning exposure time of 30 seconds is recommended. This should be adjusted either longer or shorter depending on results obtained.
PRINCIPLE:
This type of staining is used for the detection of glycogen. Tissue sections are first oxidized by 0.5% periodic acid solution. The oxidative process results in the formation of aldehyde groupings through carbon-to-carbon bond cleavage. Free hydroxyl groups should be present for oxidation to take place. Oxidation is completed when it reaches the aldehyde and the aldehyde groups are detected by the Schiff reagent. A colorless, unstable dialdehyde compound is formed and then transforms to the colored final product through the restoration of the quinoid chromophoric grouping.
QUALITY ASSURANCE:
The PAS stain, along with diastase or amylase digestion has histochemical specificity for glycogen. Skeletal muscle normally contains glycogen and is often recommended as a positive control tissue.
SPECIMEN REQUIRED:
Snap-frozen human striated muscle.
METHOD:
Technique:
From the snap-frozen biopsy, cut 10-16 micron (12 µm) sections in a crytostat. Place one or more sections to a No.1, 22 mm square coverslip.
Equipment:
- Ceramic staining rack – Thomas Scientific #8542-E40
- Columbia staining dish – Thomas Scientific #8542-C12
- Columbia staining dish (jar) – Thomas Scientific #8542-E30
- Forceps
- Latex gloves
Reagents:
- Absolute alcohol (100% ethanol) – Quantum, FLAMMABLE store in flammable cabinet at room temperature
- Glacial Acetic Acid -Fisher A507-500, CORROSIVE store at room temperature
- Amylase – Sigma A-6505, store at room temperature
- Chloroform – Baxter 049-4, FLAMMABLE CARCINOGEN, store in a flammable cabinet at room temperature)
- Periodic Acid – Sigma P7875, store at room temperature
- Permount – Fisher SP15-100, FLAMMABLE HEALTH HAZARD
- Reagent alcohol, ACS – histological Fisher A962-4 or HPLC A995, FLAMMABLE, TOXIC, TERATOGENIC, store in flammable cabinet at room temperature
- Schiff Reagent – Harleco 6073/71, store at room temperature
- Xylenes – Fisher #HC700-1GAL, FLAMMABLE, store in flammable cabinet at room temperature
Solutions:
- Carnoy’s Fixative (store at room temperature) PREPARE IN A FUME HOOD
100% Alcohol ~ 60 ml
Chloroform ~ 30 ml
Glacial acetic acid ~10 ml - Periodic Acid Solution, 0.5 % (w/v) PREPARE FRESH FOR EACH STAIN
Periodic acid ~ 50 mg
Dissolved in deionized water ~ 10 ml - 50% Alcohol
Reagent alcohol ~ 50 ml
Deionized water ~ 50 ml - 70% Alcohol
Reagent alcohol ~ 70 ml
Deionized water ~ 30 ml - 80% Alcohol
Reagent alcohol ~ 80 ml
Deionized water ~ 20 ml - 95% Alcohol
Reagent alcohol ~ 95 ml
Deionized water ~ 5 ml
Staining Procedure
- Place the coverslip with the section on it into a columbia staining dish (Thomas Scientific (#8542- E40).
- Add enough Carnoy’s fixative to cover the coverslip and incubate for 10 minutes. (Specific Volume? Enough to cover section?)
- Very carefully, rinse the (coverslip, dish, section?) with several exchanges of deionized water. Sections may wash off!!
- Add enough Periodic Acid solution to cover the coverslip and incubate for 10 minutes.
- Very carefully, rinse the coverslip with several exchanges of deionized water. Sections may wash off!! Add enough Shiff Reagent to cover the coverslip and incubate for 5 minutes
- Carefully wash with three exchanges of tap or deionized H2O.
- Dehydrate coverslip in ascending alcohol solutions (50%, 70%, 80%, 95% x 2, 100% x 2) in columbia staining dish(jar)es – Thomas Scientific #8542-E30.
- Rinse with xylene (3 – 4 x ) also in columbia staining dish(jar) – Thomas Scientific #8542-E30.
- Mount coverslip onto a labeled glass slide with Permount or any suitable organic mounting medium
Results:
Glycogen, neutral mucosubstances, basement membranes, collagen fibers, glycolipids and phospholipids will be demonstrated through a range of pink, red or purple colors. If diastase or amylase is used as a negative control, the glycogen deposits are removed leaving only the plasma membrane, which will stain pink. The two major types of fibers are usually distinguished by different intensities of staining.
REFERENCES:
- Thompson, Samuel W. SELECTED HISTOCHEMICAL AND HISTOPATHOLOGICAL METHODS, Charles C. Thomas, Springfield, IL, 1966
- Sheehan, D.C. and Hrapchak, B.B., THEORY AND PRACTICE OF HISTOTECHNOLOGY, 2nd Edition; Battelle Memorial Institute, Columbus, OH, 1987
Your first choice for scientific solutions
Find out moreSUPPORT
outstanding technical support
PRODUCT
we offer a full product guarantee
DELIVERY
we offer free delivery to UK universities and non profit organisations