
We are the tech transfer platform that brings innovation into life science workflows. We produce the most innovative R&D tools, side by side with the researchers who design, test and use them.
We are the tech transfer platform that brings innovation into life science workflows. We produce the most innovative R&D tools, side by side with the researchers who design, test and use them.
")
SpheroTribe provides a complete toolkit for generating reproducible 3D cell structures (spheroids, organoids) without restrictions of cell type.
The kit includes:
– 5X methylcellulose solution
– U-bottom 96-well plates
– pipette tips with a large opening of 200µL
| Size/content | Catalog Number |
| 10x 96-well plates (flat bottom) 2x tip boxes 1 methylcellulose bottle | TDA-SPK-KIT |
| 1x 96-well plates (flat bottom) 20 tips 2,5 mL of methylcellulose | TDA-SPK-MINIKIT |
| 1 methylcellulose bottle | TDA-SPK-2-25 |
SpheroTribe provides a simple toolkit to generate consistent and robust 3D cell structures. Simply dilute the SpheroTribe solution into your culture medium of choice, watch your cells turn into uniformly sized 3D spheroids and collect them for your downstream assays.
Once diluted in your culture medium of choice, our concentrated polymer-based solution increases the medium viscosity favouring cell-cell contacts. SpheroTribe offers a simple method to generate homogeneous 3D cell structures with increased control over their size and shape, which can be easily handled and washed for downstream experiments.
SpheroTribe is particularly useful to boost aggregation when working with challenging cells, minimize variability between samples and improve the consistency of your migration/invasion assays, immunostaining, drug screening or in vivo implantation experiments.
In addition to the SpheroTribe solution, the full kit also includes U-bottom plates and wide-opening tips so you have everything you need to get started with your 3D cell culture experiments.
25mL kit contents:
– 25mL of 5X methylcellulose solution
– 10x U-bottom 96-well plates
– 2x racks of 96 pipette tips (200µL) with a large opening
2,5mL kit contents:
– 2.5mL of 5X methylcellulose solution
– 1x U-bottom 96-well plate
– 20 pipette tips (200µL) with a large opening
Recommendation for the methylcellulose solution:
4°C for (at least) 6 months.

SpheroTribe provides a gel-like scaffold that favors cell-cell contacts by increasing medium viscosity. It was shown to generate compact spheroids mimicking solid tumors, improve spheroid formation with some of the most challenging cells and to speed up stem cell-derived organoid formation.
By maximizing cell aggregation, SpheroTribe promotes the formation of unique & uniformly sized spheroids allowing for consistent assays (growth, invasion, immune infiltration, in vivo injection, etc).
No need to work on ice, have access to sophisticated equipment of expertise. With SpheroTribe, you have everything on hand to easily grow & handle your spheroids.
The SpheroTribe solution is composed of methylcellulose, a biologically inert compound dissolved in basal culture medium without any proteins, lipids or growth factors. You can dilute it in any culture medium of your choice, and add additional compounds as desired (i.e. serum, antibiotics, differentiation factors, etc).
Patient-derived stem-like glioblastoma cells (GB P3 and BL13), human glioblastoma cell lines (U87 & T98G), HeLa, human vaginal mucosal melanoma (HMV-II), human primary colorectal cancer cells, human breast cancer cells (MDA-MB 231), human induced pluripotent stem cells, monkey kidney fibroblast-like cell line (COS-7), primary neurons from rat embryos (E18) & murine melanoma cells (B16F10).
Once spheroids have grown to your desired size, you can use them for any kind of assay according to your regular workflow. The SpheroTribe solution can be readily washed off, leaving a spheroid available for other tests at any stage of your protocol.
Example of in situ assays you can perform directly on the U-bottom plate supplied:
Examples of downstream assays that might require transferring spheroids to other vessels:
For more guidance on downstream assays, check out our FAQ section containing useful tips & example protocols.


Human glioblastoma U87 cells were cultured in DMEM with or without SpheroTribe
in U-bottom plates and imaged after 2 days (4X magnification) and 6 days (10X magnification)

Glioblastoma spheroids were included into a collagen matrix after being cultured in medium added with SpheroTribe solution for 4 days.
Images were taken immediately after (left) or 24 hours after (right) inclusion in the collagen matrix.
Image credits: (c) Thomas Daubon, 2023.

A. 10,000 B16F10 cells were grown for 6 days as spheroids using SpheroTribe. B. 100,000 PBMC from murine spleen were activated with IL-15 (40 ng/mL) [1], incubated with anti-PD1 (10 µg/mL) for 1h and added on B16F10 spheroids for 3 days.
Graph shows flow cytometry quantification of differential lymphocyte infiltration after spheroid dissociation according to treatment. N=4. Mann-Whitney U Test, p-value<0.05. [1] https://doi.org/10.3389/fonc.2022.898732.
Image credits: Guillaume Mestrallet, PhD – Tisch Cancer Institute, Icahn School of Medicine at Mount Sinai, New York, US – 2023. @GMestralletPhD

Human iPSCs were seeded in ULA plates in presence (left) or absence (right) of SpheroTribe solution (T=0) and cultured for 3 days following a self-assembling human heart organoid differentiation protocol [1].
Image credits: Aitor Aguirre, Ph. D. – Michigan State University, US
[1] Lewis-Israeli, Y.R., Wasserman, A.H., Gabalski, M.A. et al. Self-assembling human heart organoids for the modeling of cardiac development and congenital heart disease. Nat Commun 12, 5142 (2021). https://doi.org/10.1038/s41467-021-25329-5

U-87 glioblastoma cells were seeded at 1,000 cells per well in round-bottom wells molded in agarose using a Stampwell U-shape (Idylle) in full culture medium without (right) or added with SpheroTribe (left). After 3 days, pictures were taken and number of cell aggregates per well were quantified from 64 independent wells and associated standard deviation (SD) values were calculated.

COS-7 cells were cultured in non-tissue culture treated U-bottom plates for 4 days in presence (up)
or absence (bottom) of the SpheroTribe concentrate. Scale bar = 500 µm

HeLa cells were cultured in non-tissue culture treated U-bottom plates for 4 days in presence (up)
or absence (bottom) of the SpheroTribe concentrate. Scale bar = 500 µm

Need advice for your downstream assays? Check out our FAQ section for published protocols of immunostaining, invasion, migration, proliferation assays & in vivo spheroid implantation.
SpheroTribe relies on the use of methylcellulose, a crowding agent that is well-known to drive efficient cell aggregation into spheroids. Once diluted in culture medium, methylcellulose increases the viscosity of the medium, creating a gel-like environment that restrict cell movement and encourages cell-cell contacts for the formation of compact spheroids.
The SpheroTribe solution is composed of methylcellulose, a derivative of cellulose that is known to be biologically-inert, i.e. to neither actively contribute to biological responses or interfere with it. It is notably used in various biofabrication tools, including bioinks. In addition, SpheroTribe allows you to culture cells without exogenous ECM components, avoiding the known bias they may have on cell signaling. If needed, SpheroTribe can be readily washed off at any stage of the protocol to leave spheroids available for subsequent assays.
So far, SpheroTribe has been successfully used to generate spheroids/organoids with the following cell types:
Patient-derived stem-like glioblastoma cells (GB P3 and BL13), human glioblastoma cell lines (U87 & T98G), HeLa, human vaginal mucosal melanoma (HMV-II), human primary colorectal cancer cells, human breast cancer cells (MDA-MB 231), monkey kidney fibroblast-like cell line (COS-7), primary neurons from rat embryos (E18) & murine melanoma cells (B16F10), human induced pluripotent stem cells (hiPSCs)-derived organoids.
We would greatly appreciate your valuable inputs by helping us complementing this list with any of your positive research experiences. Drop us a message through our Contact page!
The SpheroTribe concentrated solution is made up in basal medium and does not contain any proteins, lipids or growth factors. You can dilute it in any culture medium of your choice, and add other compounds as desired (i.e. serum, antibiotics, etc).
One SpheroTribe kit contains everything you need to grow up to 960 unique spheroids. Total number of spheroids generated with one kit may vary depending on the concentration of SpheroTribe solution used for cell aggregation, total spheroid growth duration and frequency of medium renewal.
Yes, it is also possible to buy the methylcellulose solution alone and use it to complement your current method. Please contact us and we will send a dedicated quote.
The total time to initiate 3D cell culture with SpheroTribe should take no more than 30 minutes. After that, optimal culture duration to achieve desired spheroid size will vary depending on your cell proliferation rate and targeted application. As a general rule, compact & homogeneous spheroids are usually formed after 3 days of culture.
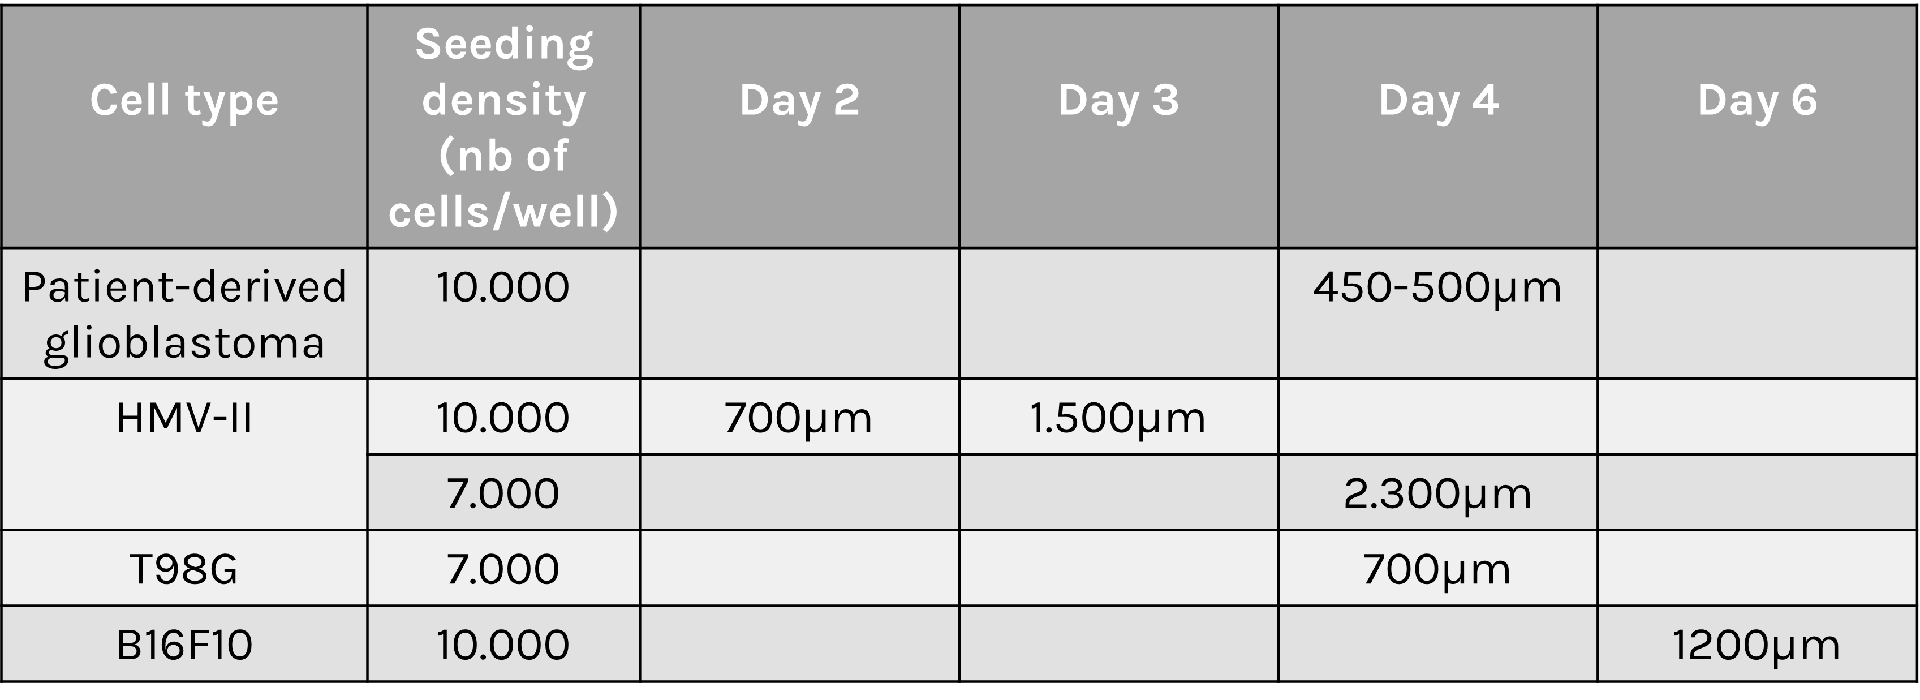
Optimal seeding density can vary greatly depending on the cell type, proliferation rate and targeted application. You will most probably need to start with a couple of optimization tests to find out which density will best suit your needs. As a general rule, we recommend using 10,000 to 20,000 cells per well for primary cells and 2,000 to 7,000 cells per well for tumoral/immortalized cell lines.
Spheroid sizes can vary greatly depending on cell type characteristics, initial density and culture conditions used. To help you select optimal conditions, here are a couple of examples of sizes reached for different cell types and seeding densities:
A variety of downstream assays have been performed with spheroids generated with SpheroTribe. We only provide a detailed protocol for the formation of spheroids, as this is what SpheroTribe is designed for. However, if needed, you can check out the following publications describing protocols for various assays using glioblastoma spheroids generated with SpheroTribe. These can easily be applied to other cell types:
The SpheroTribe kit has been shown to generate unique & uniform spheroids with most cell types tested. Yet, when working with particularly challenging cells, here are a few tips to keep in mind to maximize your chance to obtain unique & uniform spheroids in each well:
Any other questions? Please contact us
Original publication:
Other publications using SpheroTribe spheroids:
A technology designed by Tâm Mignot, Olivier Theodoly, Amandine Desorme, Guillaume Sudre and Laurent David.

")

Chitosan-coated coverslips for live bacteria imaging
Chitozen is a chitosan-coated coverslip immobilizing bacteria for microscopy without inducing bacteriostatic effects. It is compatible with 6-channel sticky slides for flow experiments. It is very helpful if you want to:
Assay compatibility:
> Fluorescence
> Co-cultures (bacterial predators, immune cells)
> Addition of external factors (e.g. antibiotics, chemicals, inhibitors)
> Static or dynamic conditions
Imaging modes:
> phase-contrast,
> epifluorescence,
> confocal,
> super-resolution microscopy,
> atomic force microscopy (AFM) – documentation & example pictures available on request
Experimental outputs:
> Behavioural changes: growth, elongation, cell division, fitness, colony/biofilm formation, etc
> Single molecule imaging
Chitozen is efficient with the following bacteria:
> E. coli
> Bacillus subtilis
> Caulobacter crescentus
> Corynebacterium glutamicum
> Helicobacter pylori
> Mycobacterium smegmatis
> Myxococcus xanthus
> Pseudomonas aeruginosa
> Pseudomonas fluorescens
> Salmonella
> Staphylococcus aureus
> Vibrio cholerae
This list is updated regularly according to feedback provided by researchers who use Chitozen.
Chitozen coverslips are compatible with 6-channel sticky slides to work in a closed system in static or dynamic flow conditions. Order you coverslips alone if you need to work in an open system (i.e. for AFM imaging).
5-coverslips only*
> 5x standard (25 x 75 mm) chitosan-coated coverslips
5-coverslips with microfluidic channels
> 5x standard (25 x 75 mm) chitosan-coated coverslips
> 5x bottomless 6-channel sticky slides
(Optional) centrifugation pack: the Chitozen coverslips can be centrifuged using a rack compatible with standard microscope slide (25mmx75mm) dimensions. If needed, add our centrifugation pack to your Chitozen kit. It includes:
> µ-Slide Microscopy Rack (ibidi
> Magnetic Lid for Microscopy Rack
> Clamp & adapter for sticky slides
*If using the Chitozen coverslips alone, separate wells can be created manually by using a sealing glue or Stencell silicon chambers. We can provide these 2 products for you. Contact us for more information.
For custom orders (i.e. alternative coverslip amounts), please contact us.
Lifetime: up to 12 months at room temperature, shielded from direct sunlight
© 2019 Tréguier et al. This content is distributed under the terms of the Creative Commons Attribution 4.0 International license.

Credit: Amandine Desorme, LCB – CNRS, 2021
Credit: Amandine Desorme, LCB – CNRS, 2021

Peptidoglycan is labeled with the green fluorophore BADA.
Credit: Amandine Desorme, LCB – CNRS, 2021

AB1157 E. coli expressing DNA marker HU-mCherry were imaged at 37oC with perfusion of ½ LB at a flow rate of 2 ml/min. Drug X was added at time point 35 minutes and removed at time point 60 minutes.
Credit: Emily Helgesen – Oslo University Hospital – 2022

AB1157 E. coli expressing SeqA-YFP (green), a protein associated with DNA replication, were imaged at 37°C over 60 minutes without perfusion of medium
Credit: Emily Helgesen – Oslo University Hospital – 2022
E. coli BW25113 cells were imaged at 37°C with perfusion of M9 medium at a flow rate of 0.05 mL/min.
Credit: Bianca Sclavi – 2021

E. coli MG1655 with chromosomally encoded HU-eGFP under the native promoter were imaged with perfusion at a flow rate of 0.05 mL/min.
Credit: Itzhak Fishov – Ben-Gurion University of the Negev, 2022
A technology designed by Tâm Mignot, Olivier Theodoly, Amandine Desorme, Guillaume Sudre and Laurent David.


Everspark buffer at 100 mM MEA in Tris buffer
10 vials containing 450 μL each (total volume 4,5 mL)
| Description | Catalog Number |
| Everspark 1.0 | KMO-ETE-450 |
| Everspark 2.0 | KMO|ETE+|450-10 |
Discover the long-lasting Everspark blinking buffer series for prolonged blinking in dSTORM microscopy. No more rushing your imaging. Mount your sample, and get stable blinking for weeks.
NEW ! Discover the newly-developed Everspark 2.0 also compatible with green fluorophores (i.e. AF488) for improved resolution in 3-colour dSTORM microscopy.
Compatible fluorophores: yellow to far-red
Validated fluorophores include JF 549, DL 550, CF 555, CF 568, AF 568, JF 646, AF 647, CF 647, Atto 647N, DL 650, CF 680 & Cy5
Multicolor imaging: +
Blinking stability (after mounting): up to 2 months
Blinking events: +
Compatible fluorophores: green, yellow & far-red
Validated fluorophores include AF 488, MemBright 488, FITC, FAM, Spy555, CF 568 & AF 647
Multicolor imaging : +++
Blinking stability (after mounting): up to 3.5 months
Blinking events: +++
Kit description:
10 vials with 450 µL of Everspark buffer at 100 mM MEA in Tris.
1 vial per experiment.
Vials lifetime: Up to 6 months in a closed pouch (eg unmounted).
Laser requirements: for green fluorophore imaging (Everspark 2.0 only), we recommend using a 488 laser >200mW, ideally 500mW for optimal results.

Centrosomal proteins Cep152, rootletin and PCM labelled with AF647, CF568 & AF488 respectively were imaged on a Vutara VXL (Bruker) inEverspark 2.0 buffer before 3D dSTORM reconstruction
Credits: Karine Monier, INMG-PGNM, Lyon

Centrosomal proteins Cep152, rootletin and PCM labelled with AF647, CF568 & AF488 respectively were imaged on a Vutara VXL (Bruker) in Everspark 2.0 buffer before 3D dSTORM reconstruction
Credits: Karine Monier, INMG-PGNM, Lyon

AF488-coated beads were mounted in Everspark 1.0 or Everspark 2.0 buffer and imaged on a Vutara VXL (Bruker) before 3D dSTORM reconstruction.
Credits: Karine Monier, INMG-PGNM, Lyon

Left: Two centrosomes imaged the same Day (D0) and 7 days after mounting (D7) on the same slide stored in the dark at 4°C. The typical 450 nm donut-like structure is visualised using a colour-coded scale encoded with the IGOR software, where each point appears as a function of its localisation precision (5 to 60 nm; inverted rainbow colour scale). Labeling: Distal-appendages detected by immunofluorescence with AF647 in RPE-1 cells.
Right: The number of blinking events per centrosome and the median of the localization precision in nm are presented for each serie of 50,000 images recorded at D0 and D7 (left).
Credits: Camille Fourneaux & Karine Monier, CRCL, Lyon

Each point is represented by its centroid (purple points) and its gaussian width (white). Intensity profil is displayed on the right with the measurement from peak to peak, in agreement with the size of the distal appendage crone. Labeling: distal-appendages detected by immunofluorescence with AF647 in RPE-1 cells.
Credits: Corentin Rousset, Karine Monier, CRCL Lyon
Find below the protocol of use of our Everspark buffers:
Video Protocols:
Everspark technology has been intially developed by Karine Monier, Arnaud Favier and Christophe Place and published in Scientific Reports:
Provost, A., Rousset, C., Bourdon, L. et al. Innovative particle standards and long-lived imaging for 2D and 3D dSTORM. Sci Rep 9, 17967 (2019). https://doi.org/10.1038/s41598-019-53528-0
Publications:
Dia2 formin controls receptor activity by organizing plasma membrane lipid partitioning at the nanoscale
Changting LI, Yannick HAMON, David MAZAUD, Pamela GONZALEZ TRONCOSO, Marie DESSARD, Hai-tao HE, Christophe LAMAZE, and Cedric M. BLOUIN. bioRxiv 2023.12.15.571857; doi: https://doi.org/10.1101/2023.12.15.571857
Nanoscale engagement and clusterization of Programmed death ligand 1 (PD-L1) in the membrane lipid rafts of Non-Small Cell Lung Cancer cells
Martina Ruglioni, Simone Civita, Tiziano Salvadori, Sofia Cristiani, Vittoria Carnicelli, Serena Barachini, Iacopo Petrini, Irene Nepita, Marco Castello, Alberto Diaspro, Paolo Bianchini, Barbara Storti, Ranieri Bizzarri, Stefano Fogli and Romano Danesi bioRxiv 2022.08.09.503318; doi: https://doi.org/10.1101/2022.08.09.503318
HIV-1 diverts actin debranching mechanisms for particle assembly and release in CD4 T lymphocytes
Rayane Dibsy, Erwan Bremaud, Johnson Mak, Cyril Favard, Delphine Muriaux
Nat Commun. 2023 Oct 31;14(1):6945. doi: 10.1038/s41467-023-41940-0
Fluorescent Polymer-AS1411-Aptamer Probe for dSTORM Super-Resolution Imaging of Endogenous Nucleolin
Fabre L, Rousset C, Monier K, Da Cruz-Boisson F, Bouvet P, Charreyre MT, Delair T, Fleury E, Favier A. Biomacromolecules. 2022 May 12. doi: 10.1021/acs.biomac.1c01706. PMID: 35549176
Comparative analysis of ChAdOx1 nCoV-19 and Ad26.COV2.S SARS-CoV-2 vector vaccines.
Michalik S, Siegerist F, Palankar R, Franzke K, Schindler M, Reder A, Seifert U, Cammann C, Wesche J, Steil L, Hentschker C, Gesell-Salazar M, Reisinger E, Beer M, Endlich N, Greinacher A, Völker U. Haematologica. 2022 Apr 1;107(4):947-957. doi: 10.3324/haematol.2021.280154. PMID: 35045692
Metabolic biorthogonal labeling and dSTORM imaging of peptidoglycan synthesis in Streptococcus pneumoniae
Jennyfer Trouve, Oleksandr Glushonkov and Cecile Morlot
Star Protocols, December 13, 2021. doi: 10.1016/j.xpro.2021.101006
Insights in ChAdOx1 nCoV-19 vaccine-induced immune thrombotic thrombocytopenia.
Greinacher A, Selleng K, Palankar R, Wesche J, Handtke S, Wolff M, Aurich K, Lalk M, Methling K, Völker U, Hentschker C, Michalik S, Steil L, Reder A, Schönborn L, Beer M, Franzke K, Büttner A, Fehse B, Stavrou EX, Rangaswamy C, Mailer RK, Englert H, Frye M, Thiele T, Kochanek S, Krutzke L, Siegerist F, Endlich N, Warkentin TE, Renné T.
Blood. 2021 Dec 2;138(22):2256-2268. doi: 10.1182/blood.2021013231. PMID: 34587242
Superresolution Microscopy of Drosophila Indirect Flight Muscle Sarcomeres.
Szikora S, Novák T, Gajdos T, Erdélyi M, Mihály J. Bio Protoc. 2020 Jun 20;10(12):e3654. doi: 10.21769/BioProtoc.3654. eCollection 2020 Jun 20. PMID: 33659324

Calibration beads for super-resolution microscopy 1 vial of 50 µL of a SpheroRuler suspension in PBS pH 7.4
| Description | Catalog Number |
| 10x 96-well plates (flat bottom) 2x tip boxes 1 methylcellulose bottle | TDA-SPK-KIT |
| 1x 96-well plates (flat bottom) 20 tips 2,5 mL of methylcellulose | TDA-SPK-MINIKIT |
| 1 methylcellulose bottle | TDA-SPK-2-25 |
SpheroRuler is a monodispersed suspension of 1µm diameter spheres coated with 647-fluorophores giving a stable blinking in SMLM microscopy. Their consistent size and geometry make them very practical and reliable standards to assess the accuracy of your x-y or z measurements, 3D reconstruction methods or your image quality. Monodispersed and immobile in solution, they can also be used as rulers, for drift correction or as guides to help localize features on your biological samples.
")
Kit description: 1 vial of 50 µL of a SpheroRuler suspension in PBS pH 7.4.
Allows 10 experiments when using the recommended 5µL volume in 35mm glass-bottom dishes.
Concentration: 7.10exp8 particles per mL.
Stability: up to 7 months when stored at 4°C.
Dye: 647-fluorophore (far-red fluorescence).
Compatible with: dSTORM, SRRF, Airyscan confocal, confocal, SEM
Following the success of SpheroRuler beads, we are thrilled to introduce some brand-new SpheroRulers of various sizes and colours that are now ready to join our catalog:

Interested in one or several of them? Please contact us


(A, B). Pictures of SpheroRuler beads acquired in wide-field (A) and SRRF-Stream super-resolution (B) imaging. Scale bar = 5µm
(C, D) Local enlargements of A and B pictures respectively.
Scale bar = 1µm
(E) Fluorescence intensity distributions along the solid lines in C and D.
Credits: Yao Baoli – Xi’an Institute of Optics and Precision Mechanics, Chinese Academy of Sciences, 20lksehg

SpheroRuler beads were imaged on a confocal microscope with a 63X oil objective.
Credits: Kseniya Korobchevskaya – Institute of Developmental & Regenerative Medicine, University of Oxford, UK
Credits: Lydia Y Li, Nabi Lab, The University of British Columbia, 2023
The SpheroRuler beads are 1μm-diameter polymer particles surrounded by 647-fluorophores covalently anchored to their surface. Beads will be visible as hollow rings or spheres when reconstructed in 2D or 3D SMLM experiments respectively
SpheroRuler beads are coated with 647-fluorophores giving a stable blinking in SMLM microscopy, and have been initially developed for dSTORM imaging. Since then, they have also been successfully used in SFFR, SEM, confocal, Airyscan confocal and SEM microscopy.
The spherical particles making up Spheroruler beads have been selected based on very good monodispersity properties. The accuracy and reproducibility of the bead diameter have been characterized by SEM on 25 independent microspheres and showed a standard deviation of 1 +/- 0.05μm.
The SpheroRuler kit contains a 50μL suspension of SpheroRuler beads. All you need to have on your side is some blinking buffer, coverslips and imaging vessels of your choice.
One kit contains a 50μL suspension of SpheroRuler beads, allowing for 10 experiments when using the recommended 5μL volume in 35mm glass-bottom dishes.
Yes, SpheroRuler beads are resuspended in PBS and can be loaded together with biological specimens (cells, tissue sections, etc).
Yes, SpheroRuler beads are resuspended in PBS and can be loaded together with biological specimens (cells, tissue sections, etc).
The SpheroRuler suspension is stable for at least 7 months when stored at 4°C.
In 2D, you should retrieve a hollow circle of 1μm diameter. In 3D, you should retrieve a hollow sphere of 1μm diameter.
SpheroRuler beads are highly fluorescent beads coated with a high density of fluorophores. We recommend using a “multi-emitter / high density” rather than a “single-emitter / low density”, algorithm, to guarantee an efficient localization of individual blinking events. Although the available options will vary on each imaging system used, an example of algorithm that was successfully used is the “Account for overlap” function on the ZEN software (Zeiss).
Fluorophores are directly coated on the bead surface without linkers or antibodies, and their thickness is therefore negligible compared to the measured diameter. The apparent thickness of the fluorophore ring will depend on the resolution of your imaging system (i.e. around 160-200nm when measured in dSTORM). The external periphery of the beads should be taken into account when measuring diameter.
Although 2D reconstructions of SpheroRuler beads should be accurately circular, obtaining an elongated shape in z is a common artefact that will depend on the system used for imaging and for 3D reconstruction (biplane reconstruction, astigmatism, etc). The measured diameter in z and its distance from the actual 1μm can therefore be used as a robust indicator to evaluate the fidelity of the 3D reconstruction for a given system. As an example, measured z diameter was 1.3 μm when tested on a Vutara VXL system using biplane imaging.
The SpheroRuler beads are coated with a high density of fluorophores. A few tips that will facilitate the SpheroRuler reconstruction:
– Make sure you perform a “pumping” step by illuminating with ultra-high power (i.e. laser 80% for less than 30s) before starting the acquisition in order to improve the localization precision.
– Use a “multi-emitter / high density” algorithm, or any equivalent, to guarantee an efficient localization of individual blinking events.
– If still not sufficient to efficiently reconstruct the spheres, or if such algorithm is not available, using a PSF filter to eliminate out-of-focus events or close double emitters should refine the localisation precision and make the peripheral crown more visible, therefore improving the reconstruction fidelity.
")
Photoinducible protein activator (powder)
A technology developed by Ludovic Jullien, Isabelle Aujard and Thomas Le Saux – ENS Paris, France
| Size | Catalog Number |
| 5 mg | LJU-CIN-5 |
| 50 mg | LJU-CIN-50 |
Actiflash is a small steroid ligand that activates engineered proteins upon light induction. It can be used to precisely control protein activity down to the single cell level in live cell cultures and animals.
")
Actiflash is a tamoxifen-like caged-inducer called cyclofen. Upon UV-light illumination, optical-induced uncaging of Actiflash quickly releases proteins fused to the modified estrogen receptor ligand-binding domains ERT2. This allows them to translocate into the nucleus, activate transcription (using Gal4-UAS system) or induce recombination (using the Cre-lox one).
The protein expression can thus be simply controlled in time and space thanks to UV-light!

Technology capitalizing on the versatile use of Tamoxifen-OH for controlling functions of multiple types of proteins.
Caged Cyclofen-OH liberates Cyclofen-OH, a highly photostable compound in contrast to Tamoxifen-OH encountering photodegradation under illumination.
Uncaging requires either UV-A light or a strong IR laser. Visible light is inactive, which facilitates the experiments with biological samples.
Caged Cyclofen-OH is cell-permeant and can be added either in the external medium or directly injected for conditioning.
Caged Cyclofen-OH does not generate any basal activation of protein function and it benefits from an excellent temporal resolution upon uncaging.
Actiflash is a great R&D tool to convert your inducible ERT model into a photo-inducible one. It is very helpful if you want to control transcription (using Gal4-UAS) or induce recombination (using Cre-lox) in space and/or time for in-vivo cell tracking experiments and more.
Actiflash has been successfully used with various cell lines as well as zebrafish embryos. Actiflash will work best on zebrafish embryos from 12 to 48hpf.
Find below a plasmid list that can be used with Actiflash. All these plasmids are available from Addgene.
Lifetime: upon receipt, Actiflash is stable for years at 2-8°C. Once solubilized in a DMSO solution (typically at 10 mM), Actiflash can be stored at -20°C for several months. Always wrap the vials containing the aliquoted Actiflash with aluminium foil to protect it from light.
It is advised to first establish the extent of phenotype sought for as a function of the Tamoxifen-OH concentration. Then the concentration of Actiflash used for sample conditioning is fixed at Tamoxifen-OH concentration causing 100% of the desired phenotype (in general 3-5 μM in cultured cells and zebrafish embryos).
Incubate your samples in a serum-free medium for 90 mins, away from light.
Illumination of Actiflash may be performed with UV (325-425nm range) light or multiphoton excitation (at 750 and 1064 nm with two- and three-photon excitation, respectively) to release Cyclofen-OH. You can use either benchtop UV lamps or light sources installed onmicroscopes.
The objective is to provide enough photons to exhaust the conversion of the Actiflash but without generating detrimental side-effects on the biological sample.Simply analyze the phenotype recovery with decreasing illumination duration. Then determine the shortest illumination duration leading to 100% uncaging of Actiflash.
Actiflash has been successfully used with various cell lines as well as animal models:
● Cell lines: CV1, mammalian epithelial cells (MDCK)
● Zebrafish: 12 hpf – 2 dpf embryos
● Mice
We would greatly appreciate your valuable inputs by helping us complementing this list with any of your positive research experiences. Drop us a message through our Contact page!
Actiflash works optimally on embryos below 2 dpf when following the provided protocol of use. On older embryos, protocol adjustments might need to be implemented to achieve a satisfactory photoconversion (i.e. heart injection, electroporation, etc).
You will find below a non-exhaustive list of proteins that have been fused to the estrogen receptor:
● Recombinase Cre
● Tyrosine-protein kinase ABL1
● Cellular tumor antigen p53
● Proto-oncogene c-Fos
● Endothelial transcription factor GATA-2
● CMP-N-acetylneuraminate-beta-galactosamide-alpha-2,3-sialyltransferase4 (GAL4)
Actiflash is provided as a powder. It is stable for years at 2-8°C. Once solubilized in a DMSO solution (typically at 10 mM), Actiflash can be stored at -20°C for several months. Always wrap the vials containing the aliquoted Actiflash with aluminium foil to protect it from light.
You can perform experiments with Tamoxifen-OH as a positive control.
After conditioning your sample at a given concentration (e.g. 5 μM) with Actiflash,
illuminate your samples with the shortest illumination duration leading to the maximum
phenotype recovery. Compare with the results obtained with Tamoxifen-OH (1 μM).
Any plasmid containing the ERT sequence should work.
Please find below a list of 52 plasmids developed by Sophie Vriz and Michel Volovitch in The Sophie Vriz Lab, who have the ownership of citations related to these plasmids. These 52 plasmids are all available on Addgene
| Type | Addgene | Vriz lab name & link to Addgene | Coding sequence | Main use | Regulatory sequences |
| ERT2 ready for fusion | |||||
| 184057 | pCSnERT(#186) | nls-ERT2 | Mammalian Expression, mRNA in vitro synthesis | sCMV, SP6 | |
| ERT2 fused to CRE | |||||
| 184058 | pCSCRET2(#323) | 6myc-CRE-ERT2 | Mammalian Expression, mRNA in vitro synthesis | sCMV, SP6 | |
| 184059 | pT2EFCRET(#324) | CRE-ERT2 | Zebrafish Expression | X.laevis-EF1 | |
| 184060 | pT2h70CRET(#325) | CRE-ERT2 | Zebrafish Expression | D.rerio-hsp70, SP6 | |
| 184061 | pT22iU66CriT(#387) | CRE-ERT2 | Zebrafish Expression, stable transgenesis (blue eye) | D.rerio-Ubi, SP6 | |
| 184062 | pT22iD36CriT(#388) | CRE-ERT2 | Zebrafish Expression, stable transgenesis (blue eye) | D.rerio-Dio3 | |
| ERT2 fused to Fluorescent Protein or Fluorogen-activated peptide | |||||
| 184063 | pCSmChnERT(#99) | mCherry-nls-ERT2 | Mammalian Expression, mRNA in vitro synthesis | sCMV, SP6 | |
| 184064 | pCSKaedenERT(#100) | Kaede-nls-ERT2 | Mammalian Expression, mRNA in vitro synthesis | sCMV, SP6 | |
| 184065 | pCSGFPnERT(#205) | eGFP-nls-ERT2 | Mammalian Expression, mRNA in vitro synthesis | sCMV, SP6 | |
| 184066 | pT22UbGfpnE4PCh(#301) | eGFP-nls-ERT2-P2A-mCherry | Zebrafish Expression, stable transgenesis (blue eye) | D.rerio-Ubi | |
| 184067 | pT2iC6Dronpa2nlsER4(#636) | Dronpa2-2nls-ERT2 | Mammalian Expression, mRNA in vitro synthesis | sCMV, SP6 | |
| 184068 | pT2iC6FAST1nls2ER4(#638) | YFAST-2nls-ERT2 | Mammalian Expression, mRNA in vitro synthesis | sCMV, SP6 | |
| ERT2 fused to Gal4 activator | |||||
| 184069 | pCSTG4FER3(#190) | Gal4bdFF-ERT2 | Mammalian Expression, mRNA in vitro synthesis | sCMV, SP6 | |
| 184070 | pT22gCfpUbiG4FER4P2A(#249) | Gal4bdFF-ERT2-P2A | Zebrafish Expression, stable transgenesis (blue eye) | D.rerio-Ubi | |
| 184071 | pT2iaTubG4FER3(#940) | Gal4bdFF-ERT2 | Zebrafish Expression | C.auratus-a1Tub | |
| 184072 | pT22i2Shh24G4FER3(#1041) | Gal4bdFF-ERT2 | Zebrafish Expression, stable transgenesis (blue eye) | D.rerio-Shha+ABC | |
| 184073 | pT26CfpSox10G4FER3(#1048) | Gal4bdFF-ERT2 | Zebrafish Expression, stable transgenesis (blue heart) | D.rerio-Sox10 | |
| 184074 | pT26i4Gli8G4E3(#1254) | Gal4bdFF-ERT2 | Zebrafish Expression, stable transgenesis (blue heart) | D.rerio-GliRE | |
| ERT2 fused to various kinases, inhibitors, redox enzymes | |||||
| 184075 | pCSZPKIaHAERT(#118) | ZfPKAinhiba-HA-ERT2 | Mammalian Expression, mRNA in vitro synthesis | sCMV, SP6 | |
| 184076 | pCSZPKIamutHAERT(#119) | ZfmutPKAinhiba-HA-ERT2 | Mammalian Expression, mRNA in vitro synthesis | sCMV, SP6 | |
| 184077 | pCSmp38ERT(#143) | 5myc-ZfP38a-ERT2 | Mammalian Expression, mRNA in vitro synthesis | sCMV, SP6 | |
| 184078 | pT22U6CatalE4PCh(#767) | CatalDeltaC-ERT2-P2A-mCherry | Zebrafish Expression, stable transgenesis (blue eye) | D.rerio-Ubi, SP6 | |
| ERT2 fused to various vertebrate transcription factors | |||||
| 184079 | pCSmEn2ERT(#117) | 6his-myc-chkEn2-ERT2 | Mammalian Expression, mRNA in vitro synthesis | sCMV, SP6 | |
| 184080 | pCSmEn2SRERT(#231) | 6his-myc-chkEn2(SR)-ERT2 | Mammalian Expression, mRNA in vitro synthesis | sCMV, SP6 | |
| 184081 | pCSmEn25EERT(#232) | 6his-myc-chkEn2(5E)-ERT2 | Mammalian Expression, mRNA in vitro synthesis | sCMV, SP6 | |
| 184082 | pCSmEn2n4ERT(#234) | 6his-myc-chkEn2(n4)-ERT2 | Mammalian Expression, mRNA in vitro synthesis | sCMV, SP6 | |
| 184083 | pT22gCfpUbm5En2E4PCh(#251) | 5myc-chkEn2-ERT2-P2A-mCherry | Zebrafish Expression, stable transgenesis (blue eye) | D.rerio-Ubi | |
| 184084 | pT22UbHEn2E4PCh(#262) | 3HA-chkEn2-ERT2-P2A-mCherry | Zebrafish Expression, stable transgenesis (blue eye) | D.rerio-Ubi | |
| 184085 | pT22UbhaEng2aE4PCh(#271) | 3HA-ZfEng2a-ERT2-P2A-mCherry | Zebrafish Expression, stable transgenesis (blue eye) | D.rerio-Ubi | |
| 184086 | pT22UbhaEng2bE4PCh(#272) | 3HA-ZfEng2b-ERT2-P2A-mCherry | Zebrafish Expression, stable transgenesis (blue eye) | D.rerio-Ubi | |
| 184087 | pT22Ubm5Eng2aE4PCh(#283) | 5myc-ZfEng2a-ERT2-P2A-mCherry | Zebrafish Expression, stable transgenesis (blue eye) | D.rerio-Ubi | |
| 184088 | pT22Ubm5Eng2bE4PCh(#284) | 5myc-ZfEng2b-ERT2-P2A-mCherry | Zebrafish Expression, stable transgenesis (blue eye) | D.rerio-Ubi | |
| 184089 | pT22Ubm5En2SRE4PCh(#302) | 5myc-chkEn2(SR)-ERT2-P2A-mCherry | Zebrafish Expression, stable transgenesis (blue eye) | D.rerio-Ubi | |
| 184090 | pCSm5En2CER4(#457) | 5myc-chkEn2(C>S)-ERT2 | Mammalian Expression, mRNA in vitro synthesis | sCMV, SP6 | |
| 184091 | pT22Ubm4Eng2bKRPC(#493) | 4myc-ZfEng2b(WW>KK)-ERT2-P2A-mCherry | Zebrafish Expression, stable transgenesis (blue eye) | D.rerio-Ubi | |
| 184092 | pT22gcfUbm5En25EE4PCh(#552) | 5myc-chkEn2(5E)-ERT2-P2A-mCherry | Zebrafish Expression, stable transgenesis (blue eye) | D.rerio-Ubi | |
| 184093 | pCSm5En2DER4(#1062) | 5myc-chkEn2(C>D)-ERT2 | Mammalian Expression, mRNA in vitro synthesis | sCMV, SP6 | |
| 184094 | pT22cUm5En2E4P3Che(#1188) | 5myc-chkEn2-ERT2-5’fP2A-mCherry | Zebrafish Expression, stable transgenesis (blue eye) | D.rerio-Ubi | |
| 184095 | pT22cUm5En2SE4P3Che(#1189) | 5myc-chkEn2(C>S)-ERT2-5’fP2A-mCherry | Zebrafish Expression, stable transgenesis (blue eye) | D.rerio-Ubi | |
| 184096 | pT22i5uasm5En2E4P3Che(#1208) | 5myc-chkEn2-ERT2-5’fP2A-mCherry | Zebrafish Expression, stable transgenesis (blue eye) | 5xUAS, SP6 | |
| 184097 | pT22i5uasm5En2SE4P3Che(#1209) | 5myc-chkEn2(C>S)-ERT2-5’fP2A-mCherry | Zebrafish Expression, stable transgenesis (blue eye) | 5xUAS, SP6 | |
| 184098 | pT22i5uasH3En2SE4P3Che(#1212) | 3HA-chkEn2(C>S)-ERT2-5’fP2A-mCherry | Zebrafish Expression, stable transgenesis (blue eye) | 5xUAS, SP6 | |
| 184099 | pT22i5uasm5En25EE4P3Che(#1213) | 5myc-chkEn2(5E)-ERT2-5’fP2A-mCherry | Zebrafish Expression, stable transgenesis (blue eye) | 5xUAS, SP6 | |
| 184100 | pT2iD6Hoxa13aER4(#685) | ZfHoxa13a-ERT2 | Mammalian Expression, mRNA in vitro synthesis | sCMV, SP6 | |
| 184101 | pT2iD6Hoxa13bER4(#686) | ZfHoxa13b-ERT2 | Mammalian Expression, mRNA in vitro synthesis | sCMV, SP6 | |
| 184102 | pT2iU6m5Hoxa13bE4PCh(#765) | 5myc-ZfHoxa13b-ERT2-P2A-mCherry | Zebrafish Expression | D.rerio-Ubi, SP6 | |
| 184103 | pCSThaP6ERT(#184) | HA-MmPax6-ERT2 | Mammalian Expression, mRNA in vitro synthesis | sCMV, SP6 | |
| ERT2 fused to Caspase-9 (apoptosis actuators and sensors) | |||||
| 184104 | pT2iApowriter2(#336) | myr-DIAP1-5myc-tEosFP-nls’-P2A-Casp9-ERT2 | Zebrafish Expression | D.rerio-Ubi | |
| 184105 | pT22Apowriter2(#340) | myr-DIAP1-5myc-tEosFP-nls’-P2A-Casp9-ERT2 | Zebrafish Expression, stable transgenesis (blue eye) | D.rerio-Ubi | |
| 184106 | pT2iU6Apowriter2N(#355) | myr-DIAP1-5myc-tEosFP-nls’-P2A-Casp9-ERT2 | Zebrafish Expression | D.rerio-Ubi, SP6 | |
| 184107 | pT22iuasvApoWtEos3N(#486) | myr-DIAP1-2nls-tEosFP-nls’-P2A-Casp9-ERT2 | Zebrafish Expression, stable transgenesis (blue eye) | 4xUAS | |
| 184108 | pT22iuasvApoWChe(#488) | myr-DIAP1-nls’-mCherry-P2A-Casp9-ERT2 | Zebrafish Expression, stable transgenesis (blue eye) | 4xUAS |
With the Actiflash conditioned samples, analyze the phenotype recovery observed using a
100% laser power and a decreasing illumination duration. You will thus determine the
shortest illumination duration leading to 100% uncaging.
Examples of the duration required for uncaging 100% of Actiflash:
• One-photon excitation at a 365 nm wavelength with a benchtop UV lamp having a power
range of 4-6 W (e.g. for global photoactivation): 5 minutes.
• One-photon excitation in the 350-405 nm, laser excitation power P = 10 μW focused on a
spot of diameter 10 μm: a few seconds.
• Two-photon excitation delivering 200 fs pulses at 750 nm and P = 10 mW in a cell of volume
V =100–1000 μm3: 1 second.
Actiflash has been designed by Ludovic Jullien , Isabelle Aujard and Thomas Le Saux
Additional publications:
Feng, Z., Ducos, B., Scerbo, P., Aujard, I., Jullien, L., & Bensimon, D. (2022). The Development and Application of Opto-Chemical Tools in the Zebrafish. Molecules (Basel, Switzerland), 27(19), 6231. https://doi.org/10.3390/molecules27196231

")

Ready-to-use silicon chambers to stick and remove for cellular confinement or dynamic assays, such as migration or wound-healing.
Each product contents 100 stencils (2 sheets of 50 stencils)
Ready-to-use silicon chambers to stick and remove for cellular confinement or dynamic assays, such as migration or wound-healing.
Each product contents 100 stencils (2 sheets of 50 stencils)
| Description | Catalog Number |
| Solo : 1 circular well – Diam. 12mm | STU-STE-1WL |
| Quartet : 4 circular wells – Diam. 3mm | STU-STE-4WL |
| Nonet : 9 circular wells – Diam. 3mm | STU-STE-9WL |
| Allegro : 2 oblong wells spaced by 0.50 mm | STU-STE-LRG |
| Presto : 2 oblong wells spaced by 0.25 mm | STU-STE-THN |
Stencell are ready-to-use silicon chambers that you can stick and remove for cellular confinement or dynamic assays, such as migration or wound-healing.
Stencell was designed to standardize your experiments and minimize the consumption of reagents.
It is very helpful when you are working with super expensive reagents or very rare cell lines, and when you want to test various experimental hypothesis.
Cell migration and wound healing with Presto and Allegro
Parallelized experiments with Quartet and Nonet
Confined experiments with Solo

Material: PDMS
Kit content: 100 stencils (2 sheets of 50 identical stencils)
Sizes & shapes:
– Solo: 1 circular well – Diam. 12 mm
– Quartet: 4 circular wells – Diam. 3 mm
– Nonet: 9 circular wells – Diam. 3 mm
– Presto: 2 oblong wells spaced by 0.25 mm
– Allegro: 2 oblong wells spaced by 0.50 mm
Storage: up to 2 years, at room temperature under their protective sheets.
Stencell was designed by Vincent Studer, Pierre-Olivier Strale and Aurélien Pasturel.
They were hosted by the Cell Organ-izers joint research laboratory (CNRS-Alvéole).
Original publication:
Pasturel, A., Strale, P. O., & Studer, V. (2020). Tailoring Common Hydrogels into 3D Cell Culture Templates. Advanced healthcare materials, 9(18), e2000519. https://doi.org/10.1002/adhm.202000519


The device to confine and study your cell behavior within a physiological rigidity range.
Kit contents:
. 1 Agarsqueezer device
. 2 needles
Silicium wafers to mold confining pillars of various heights can be bought separately here.
A technology developed by Audrey Prunet, Gilles Simon, Hélène Delanoë-Ayari, Véronique Maguer-Satta & Charlotte Rivière – ILM Lyon, France
AgarSqueezer is a microscope slide chamber equipped with a molded agar-based compression system. Use it to apply an instant & homogeneous compression on your cells, and study their response to short and long-term confinement.

Contrary to PDMS, the mechanical properties of agarose reproduce stiffness of the in vivo microenvironment (1-150 kPa).
As the porous nature of agarose facilitates nutrient and oxygen diffusion, the AgarSqueezer provides a safe environment for long-term cell culture. Keep your cells confined for up to 10 days!
By modulating confinement level, matrix stiffness & composition or coating with ECM proteins, AgarSqueezer leaves you plenty of options to reproduce environmental cues.
Agarsqueezer has been successfully used to confine adherent and non-adherent cells, including:
> Human: primary T-lymphocytes, TF1 & ML2 leukemic cells, HS27A fibroblasts, MCF10A breast cells, MDA-MB-231 breast cancer cells, U-2 OS osteosarcoma cells, PC-3 & DU 145 prostate cancer cells, HT29 & HCT116 colorectal adenocarcinoma cells and HT1080 fibrosarcoma cells
> Murine: megakaryocytes, osteocyte-like cells MLO-Y4, primary muscle cells & primary dendritic cells
> Plant: cells from Arabidopsis roots
> 3D cell cultures: mice gastruloïds
Compatible assays:
> Live imaging*: cell viability, proliferation, migration, morphology, nuclear deformability, cytoskeleton reorganization, cell tracking, etc
> Standard molecular analysis (immunostaining, western blot, qPCR, flow cytometry, etc): changes in gene/protein expression, proliferation, morphological analyses, etc
*Cells can be added with fluorescent probes or stimulated with drugs during confinement.
Imaging modes:
Inverted microscopes equipped with a standard adjustable petri dish holder, with any imaging mode: phase-contrast, epifluorescence, confocal, etc.
1x Agarsqueezer compression device
1x 16G flat cut needle to make holes in the agar gel, facilitating diffusion of culture medium or drugs during the experiment
1x 20G flat cut needle (same as above)
(Optional) 1x microscope stage insert (102.5mmx143.5mm), holding up to 2 AgarSqueezers in live imaging chambers (Okolab or equivalent).
In addition to basic kit contents, we recommend using a silicium wafer to mold your confining pillars in agarose. We provide four different wafers to mold pillars of various heights. Choose among our four pillar heights available depending on your desired application and add silicium wafer(s) to your order here.
")
")
Quantification of cell morphology under confinement. (A–C): Morphology of immature TF1-GFP hematopoietic cells for control (A) and for 30 μm and 5 μm (B and C, respectively). Scale bar = 20 μm. (D) Quantification of projected area by automatic image analysis. Projected area was similar for control and 30 μm, while it significantly increased for 5 μm confinement (unpaired t-test n = 160 at least for each condition). (E and F): z-Section of unconfined (E) and confined (F) cells. Scale bar = 10 μm.
et al. Lab on Chip, 2020.
Human T-lymphocytes isolated from blood were seeded in the Agarsqueezer and confined under 5µm pillars. Images were taken every 10sec for 16.5min using an inverted Zeiss Z1 automated microscope (10X objective).
Credits: Marie-Pierre Valignat – Adhesion & inflammation lab, Aix-Marseille University, France

Arabidopsis thaliana Col-0 root cells stained with Calcofluor (cell wall) and imaged with a confocal microscope either in a traditional culture setting (left), or after 24h of confinement in the Agarsqueezer using the 30µm (middle) or 5µm (right) pillars.
Credits: Léa Bogdziewiez – UPSC – Sveriges lantbruksuniversitet, Sweden

C57 primary myoblasts stained with Hoechst were imaged in the AgarSqueezer before compression (left panel), and after 1.5h of compression under 2.5 µm height pillars (middle & right panels).
Credits: Dr. Hind Zahr & Dr. Alice Varlet, Lammerding Lab – Meinig School of Biomedical Engineering, Cornell University, United States

")
")
The Agarsqueezer device has been successfully used to study compression of adherent and
non-adherent cells, including:
Human cells:
Fibrosarcoma (HT-1080)
Osteosarcoma (U-2 OS)
Colorectal adenocarcinoma
(HT29 & HCT116)
Prostate cancer (PC-3 & DU 145)
Breast cancer (MDA-MB-231)
Leukemia (TF1 & ML2)
Megakaryocytes
Fibroblasts (HS27A)
Breast cells (MCF10A)
Primary T-lymphocytes
Murine cells:
Osteocyte-like cells (MLO-Y4)
Primary dendritic cells
Primary muscle cells
Plant cells:
Arabidopsis Thaliana root cells
3D cell culture:
Mice gastruloids
The system is fully compatible with live imaging and time-lapse microscopy and all
immunostaining steps can be performed in situ. Alternatively, cells can be collected for
classical biochemical and molecular analysis (qPCR, Western Blot, flow cytometry, etc).
The device has been designed for long-term confinement studies and the porous nature of
agarose enables passive medium renewal as well as oxygen diffusion. You can safely grow cells
up to 10 days in the AgarSqueezer device.
Yes, the use of agarose allows free diffusion of small molecules (size <30 nm in 2% agarose).
You can easily add drugs, antibodies or other compounds at any point during cell confinement
studies thanks to an open access to the reservoir. Drug availability and activity within the
system has been validated using in situ addition of the tyrosine kinase inhibitor imatinib, and
diffusion experiments showed that 3 hours are required for the diffusion of small molecules
such as BSA or FITC.
The currently available pillar heights are:
– 2.5μm for inducing highly confined conditions
– 5μm for inducing moderately confined conditions
– 30μm to serve as an unconfined control
– 100μm to confine 3D cellular structures or immobilize them for imaging
Those dimensions have been determined based on the size of most classical human cell lines.
The resulting level of compression applied will depend on your sample type, size and the use
of mono- or multi-cell layers.
You can easily modulate the matrix stiffness by tuning the type and concentration of agarose used to mold the pillars. Using a standard agarose at the recommended 2% concentration will result in a storage modulus within the range of 50-200kPa. To accentuate the matrix stiffness and the resulting confinement applied, the agarose concentration can be increased. For example, a 3% agarose was found to be more efficient at confining cell cultures from Arabidopsis roots. If you wish to decrease the matrix stiffness, we recommend using a “low
melting point” or “ultra-low gelling” temperature agarose to yield a storage modulus in the range of ~1kPa. For a similar stiffness on top and bottom walls, the coverslip can be coated with an additional soft agarose layer.
To analyze the role of various ECM proteins on cell response to mechanical confinement, you
can coat the coverslip with adhesive proteins (fibronectin, collagen, Matrigel, etc). In addition,
the agarose can be added with collagen, PEGDA with covalently immobilized RGD peptides or
silk.
Our AgarSqueezer kits contain all elements making up the compression device, a wafer to mold your agarose gel and some needles specifically designed to form your entry ports in the agarose. Optionally, an insert (102.5mmx143.5mm) designed to image 2 AgarSqueezer devices in parallel can be added to your order. This insert will fit into Okolab imaging chambers or equivalents.
All you need to have on your side is:
• Agarose powder
• Distilled water
• Round 22 or 30 mm coverslips
• A screwdriver
• For imaging: a standard petri dish holder can be used to place and image the AgarSqueezer on inverted microscopes. Use objectives up to 40X for optimal performance. Although objectives of 60X and above can be used, they will result in a shorter observation area and we cannot guarantee an optimal working distance depending on your microscope.
Yes, the AgarSqueezer device can be re-used as long as it is thoroughly sterilized by autoclaving
before each experiment. Simply keep in mind that the agarose solution should be prepared
no more than one day before your experiment.
Agarsqueezer has been designed by Audrey Prunet, Gilles Simon, Hélène Delanoë-Ayari, Véronique Maguer-Satta and Charlotte Rivière (ILM Lyon, France).
Additional publications:
Mitosis down-regulates nuclear volume and resets nuclear envelope folding of cancer cells under prolonged confinement
Malèke Mouelhi, Alexis Saffon, Hélène Delanoë-Ayari, Sylvain Monnier, Charlotte Rivière, Biorxiv 2023
doi: https://doi.org/10.1101/2023.05.11.540326
Mitosis sets nuclear homeostasis of cancer cells under confinement
Maleke Mouelhi, Alexis Saffon, Morgane Roinard, Helene Delanoe-Ayari, Sylvain Monnier, Charlotte Riviere, Biorxiv 2023. doi: https://doi.org/10.1101/2023.05.11.540326
")
A stamp to mold agarose wells to culture and image spheroids and organoids
| Size | Catalog Number |
| V300 | GRE-MOU-V300 |
| V500 | GRE-MOU-V500 |
Stampwell stamps imprint arrays of wells in hydrogels in just one time. Nothing more to do than load your samples into the wells and image. The Stampwell shapes have been optimized for the imaging of spheroids and organoids.
V Shape 300µ:
. Number of pins: 42
. Depth of the well: 1 mm
. Well bottom diameter: 300µm – Shape: circular
. Well upper side: 1mm*0.5mm – Shape: rectangular


V Shape 500µ:
. Number of pins: 42
. Shape of the pins: V
. Depth of the well: 1 mm
. Well bottom diameter: 500µm – Shape: circular
. Well upper side: 1mm*0.5mm – Shape: rectangular

")
Soaked in fluorescein, negative rendering
Image credit: Gaëlle Recher – Bordeaux
scale bar: 500µm

Image credit: Gaëlle Recher – Bordeaux
Notice that the focus moving through the well height is easily visible (lines in focus Vs out of focus)
Image credit: Gaëlle Recher – Bordeaux
Filled with a single cell-loaded alginate capsule: corresponding imaged with a stereomicroscope and stitched. Gel pad is made of 2% agarose. (Scale bar: 2mm)
")
Image credit: Gaëlle Recher – Bordeaux

Airway organoids were generated from a human bronchial cell line in hydrogel and transferred either to microwells made using a V-shape Stampwell, or suspension plates, for turning them inside out and imaging.
Credits: Signe Lolle – Danmarks Tekniske Universitet, Denmark

1. Pour liquid agarose (or other hydrogel)
2. Place the stamp
3. Reticulate the hydrogel
4. Remove the stampv
Original publication:
Stampwell has been originally developed by Gaelle Recher and published in Scientific Reports:
Alessandri K, Andrique L, Feyeux M, Bikfalvi A, Nassoy P, Recher G. All-in-one 3D printed microscopy chamber for multidimensional imaging, the UniverSlide. Sci Rep. 2017 Feb 10;7:42378. doi: 10.1038/srep42378. PMID: 28186188; PMCID: PMC5301227.

")
Mold agarose wells to position and image zebrafish larvae and embryos
| Size | Catalog Number |
| Embryo 1 | GRE-MOU-REC |
| Embryo 2 | GRE-MOU-LAI |
| Larvae 1 | GRE-MOU-DEV |
| Larvae 2 | GRE-MOU-ADU |
Stampwell stamps imprint arrays of wells in hydrogels in just one time. Nothing more to do than load your samples into the wells and image. The Stampwell shapes have been optimized for the imaging of fish embryos or larvae up to 20 dpf.
Save time: no need to manually position your samples individually. Fish embryos/larvae will self-position in the wells.
Boost your assay reproducibility: once loaded in the wells, your samples are perfectly positioned, aligned and located on a similar focal plane.
Open system: direct access to embryos/larvae for adding external compounds (i.e. drug screening).


Embryo 1 (ie Rectangular)
. Number of pins: 35
. Shape of the pins: rectangular
. Length * width of the wells: 2 mm * 0,65 mm


Embryo 2:
. Number of pins: 18
. Shape of the pins: a drop
. Length of the wells: 3.90 mm
. Largest width of the wells: 0.88 mm


Larvae 1:
. Number of pins: 5 large pins ideal for the 9-14 dpf zebrafishes + 5 medium pins ideal for the 6-9 dpf zebrafishes + 5 small pins ideal for the 3-6 dpf zebrafishes
. Shape of the pins: fish body and tail
. Length of the 5 large wells: 6 mm, 2.7 for the body and 3.3 for the tail
. Length of the 5 medium wells: 5 mm, 2.25 for the body and 2.75 for the tail
. Length of the 5 small wells: 4 mm, 1.8 for the body and 2.2 for the tail


Larvae 2:
. Number of pins: 5 large wells ideal for the 15-20 dpf zebrafish or 39-42 dpf medaka larvae + 5 small wells ideal for the 1-2 dpf zebrafish
. Shape of the pins: prism
. Length of the 5 large wells: 10 mm
. Length of the 5 small wells: 3 mm
. Well depth: 1 mm

48hpf embryos (anti-HuC/D, ab210554, abcam)
Credits: Matthieu Simion, CNRS, 2022

Credits: Dr Rui Monteiro – Institute of Cancer and Genomic Sciences, University of Birmingham, United Kingdom

Bar: 1mm (projection of Z-stack – confocal microscope)
Credits: Gaëlle Recher – Bordeaux 2019

Top picture: green-heart 3dpf zebrafish larvae placed in ventral view. Middle & bottom pictures: 3dpf zebrafish larvae PFA-fixed,
mounted in glycerol and inserted in Larvae 1 Stampwell (anterior to the left). Pictures were taken using a Leica Spectral Confocal SP5.
Credits: Dr. Giovanni Risato, Prof. Natascia Tiso and Alina Ramazanova – Department of Biology, University of Padova, Italy
Anesthetized 3 dpf embryos expressing a fluorescent biosensor in the heart were mounted in agarose microwells made using the Larvae 1 Stampwell and imaged in ventral view.
Credits: Prof. Juan Llopis – CRIB, Universidad de Vastilla La Mancha, Spai
1. Pour liquid agarose (or other hydrogel)
2. Place the stamp
3. Reticulate the hydrogel
4. Remove the stampv
Original publication:
Stampwell has been originally developed by Gaelle Recher and published in Scientific Reports:
Alessandri K, Andrique L, Feyeux M, Bikfalvi A, Nassoy P, Recher G. All-in-one 3D printed microscopy chamber for multidimensional imaging, the UniverSlide. Sci Rep. 2017 Feb 10;7:42378. doi: 10.1038/srep42378. PMID: 28186188; PMCID: PMC5301227.


")


")